Table of Contents
- Overview
- Clean Up Your Google My Drive
- Clean Up Your Google Shared Drive
- Clean Up Your Google Mail
- Clean Up Your Google Photos
Overview
Because your U-M Google account has a storage limit, it’s imperative to maintain an organized account to stay under it and prevent storage banners from appearing. This document provides an overview of tips and tricks for engaging in sustainable data practices and cleaning up your U-M Google Drive, Mail, and Photos.
Tip: The following document applies to both individual Google accounts and Shared Accounts.
Clean Up Your Google My Drive
There are several ways to clean up your Google Drive files and folders to reduce storage and stay organized. To begin, you should check how much storage you are using in your account. To check your current storage usage, navigate to the account's storage overview. (If you are interested in checking the storage for your Shared Account, log in to your Shared Account instead of your individual account.)
Tip: Using Google Drive for desktop may make it easier to move and delete content in your My Drive (and shared drives) from your desktop. It may also assist with viewing the folder sizes, but use caution, as sizes aren't always accurate.
Delete files/folders
If you have files or folders you no longer need, you can delete them from your account. ITS recommends the following methods for deleting files/folders. (This is not an exhaustive list, so please use whatever way works best for you, even if it’s not listed here.)
Delete files by size
Finding and deleting your largest files is a good starting point for freeing up space.
- Go to the overview of your current storage usage. You'll see a list of files sorted by the amount of storage space used.
Select the files you want to delete and click the trash can icon (
 ) at the top of the page.
Tip: Click and drag your cursor over multiple files to select them. Alternatively, hold the CTRL/CMD key and click the files to select, OR click the first file, hold the SHIFT key, and click another file to select multiple files in a row.
You can also search for file types that use a large amount of space, such as .MP4, .MOV, and .WAV files.
- Go to Google Drive and click the advanced search options icon (
 ) to the right of the search field at the top of the page.
 - Select Videos or Audio from the Type drop-down menu.
- Select Owned by me from the Owner drop-down menu.
- Click Search.
Delete files by date
You may have old data that is no longer used and can be deleted from your Drive.
- Go to Google Drive and click the advanced search options icon () to the right of the search field at the top of the page.
- Select Owned by me from the Owner drop-down menu.
- Select one of the options from the Date modified drop-down menu. If you want to search for files modified before a certain date, select Custom… and enter the date(s) in the second field provided.
Delete files from Trash
Once you have deleted your files, they will be sent to your Trash. Files in Trash will be automatically deleted after 30 days. However, files in Trash still count against your storage limit, so it is recommended that you empty your Trash after deleting them.
To permanently delete individual files from Trash, click Trash from the left navigation in Google Drive, select the files you want to permanently delete by checking the box that appears when hovering over each, click the trash can icon (![]() ) in the top right, and click Delete forever to confirm.
) in the top right, and click Delete forever to confirm.
To empty your entire Trash, click Empty trash in the top right of the Trash page, then click Delete forever to confirm.
Once emptied, your deleted files become unrecoverable. After reducing your storage, it can take up to 72 hours for Google's systems to reflect this reduction. Refer to the Google Help Center for more information on deleting files in Drive.
Remove yourself from shared files/folders
Although shared files/folders owned by someone else don’t count against your storage limit, you are advised to remove yourself from ones that are no longer needed for better organization and maintenance of institutional data. You can find all shared files/folders under Shared with me in Google Drive.
Important: While searching for files that are shared with you, ensure all currently used files/folders are owned by someone with an active university affiliation (e.g., faculty, staff, or student) and not by someone who has left the university (e.g., quit without retiring or didn’t graduate) otherwise they may go away when non-affiliated accounts (i.e., accounts of individuals who are no longer affiliated with the university) are deleted from U-M Google.
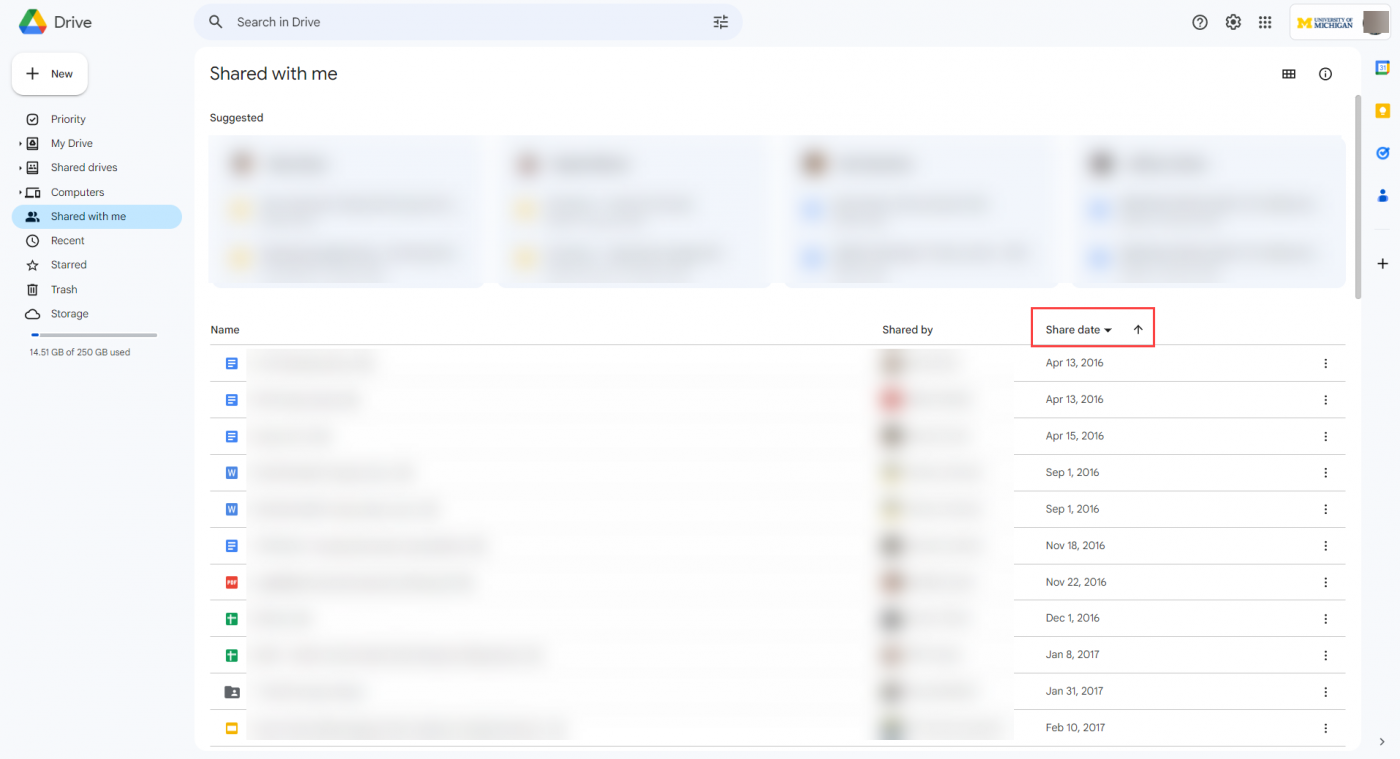
- Go to your Shared with me section in Google Drive.
- Click the List layout icon (
 ) in the top right of the results to make it easier to view the files.
 Click the down arrow beside Share date on the far right to sort the files from oldest to newest. (The oldest shared files are likely the ones on which you no longer need to be shared.)
Tip: You can also change the column type from Share date to Last modified, Last modified by me, or Last opened by me by clicking on the Share date header and selecting the option you want from the drop-down.
- Address any files that:
- Do not display the Belongs to a shared drive icon (
 ) next to the file.
 - Have users in the Shared by column who are no longer active at the university. (To verify if someone is still at the university, you can search for their uniqname in MCommunity. If no profile appears, they are most likely no longer affiliated with U-M.)
- Do not display the Belongs to a shared drive icon (
- Remove yourself from files that are no longer needed.
Transfer ownership of files/folders you own
You can find all the files and folders you own in Google Drive by using the search. It is recommended that you choose to transfer ownership of collaborative university data to a Google shared drive. Shared drives are owned by a group or team rather than an individual, which makes offboarding easier for your department/unit when you leave. If your team does not have a shared drive, refer to Shared Drives in U-M Google for more information. ITS cannot assist with moving files/folders from My Drive to shared drives.
Important: Remember that there is a 15GB storage limit for all shared drives, and only faculty, regular staff, and students can create and manage them. You can consider using a U-M Dropbox Team Folder or investigate other university-provided storage solutions.
Although not the preferred method for retaining institutional data, there may be cases where you will need to transfer ownership to an individual at the university instead. Please be aware that transferring ownership may cause the new owner's account to hit its storage limit in U-M Google. You should discuss any ownership transfers with the individual to whom you intend to transfer.
Important: Google has a 750GB limit for the number of Google Drive files you can transfer ownership of in 24 hours. There is no workaround for this, and you will have to wait at least 24 hours from when you received the error message before you can transfer more files.
Export data
Use Google Takeout to export your data from your U-M Google account to another non-university storage solution or personal device. Refer to Getting Started With Google Takeout for instructions on using the tool.
You can also use Google Takeout Transfer to copy all the files you own in Drive to a personal (non-UM) Google account. Refer to Getting Started With Google Takeout Transfer for more details.
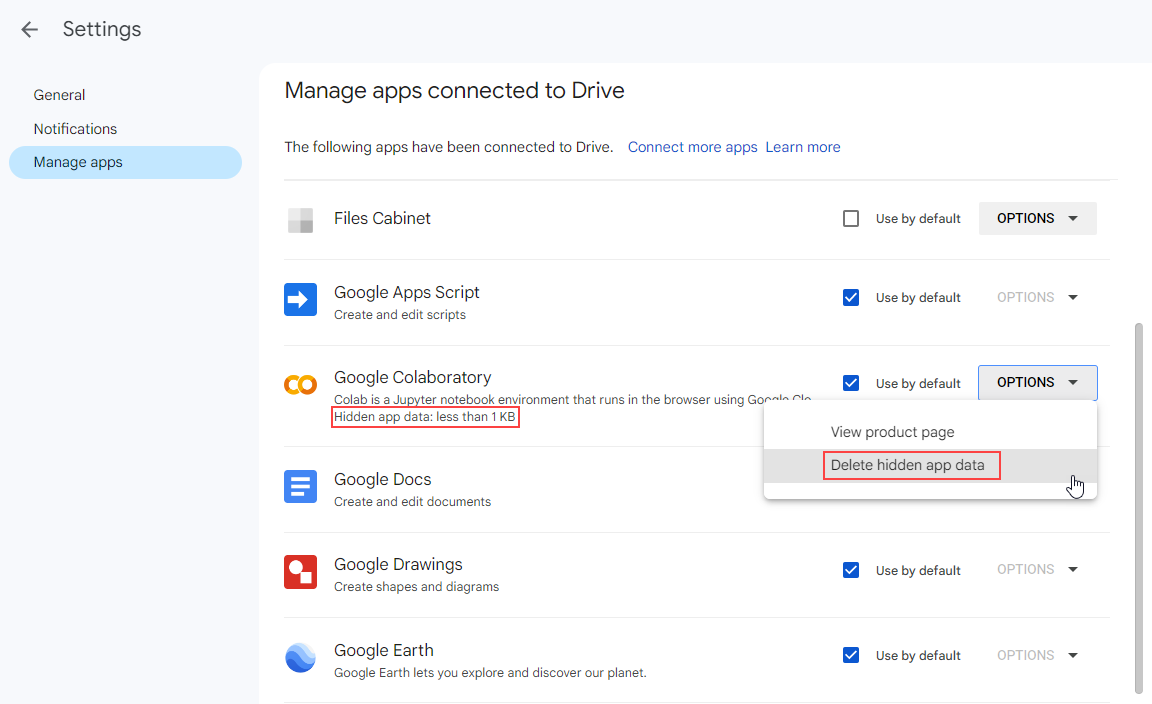
Remove hidden data from apps
If you have any third-party apps/add-ons connected to your Google Drive, they may contain hidden data that can be deleted. In most cases, the amount of data will be very small.
- Go to your Google Drive.
- Click the gear icon in the top right and select Settings.
- Click Manage apps.
- Scroll through your apps. If there is hidden data, you can find the amount under the app's description (“Hidden app data”).
- Click Options next to the app and select Delete hidden app data to delete the data.
Update Google Drive for desktop settings
If you use Google Drive for desktop to access your files on your computer, there may be some settings you should change to reduce storage usage in your Google account.
- If you use Google Chrome and sync your downloads to Google Drive for desktop, change the location where Chrome saves your downloads.
- You should not back up your computer/hard drive to Google Drive (or Google Photos), as this is an inappropriate use of your U-M Google account and university resources (SPG 601.07). If you need to back up your computer or store institutional data for archival purposes, refer to the U-M Data Storage Finder for an overview of storage services available to you. To stop backing up your computer/hard drive, unconfigure the additional folders you had set to back up to Google Drive.
- Open Drive for desktop on your computer.
- Click the gear icon in the top right corner and select Preferences from the drop-down menu.
- Click “My Laptop” on the left side.
- Click a folder in the list, uncheck the Sync with Google Drive box, click Done, and click Stop syncing. You will have to do this for every folder you have synced.
- Click Save when finished.
Note: If you are backing up photos and videos to Google Photos from a folder on your computer using Drive for desktop, you will need to uncheck Back up to Google Photos, click Done, and click Stop syncing on those folders.
Clean Up Your Google Shared Drive
Similar to My Drive, there are several ways to clean up your Google shared drives to reduce storage and stay organized. To check your current storage usage, navigate to the shared drive and click the information ("i") icon in the top right corner of the page. In the sidebar that appears, you will find the drive's storage usage under Drive details > Storage used. (Google does not provide a way to determine the size of folders in shared drives.)
Important: You should not back up your computer/hard drive to a Google shared drive, as this is an inappropriate use of U-M Google and university resources (SPG 601.07). If you need to back up your computer or store institutional data for archival purposes, refer to the U-M Data Storage Finder for an overview of storage services available to you.
Remove non-collaborative data
Shared drives should be used for collaborative data related to administration, learning, teaching, and/or research at the University of Michigan. Shared drives are not appropriate for storing personal or private data (SPG 601.07). Data in shared drives is considered to be owned by a group or team rather than an individual.
Data that is not collaborative and/or does not necessitate the real-time collaborative features Google Drive offers should be moved out of the shared drive and stored in a more applicable location, such as a U-M Dropbox Team Folder or another university-provided storage service.
Delete files/folders
Managers and Content Managers can delete files and folders in a shared drive. However, only Managers can permanently delete them from Trash.
- Go to Google Drive and click the advanced search options icon () to the right of the search field at the top of the page.
- Click the drop-down menu beside Location and select More locations...
- Click the All locations tab and double-click Shared drives.
- Hover over the name of the shared drive you need to clean up and click Select.
- Click Search when finished.
Select the files you’d like to delete, click the trash can icon (
) at the top, and click Move to trash.Tip: Click and drag your cursor over multiple files to select them. Alternatively, hold the CTRL/CMD key and click the files to select, OR click the first file, hold the SHIFT key, and click another file to select multiple files in a row.
Google will provide a list of search results for all files and folders within the shared drive. This may help you find files or folders that are no longer needed in your shared drive.
Delete files from Trash
Once you have deleted files, they will be sent to the shared drive’s Trash. Files in Trash will be automatically deleted after 30 days. However, files in Trash still count against the shared drive’s storage limit, so it is recommended that you empty the Trash after deleting them. Remember, only Managers can permanently delete data in Trash.
To permanently delete files from Trash:
- Click Trash from the left navigation in Google Drive.
- Click My Drive next to "Trash from" at the top of the page, then select your shared drive from the drop-down menu.
- Do one of the following, depending on how you'd like to delete the files:
- Delete everything: Click Empty trash at the top and click Delete forever to confirm.
- Delete individual files: Select the files you want to delete permanently, click the trash can icon at the top, and click Delete forever to confirm.
Once emptied, your deleted files become unrecoverable. After reducing your storage, it can take up to 72 hours for Google's systems to reflect this reduction.
Review membership and permissions
It is beneficial to review the membership and permissions regularly to ensure that those with access to the shared drive and its content are properly kept up to date. Remember, all shared drives must have at least two eligible Managers (i.e., faculty, regular staff, or students) to prevent the drive from being deleted.
Additionally, Managers, Content Managers, and Contributors can add or create content in the shared drive. Limiting the number of members who can add content to the shared drive can help manage storage allocation effectively.
Delete the shared drive
If the shared drive and its content are no longer needed by everyone and/or are stored elsewhere, you should delete the shared drive. Ensure that all members and collaborators are aware of the upcoming deletions so they can save any content before it is deleted.
You must be a Manager of the shared drive to delete it.
- Delete all files and folders in the shared drive. (The drive must be empty before it can be deleted.)
- Delete all files and folders from the shared drive's Trash.
- Click the shared drive's name and select View trash from the drop-down.
- Click Empty trash to bulk delete everything from Trash.
- Click the shared drive's name and select Delete shared drive from the drop-down.
- Click Delete shared drive to confirm.
Clean Up Your Google Mail
The primary way to clean up your Google Mail (Gmail) is to delete emails that are no longer relevant or needed. Additionally, emails with large attachments consume the most space - refer to "Delete emails by size" below for more information.
Tip: If you often archive your emails instead of deleting them, consider deleting them going forward. If there are emails you want to keep, instead of archiving them, you can organize them using Gmail labels. (Google does not explicitly label mail that has been archived in Gmail. However, you can use the following search query to find your archived mail: has:nouserlabels -in:Sent -in:Draft -in:Inbox.)
Additionally, you should review the Working with Google Mail documentation for best practices and tips on using Gmail efficiently.
Delete emails individually or in bulk
Google allows you to delete your emails individually or in bulk from anywhere in Gmail (e.g., labels, search results).
To delete emails individually:
- Check the box beside each email you want to delete.
- Click the trash can icon at the top.
To perform a bulk deletion:
- Check the box at the top in the menu bar to select all emails on that page.
Click “Select all [NUMBER] conversations in [LOCATION]” under the box you just checked. This will select all conversations that match your search/location.
Note: When using search, you will need to change the sort option in the top right from "Most relevant" to "Most recent" to select all emails matching the search. This is a known bug in Gmail.
- Click the trash can icon at the top.
- You may be asked to “Confirm Bulk Action.” Click OK.
Tip: If you use a screen reader, the University of Illinois has developed a Chrome/Firefox bookmarklet to assist with bulk deleting mail in Gmail.
Delete emails by size
Emails with large attachments tend to consume the most space in Gmail. Searching for and deleting these emails will help to reduce storage usage.
To find large emails that take up space:
Enter has:attachment larger:10MB in the Gmail search field at the top of the page and press Enter.
This will identify emails with attachments larger than 10MB. If this returns a lot of emails, you can start higher by replacing "10" with a larger number, such as 15 or 20, to find even larger files. Additionally, you can use in:all to ensure it searches your entire email.
- Select specific emails and delete them individually, or delete all search results in bulk.
If the email is part of a thread, you can also delete just the original message with the large attachments while retaining the other emails in the thread.
- Click on the email in the thread that contains the attachments. (It will have a paperclip icon at the top of the message.)
- Click the three-dots icon to the right of the email and select Delete.
Delete emails by date
To find old emails you may no longer need:
Enter older:2019-01-01 (or another date) in the Gmail search field at the top of the page and press Enter.
This will identify emails older than January 1, 2019. You can change this date to be sooner or later by adjusting the numbers in the search.
- Select specific emails and delete them individually, or delete all search results in bulk.
Delete emails using other search operators
Google allows you to use one or more search operators to filter your Gmail search results even further and beyond just date or size. Refer to the Google Help Center to learn more.
Delete emails from Spam
Emails left in your Spam folder count against your storage limit, so it is recommended that you delete all messages instead of waiting 30 days for them to be deleted automatically.
Tip: We recommend checking your Spam folder periodically for legitimate emails that may have been misdirected there. (If you find a message that has been accidentally marked as spam, you can select it and click Not Spam in the top toolbar to help ensure that future messages from this sender are not flagged as spam.)
To delete emails from Spam:
- Click Spam from the left sidebar in Gmail. (You may need to click More to find the Spam folder.)
- Click Delete all spam messages now. You can also select specific emails and click Delete forever.
Delete emails from Trash
Once you have deleted all the emails you no longer need, they will be sent to your Trash folder. Emails in Trash will be automatically deleted after 30 days. However, they still count against your storage limit, so it is recommended that you empty your Trash after deleting.
To empty your Trash:
- Click Trash from the left sidebar in Gmail. (You may need to click More to find the Trash folder.)
- Click Empty Trash now at the top to delete all emails in Trash. You can also select specific emails and click Delete forever.
- Click OK to confirm your deletion.
You may need to empty your Trash multiple times if there are a large number of old emails to delete. Continue clicking Empty Trash now until no emails remain.
Once emptied, your deleted emails become unrecoverable. After reducing your storage, it can take up to 72 hours for Google's systems to reflect this reduction. Refer to the Google Help Center for more information on deleting emails in Gmail.
Export Gmail data
Use Google Takeout to export your Gmail data from U-M Google to another non-university storage solution or personal device. Refer to Getting Started With Google Takeout for instructions on using the tool.
You can also use Google Takeout Transfer to copy all your Gmail emails to a personal (non-UM) Google account. Refer to Getting Started With Google Takeout Transfer for more details.
Clean Up Your Google Photos
The photos and videos in your Google Photos library are separate from those in your Google Drive. They still count against your storage limit and need to be cleaned up.
Transfer photos and videos to another account
If you have personal or private photos and videos (i.e., unrelated to university business) that you’d like to keep, it is strongly recommended that you transfer this data to a personal, non-UM storage service or a personal computer for safekeeping. (In general, you should not be storing your personal and private photos/videos within U-M Google.) There are three methods to transfer your data:
- Google Takeout Transfer (only works with another Google account)
- Partner Sharing (only works with another Google account)
- Google Takeout (works anywhere you want to store photos)
Using Google Takeout Transfer
You can use Google Takeout Transfer to copy your photos, videos, and album structures to an external (non-UM) personal Google account. Refer to Getting Started With Google Takeout Transfer for instructions on using the tool and its limitations.
Using Partner Sharing
To move your photos/videos to a different, non-UM personal Google account, share your photo library with that account using Partner Sharing.
Note: Unfortunately, your photo album structures will not be transferred. You will have to manually recreate and sort each album in your personal Photos account afterward.
- Go to Google Photos.
- Click the gear icon in the top right.
- Click the drop-down arrow beside Sharing and then click Partner Sharing.
- Keep the start date set to Off.
- Select All photos and click Next.
- Enter your personal Google account’s email address in the field provided and click Next. (You can only transfer to another Google account.)
- Confirm that everything looks correct and click Send invitation.
- Open an incognito window and log in to your personal (non-UM) Google account.
- Go to Google Photos with your personal account. It may take a few minutes to register the invitation.
- Click the gear icon in the top right.
- Click the drop-down arrow beside Sharing and then click Partner Sharing.
- Click Pending invitation under "Photos from [UMICH ACCOUNT]."
- Click Accept.
- You may be asked to "Share back with [UMICH ACCOUNT]" - if so, click Not now.
- You will be taken to an album with all your photos/videos from your U-M Google account. Click Turn on auto save in the top left corner.
- Select Save all photos and click Done. (The top left corner should now say "Saving automatically.")
Depending on the number of photos and videos you currently have in your U-M Google Photos library, it may take some time for Google to automatically save your photos/videos to your personal account (especially videos). To be safe, we recommend waiting at least 24 hours, maybe more, before disconnecting Partner Sharing and deleting your photos/videos from U-M Google. (You can check if they have all been saved by going to your recently added photos page and scrolling through it.)
To disconnect Partner Sharing after Google has automatically saved all of your U-M Google account photos/videos:
- Go to Google Photos with your personal account.
- Click the gear icon in the top right.
- Click the drop-down arrow beside Sharing and then Partner Sharing.
- Click Remove partner and then click Remove.
- Repeat these steps to disconnect Partner Sharing from your U-M account, as well.
If all of the photos/videos you saved to your personal account from your U-M account are still there after removing Partner Sharing, you should be safe to delete them from your U-M account. Refer to “Delete photos and videos” below for instructions.
Using Google Takeout
You can use Google Takeout to export your Google Photos data from U-M Google to another non-university storage solution or personal device. Refer to Getting Started With Google Takeout for instructions on using the tool.
Delete photos and videos
Google allows you to delete your photos and videos individually or in bulk from Google Photos. However, if you have a lot of photos/videos, this process is manual and will take a while to complete.
- Go to Google Photos.
- Choose how you want to select your photos/videos:
- Click the checkmark next to each date in your library to select all photos from that date.
- Click the checkmark in the top left corner of the most recent photo in your library, hold Shift, click the last photo you can (since it is difficult to scroll while holding Shift), stop holding Shift, scroll down, hold Shift again, and repeat this process. (If you have a lot of photos, you will want to complete this in more manageable chunks until everything is deleted.)
Click the trash can icon in the top-right corner of the page, then click Move to trash to confirm your deletion. (You may need to click Got it before Move to trash appears if you’ve never deleted data from Google Photos.)
Tip: If you receive a prompt to "Delete permanently" when moving photos and videos to the trash, your trash is full.
Although photos/videos in Photos Trash don’t count toward your storage limit at this time, it is still important to remove anything that is no longer needed. You can either wait 60 days for Google to automatically delete everything from your Trash, or select Trash from the left navigation, click Empty trash in the top-right corner, then click Empty Trash to confirm.
Once emptied, your deleted photos and videos become unrecoverable. After reducing your storage, it can take up to 72 hours for Google's systems to reflect this reduction. Refer to the Google Help Center for more information on deleting photos/videos in Google Photos.
Note: If you have stored any photos or videos in the Locked Folder in Google Photos, ensure you check and delete them as well, as they also count against your storage.
Turn off mobile device backup
If applicable, turn off automatic syncing of your phone’s photo storage to your U-M Google Photos library. These instructions include steps to reactivate automatic sync with your personal (non-UM) Google account.
Note: Some steps may differ slightly depending on the type of phone and operating system you have.
- Open the Google Photos app on your mobile device.
- Tap your profile picture in the top right corner.
- Tap the drop-down arrow next to your account name and select Add another account.
- Log in with your personal Google account.
- Switch back to your U-M Google account from the profile picture menu.
- Tap your profile picture again and then tap Backup.
- Toggle the Back up photos & videos on this device automatically switch off by tapping it.
- Switch back to your personal Google account from the profile picture menu.
- Tap Turn on backup.
- Select the sync settings you want to proceed with and tap Confirm.
Your phone’s photo storage should now be automatically synced to your personal Google account instead of your U-M Google account.