Content
- Overview
- Log in
- Headset Setup
- Dashboard
- Manage Agents (Add, Edit, Remove)
- Silent Monitoring
- Change Agent Status
- Reporting
- Contact Lens
- Quick Connects
- Routing Profiles
- Queues
- Modify Hours of Operation and Set Holiday Hours or Closures
- ConnectPath Tool Overview
- How to access Amazon Billing Information
- Learn More
Overview
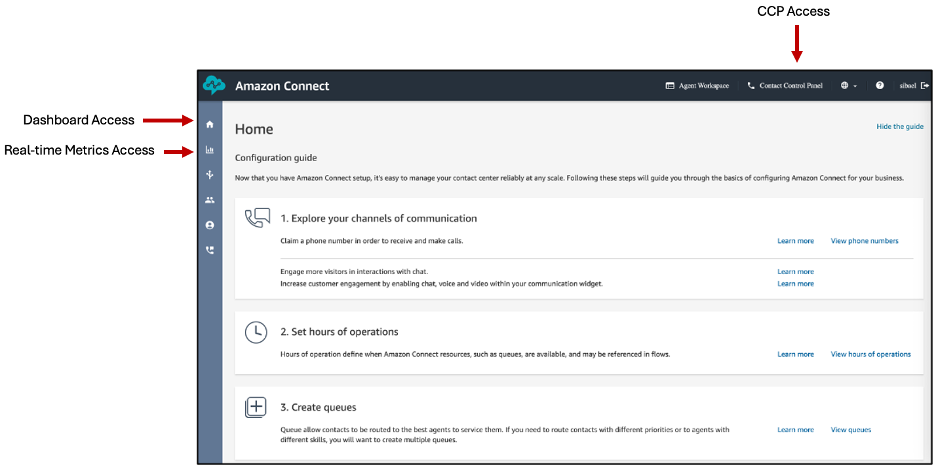
Contact Center managers can access Amazon Connect dashboard and the Contact Control Panel (CCP) to manage agents, receive and make calls, and access Real-Time and Historical Metrics.
Important Notes:
- Managers can access the Amazon Connect Dashboard and the CCP via the following browsers only: (1) Google Chrome (2) Firefox. You must have microphone access allowed in the browser. Make sure you are using the most recent version of the web browser on your device(s).
- Softphone is not supported on mobile browsers. For more information, see Browsers supported by Amazon Connect
- Important: All Agents and Supervisors must change their status to Offline and Log out of the system at the end of the day. Closing the CCP or the browser will not automatically sign you out.
Login to Amazon Connect
- Navigate to the Amazon Connect Login page to find your department’s URL
- Once you click on the relevant Manager Login URL, you will be taken to the U-M Weblogin page. Log in with your U-M SSO (Shibboleth), then select the button for your department and click Sign In.
- Once you are logged in, you will be taken to the Amazon Connect Dashboard.
- When logging in for the first time, you’ll be prompted for permission to access your microphone and pop-ups in the browser. Click the Allow button.
- Make sure your headset is turned on and paired with your computer.
Headset Setup
- Connect your headset to your computer ahead of accessing Amazon Connect.
- When logging in for the first time, you’ll be prompted for permission to access your microphone and pop-ups in the browser. Click the Allow button.
- Note:This will only happen one time. If you miss this step, clear your browser's cache and cookies and log back into Amazon Connect so you’ll be prompted again to give permission to your headset.
- Note: If instructed by your department, Click the Allow button for the video camera access as well.
- Click the Gear icon in the upper right to check the following settings:
- Ensure your video settings are appropriate
- Scroll down to choose your headset as the Speaker, Microphone, and Ringer settings
- Make sure the Softphone radio button is selected.
- Click Save
- Click the Phone icon to proceed with taking calls after this step.
Dashboard
Use the Amazon Connect Dashboard to:
- Run Real-Time metrics and Historical Time reports from the Analytics and Optimization menu.
- Change agent status (using the Real-time reports)
- Do Contacts lens/Contact search using different parameters, and save search reports.
- Manage Queues, Quick Connects, and Routing Profiles
- Manage Users
- Access Contact Control Panel (CCP) to monitor calls or make/receive calls
- See the Amazon Connect - Agent Training for a full description of using the CCP.
Manage Agents
Add Agent
Step 1: In MCommunity
- Log in to MCommunity with your UMICH uniqname and password.
- On the directory's home page click My Groups.
- Add agent (supervisor) to your AWS Contact Center group (or ask the group owner to add them).
Step 2: In Amazon Connect
- Navigate to the Amazon Connect Login page to find your department’s URL for Amazon Connect and login.
- Navigate to the People icon, then ”User Management” in the left navigation.
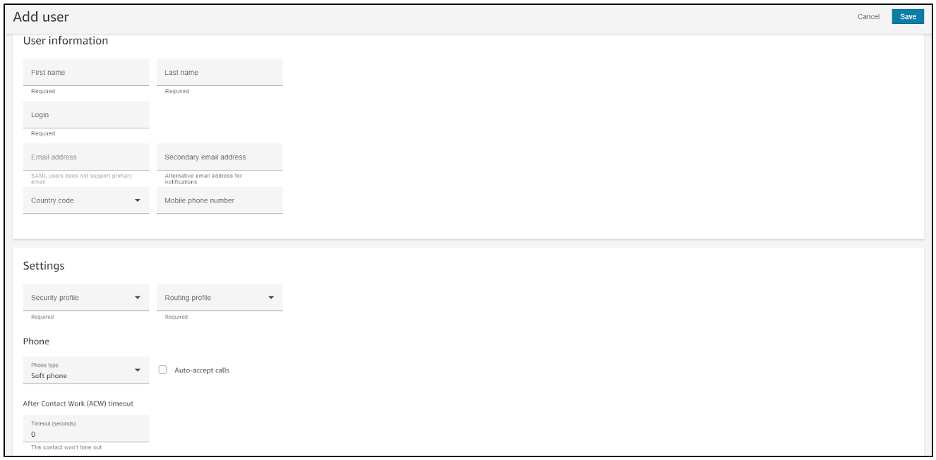
- Click Add New User
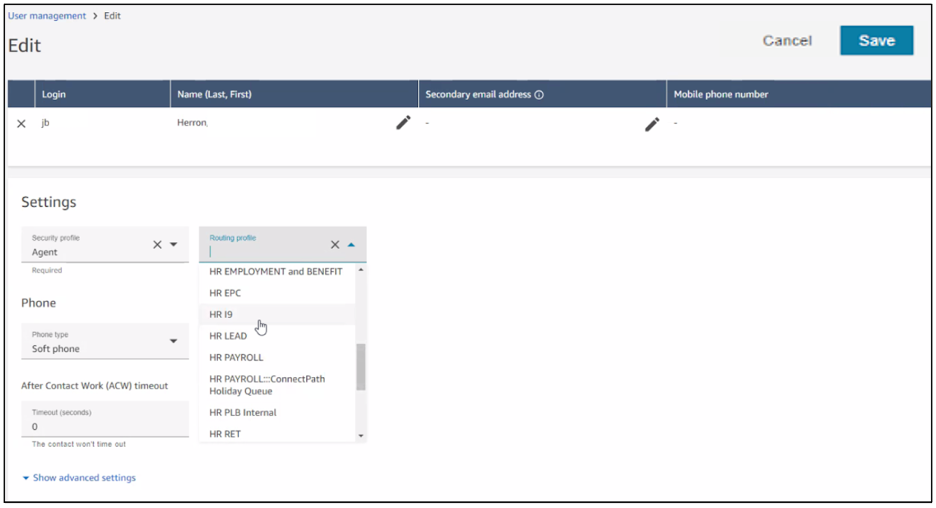
- In Add User window, enter the agent information:
- First Name
- Last Name
- Login Name (Unique name)
- Security Profile (Agent, Manager, etc..)
- Routing Profile (Contact Center Queue)
- Phone Type (Softphone)
- After Call Work (ACW) Timeout
- Setting the ACW timeout value to 0 would set it to infinite while entering any values other than 0 should put them in available state after X seconds.
- Click Save.
Edit Agent Role
- Navigate to the Amazon Connect Login page to find your department’s URL for Amazon Connect and login.
- Navigate to the People icon, then ”User Management” tab in the left navigation.
- Search for the agent that you would like to modify.
- Modify the setting desired (Routing Profile, ACW, etc)
- Click Save.
Remove Agent
- Navigate to the Amazon Connect Login page to find your department’s URL for Amazon Connect and login.
- Navigate to the People icon, then ”User Management” tab in the left navigation.
- Search for the agent that you would like to remove
- Click the checkbox next to the user you would like to remove
- Click the Delete button
- Important: Log into MCommunity and remove the agent or manager from your AWS Contact Center group.
Silent Monitoring
As a manager, you have the option to silently monitor your agent's and join the calls if needed.
- Navigate to the Amazon Connect Login page to find your department’s URL for Amazon Connect and login.
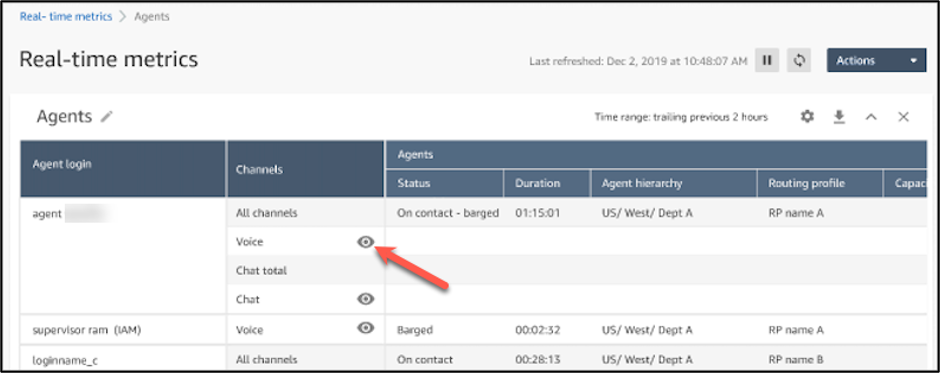
- From the left navigation menu, choose Analytics and optimization, then Real-time metrics then Agents.
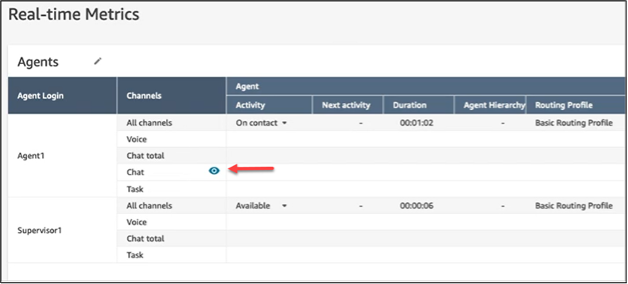
- Choose the eye icon that appears next to the Voice channel of the agent that you want to monitor, as shown in the following image. You can barge into a conversation that you had been monitoring already.
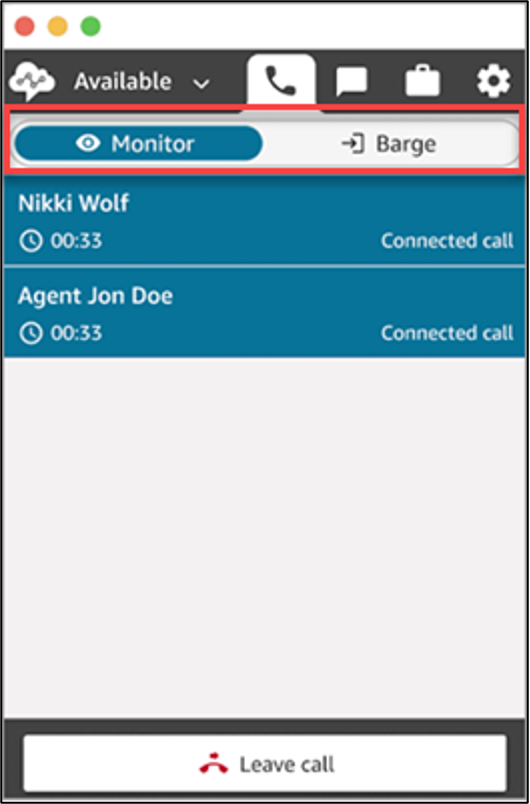
- Ensure you have the CCP open.
- Click the eyeball icon to “listen in on phone conversation”
- You will see an incoming call notification for the monitoring session > click Accept
- Once in the monitoring state you may either click Barge to join the call with the agent & customer or click Leave call to stop monitoring.
Silent monitoring - Chats (if applicable)
- Open your CCP. It must be open before you can barge a chat.
- From the left navigation menu of the Amazon Connect Dashboard, choose Analytics and Optimization, then Real-time Metrics then Agents.
- Choose the eye icon that appears next to the Chat channel of the agent that you want to monitor, as shown in the following image. You can barge into a conversation that you had been monitoring already.
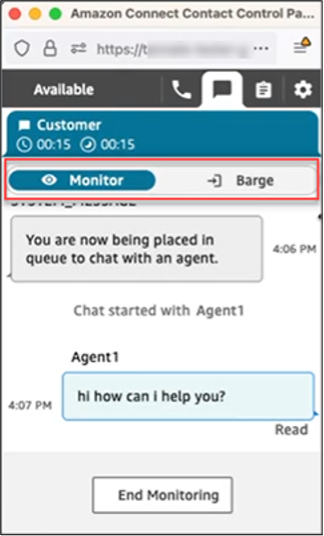
- This takes you to the open CCP, as shown in the following image. You can monitor the chat conversation and toggle between the Monitor and Barge states. The following image shows the Monitor state.
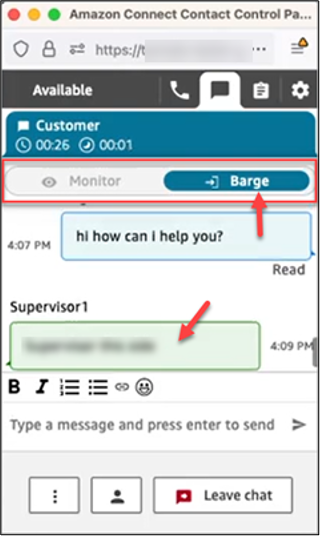
- Following is an example of what the CCP looks like when a supervisor barges into a chat.
Change Agent Status
Agents manually set their status in the Contact Control Panel (CCP). However, on the real-time metrics report, managers can manually change the Agent Activity status of an agent. This overrides what the agent has set in the CCP. The value that's displayed in the Agent Activity column can be either:
- The agent's availability status, such as Offline, Available, or Break.
- The contact state, such as Incoming or On contact.
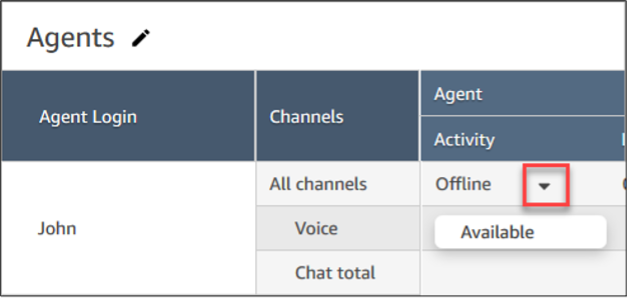
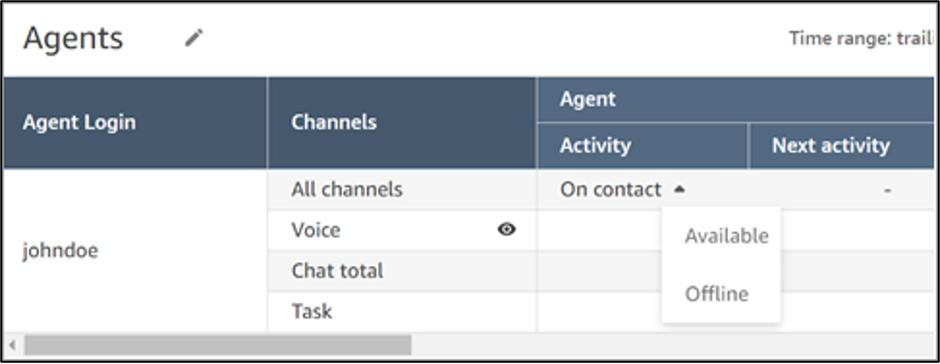
When you choose the Agent Activity column, you can select and change an agent's availability status, such as Offline, Available, or Break. The following image shows an example where only the Available status is in the dropdown list of the Activity column. This change appears in the agent event stream.
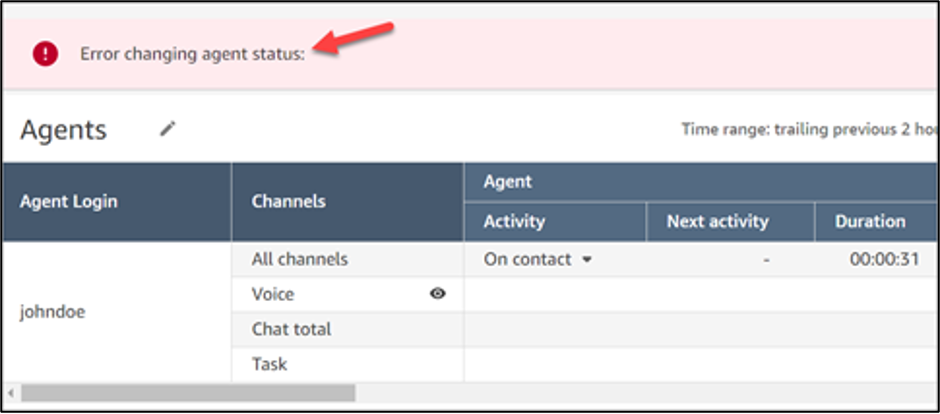
However, when a contact state is displayed in the Agent Activity column, such as Incoming or On contact, you cannot change it to Available or Offline, for example, even though those options are displayed in the dropdown menu, as shown in the following image. This means you can't set the agent's next status while they are on a contact.
Note: You'll get an error message that says Error changing agent status, as shown in the following image.
Reporting
Real-Time Metrics Reports
Real-time metrics reports show real-time or near-real time metrics information about activity in your contact center. Metrics such as the number of agents currently online in real-time (updating every 15 seconds), agent’s availability, calls currently in the queue, number of callback contacts, and number of calls handled the queue.
To Create a real-time metrics report:
- Navigate to the Amazon Connect Login page to find your department’s URL for Amazon Connect and login.
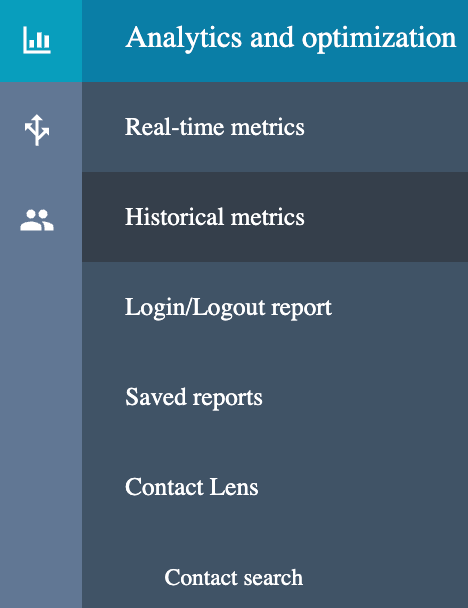
- From the left navigation menu, choose Analytics and optimization, then Real-time metrics.
Choose one of the following report types.
- Queues
- Agents
- Routing profiles
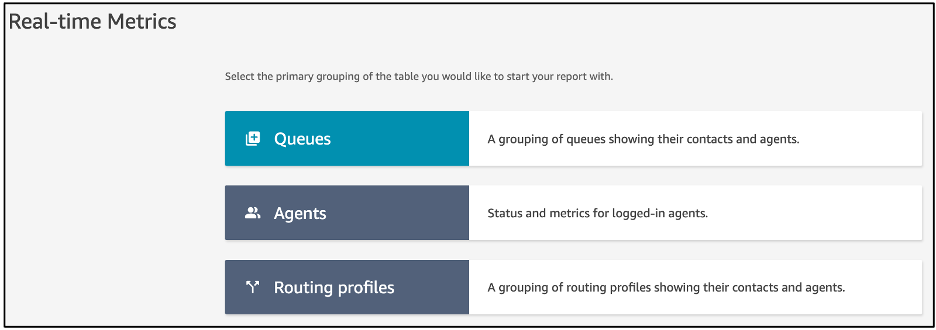
- For example, select Queues. To customize a report, choose the gear icon from its table.
Important: use the Gear/Settings icon to customize reports for all sections (Queues, Agents, Routing Profiles).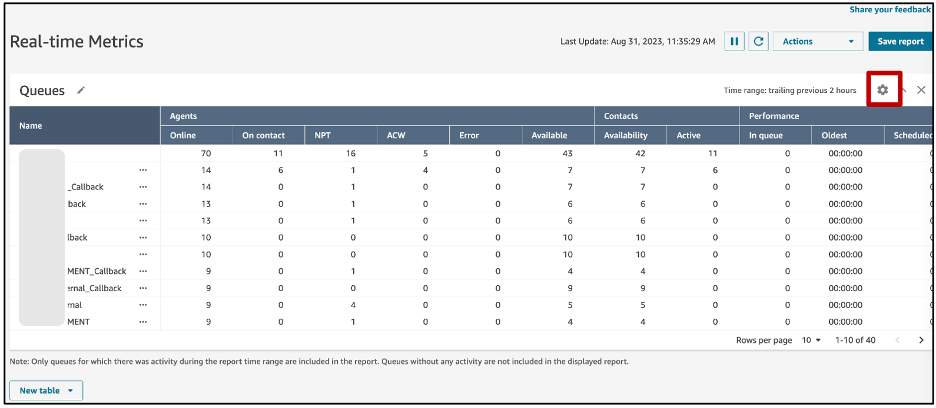
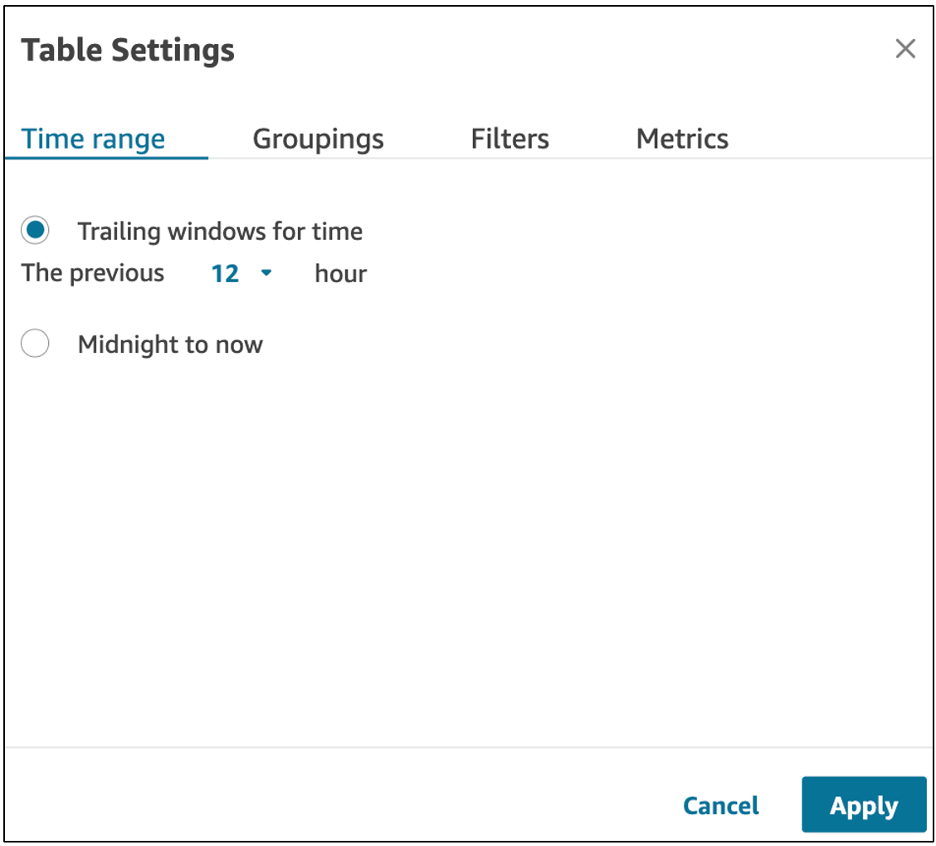
- Customize the Table Settings:
- On the Time Range tab, from Trailing windows for time, select the time range, in hours, for the data to include in the report. (12 hrs time range is one of the most common time ranges used by managers). If you select Midnight to now, the time range is from midnight to the current time, based on the Time Zone that you select.
- (Optional) On the Groupings tab, determine how the data is aggregated in the rows of your table.
- (Optional) On the Filters tab, specify filters to scope the data to be included in the report. The available filters depend on the report type. Possible filters for Queues could be: Queues, Routing profiles, and Channels.
- (Optional) On the Metrics tab, choose the metrics and fields to include in the report. The available metrics and fields depend on the report type and filters that you select.
- When you are finished customizing the report, choose Apply.
- To save your report for future reference, choose Save, provide a name for the report, and then choose Save.

- (Optional) To add another report to the page, choose New Table at the bottom of the screen and then choose a report type. You can add multiple reports of the same report type.

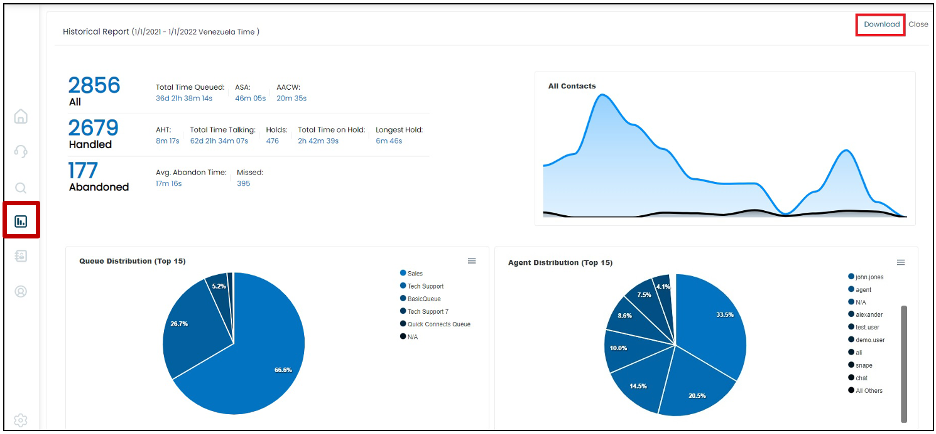
Historical Metrics Reports
Historical metrics reports include data about past, and completed activity and performance in your contact center. Metrics to include in the historical reports might include information Contact record-driven metrics or Agent activity-driven metrics.
To Create a Historical Report:
- Navigate to the Amazon Connect Login page to find your department’s URL for Amazon Connect and login.
- From the left navigation menu, choose Analytics and Optimization, then Historical metrics.
Choose one of the following report types.
- Queues
- Agents
- Routing profiles
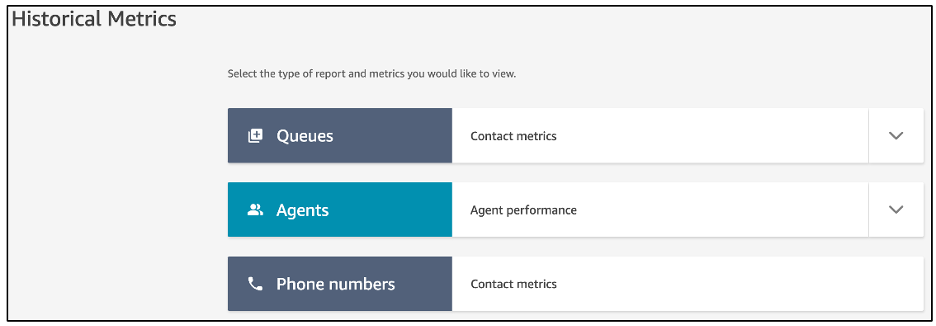
- Choose the gear icon to customize your report. Select the desired Time range, Groupings, Filters and Metrics to include in your reports.
- When you are finished customizing your report, choose Apply.
- (Optional) click Save Report, and provide a name for the report, and then choose Save.
Login/Logout Report
The Login/Logout report displays the login and logout information for the users in your contact center including agents and managers.
To generate a Login/Logout report:
- Navigate to the Amazon Connect Login page to find your department’s URL for Amazon Connect and login.
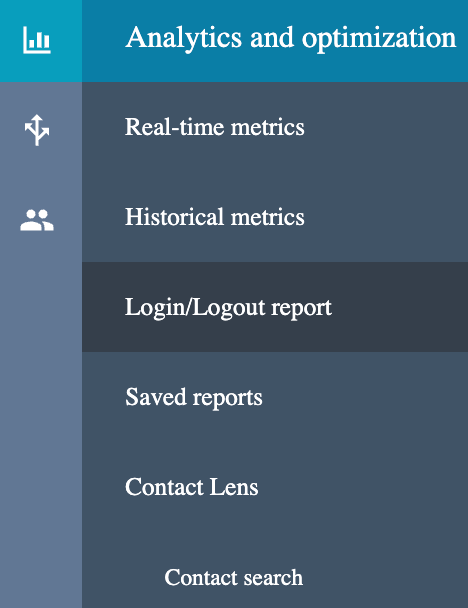
- Choose Analytics and Optimization, Login/Logout report.
- On the Login/Logout report page, choose the Time range for the records to include in the report, specify the Time zone and filter data by agent, agent hierarchy, none or Routing profile.
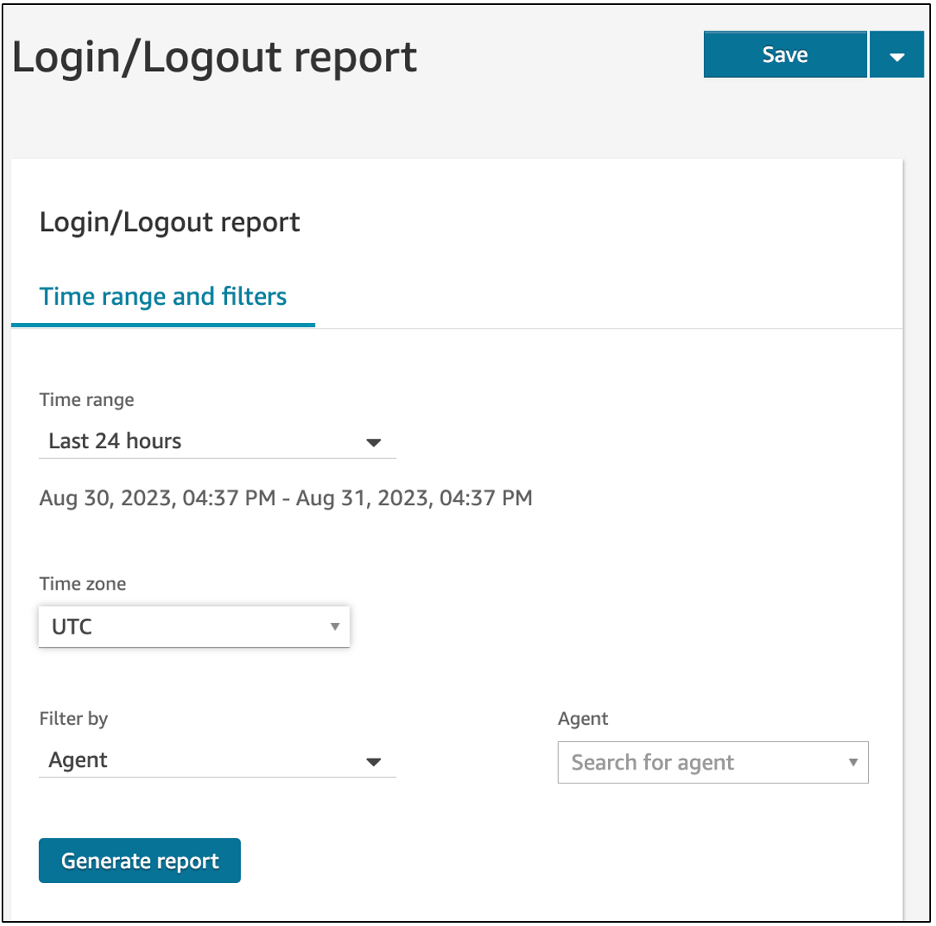
- Choose Generate report, Save.
- Provide a name for the report, and choose Save.
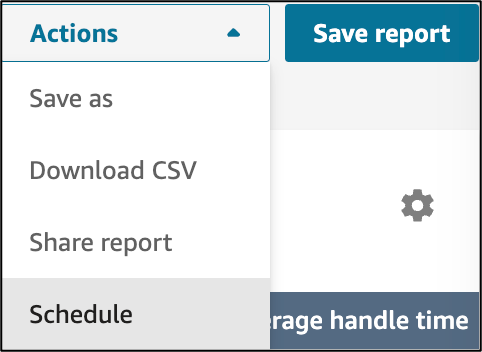
Actions Menu
Actions menu allows you to save reports with a new name, download reports a comma-separated value (CSV) file, schedule reports or share them with others.
Save as a Report
- To save your report with a new name. After you've created and saved the report, Click Actions in the top-right corner of the page.
- Choose Save as.
- provide a name for the report, and then choose Save.
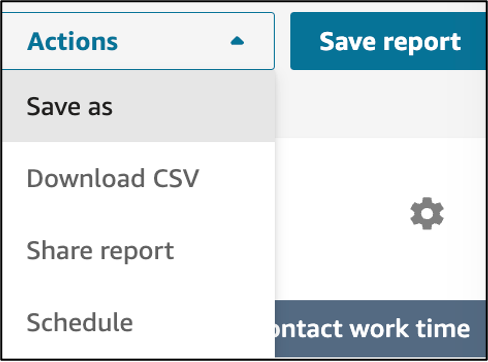
Download a Report as a CSV file
- After you've created and saved the report.
- Click Actions and choose Download CSV from the down arrow.
- When prompted, confirm whether to open or save the file.
- You can open the report in Excel. All times in the downloaded report are in seconds.

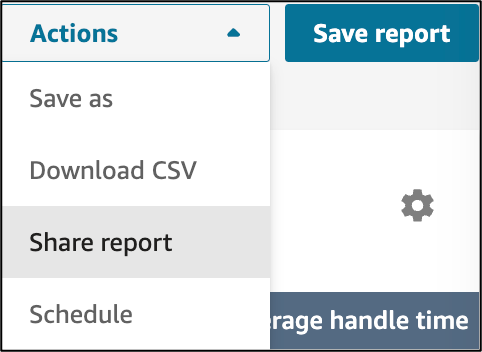
Share a Report
- After you've created and saved the report.
- Click Actions and choose Share Reports from the down arrow.
- Type in the name of your report.
- Click Save.
- You will be provided with 2 options either a direct link to the report and you can publish the report and make it viewable by others. Users can use the link to get the report or they can locate it under Saved Reports.
Schedule a Report
- After you've created and saved the historical report.
- Click Actions and choose Schedule from the down arrow.
- Name the report and it will show a confirmation message, click Continue to proceed .
- Specify the Recurrence and Delivery Options.
- Scheduling reports to deliver via email is currently only available using the ConnectPath tool (if your department is subscribed). Please see the ConnectPath section for more information.
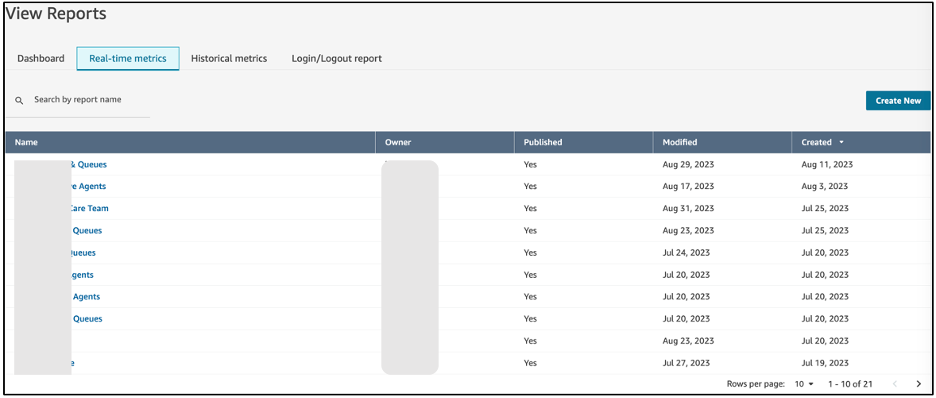
View Saved Reports
- choose Analytics and optimization, and then Saved reports,
- Choose the Real-time metrics tab or Historical Metrics tab.
- Click the report name to view it.
Contact Lens
Amazon Connect Contact Lens provides contact center analytics and quality management capabilities that enable you to monitor, measure, and continuously improve contact quality and agent performance. It helps improve your agent productivity, customer experience, and manager insights. With Contact lens, you can:
- Search for contacts
- Transcribe customer conversations
- Analyze conversations using conversational analytics
- Evaluate agent performance to identify coaching opportunities
- Review agent screen recordings handling customer contacts.
- Monitor live and recorded conversations.
Search for Contacts
- Navigate to the Amazon Connect Login page to find your department’s URL
- Once you click on the relevant Manager Login URL, you will be taken to the U-M Weblogin page. Log in with your U-M SSO (Shibboleth), then select the button for your department and click Sign In.
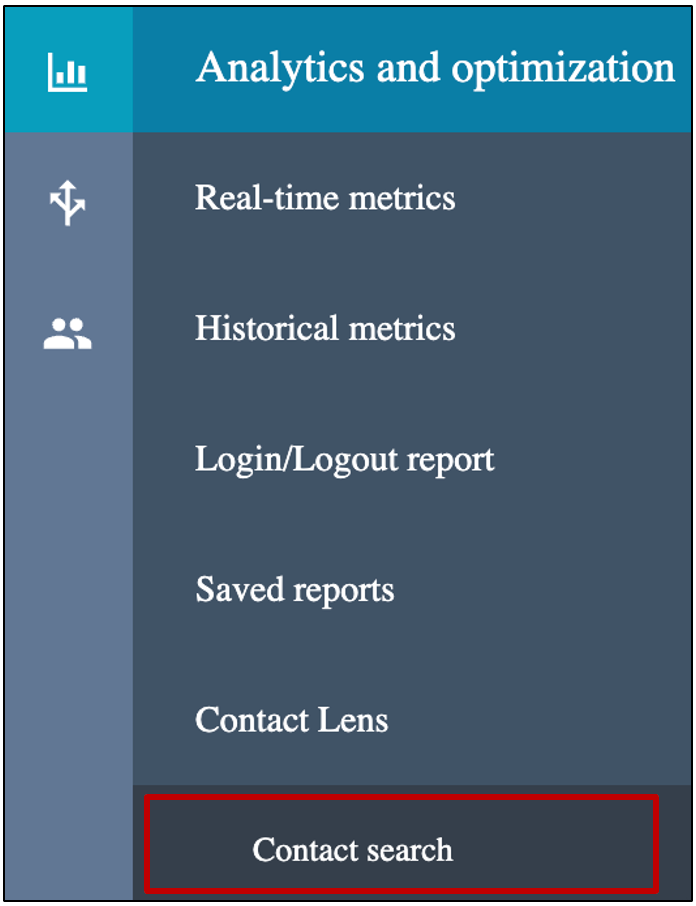
- Choose Analytics and optimization, then Contact search.
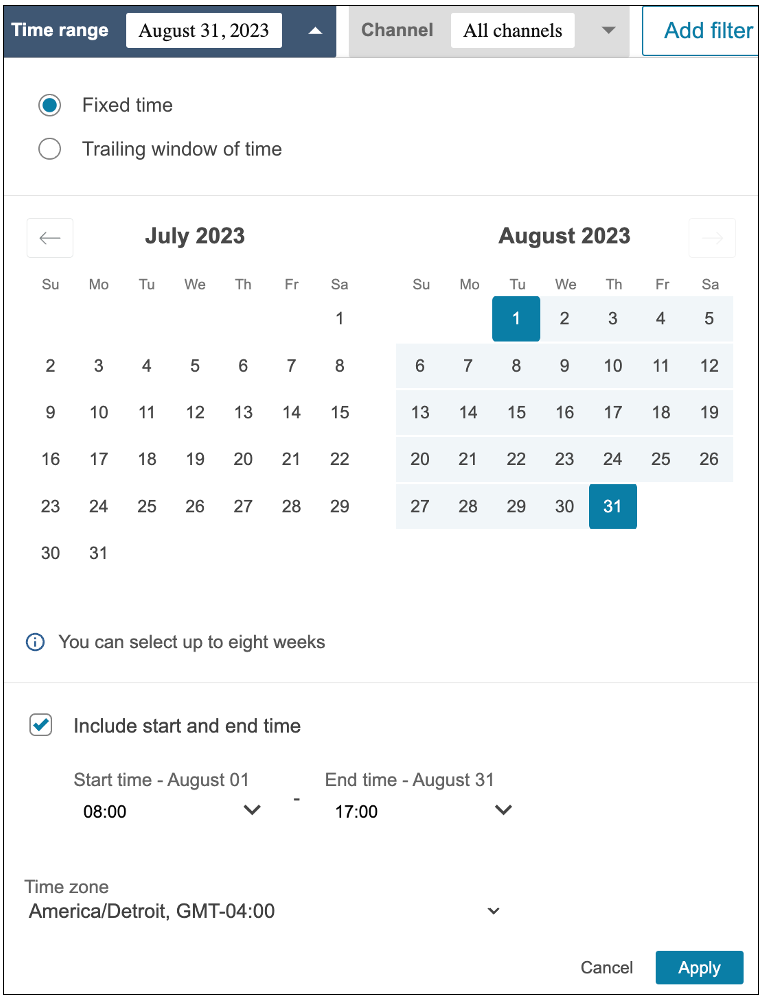
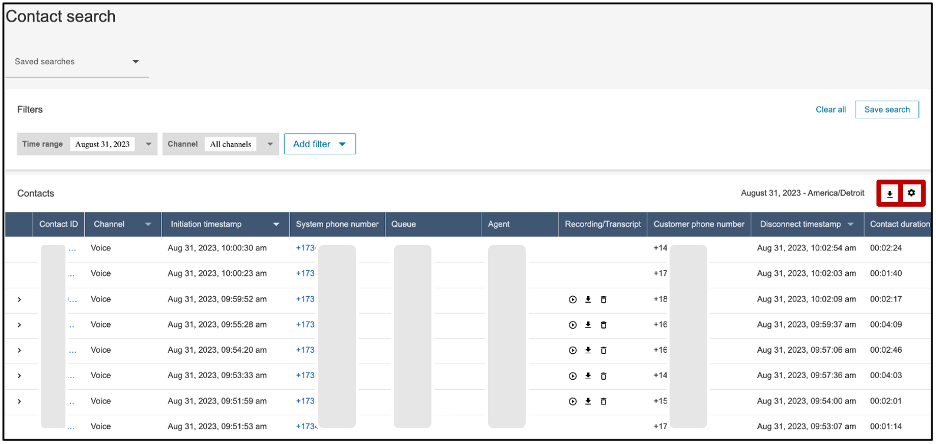
- Use the filters on the page to narrow your search. Specify the time range, you may also check Include start and end time. For date, you can search up to 8 weeks at a time. From Add filter icon, search by specific fields (Agent, contact ID, disconnect reason, Interaction duration....), and then click Apply.
- (Optional) Click the gear icon to add Additional fields to your search results. These options are not used to filter your search.
- Click the Download icon to download your search results. Note: You can download up to 3,000 search results at a time.
- You may also click the Play button on the Contact Record to view the audio and agent screen recording if it has been enabled.
Quick Connects
Step 1: Add a New Quick Connect to Amazon Connect
- Navigate to the Amazon Connect Login page to find your department’s URL.
- Once you click on the relevant Manager Login URL, you will be taken to the U-M Weblogin page. Log in with your U-M SSO (Shibboleth), then select the button for your department and click Sign In.
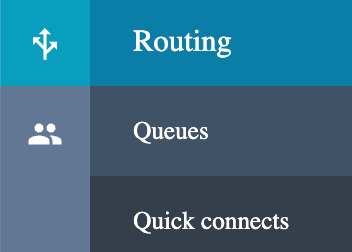
- On the navigation menu, choose Routing> Quick connects.
- Click Add new.
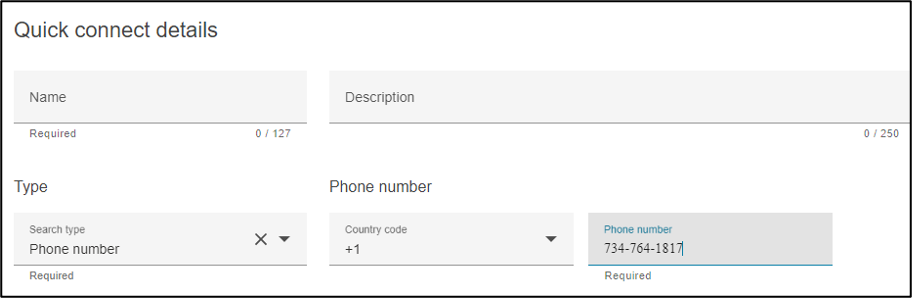
- Choose one of the following types.
- User
- Phone Number
- Queue
- Enter details, then Save.
STEP 2: Assign Quick Connect to a Queue
- Navigate to the Amazon Connect Login page to find your department’s URL for Amazon Connect.
- Once you click on the relevant Agent Login URL, you will be taken to the U-M Weblogin page. Log in with your U-M SSO (Shibboleth), then select the button for your department and click Sign In.
- On the navigation menu, choose Routing> Queues.
- Locate the Queue that is a part of the agent’s Routing Profile where you would like the Quick Connect to be displayed.
- Click on the Hyperlink Queue name.
- Assign the Quick connect to that Queue by clicking on the Quick connects box and placing a checkmark next to the Quick connect to be added.
- Click Save.
Routing Profiles
Create New
- Navigate to the Amazon Connect Login page to find your department’s URL for Amazon Connect.
- Once you click on the relevant Manager Login URL, you will be taken to the U-M Weblogin page. Log in with your U-M SSO (Shibboleth), then select the button for your department and click Sign In.
- On the navigation menu, select Users> Routing profiles.
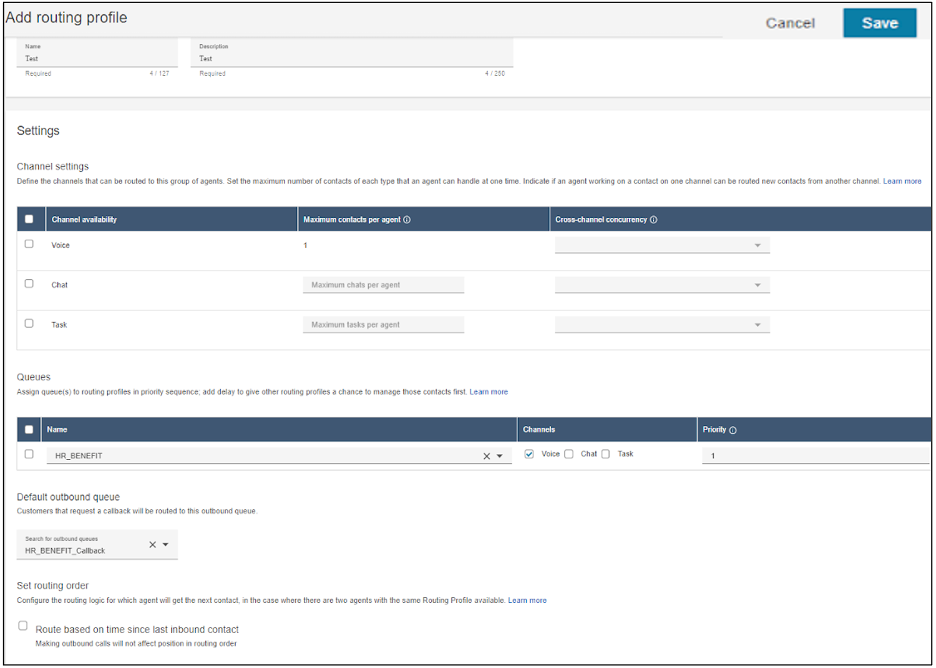
- Click Add routing profile.
- In the Routing Profile Details section, Enter Name and Description.
- In the Channel Settings section, select relevant channels.
- In the Queues Settings section,
- Assign whichever queues for this profile from the dropdown menu.
- Modify Priority and Delay as needed (in the Priority- Specify the order in which contacts are to be handled for that queue. In the Delay- Enter the minimum amount of time a contact should be in the queue before they are routed to an available agent).
- Assign Outbound queue.
- Assign queue order.
- Click Save.
Modify Routing Profile
- Navigate to the Amazon Connect Login page to find your department’s URL for Amazon Connect.
- Once you click on the relevant Manager Login URL, you will be taken to the U-M Weblogin page. Log in with your U-M SSO (Shibboleth), then select the button for your department and click Sign In.
- On the navigation menu, select Users> Routing Profiles.
- Click on the hyperlink of the Routing profile to modify.
- Change Parameters as desired:
- Name & Description
- Channels
- Queues
- Modify Assigned queues for this profile
- Modify Priority and Delay as needed.
- Modify Outbound Queue
- Click Save.

Assign Routing Profile to Agent
- On the navigation menu, select Users> User Management
- Click on the hyperlink for the agent to modify
- Click on the Routing Profile section to select the desired Routing Profile
- Click Save
Queues (if applicable)
Create a queue
- Navigate to the Amazon Connect Login page to find your department’s URL
- Once you click on the relevant Manager Login URL, you will be taken to the U-M Weblogin page. Log in with your U-M SSO (Shibboleth), then select the button for your department and click Sign In.
- On the left navigation menu, choose Routing, then Queues, then Add new queue.
- Add the appropriate information about your queue and choose Add new queue. The queue is automatically active.
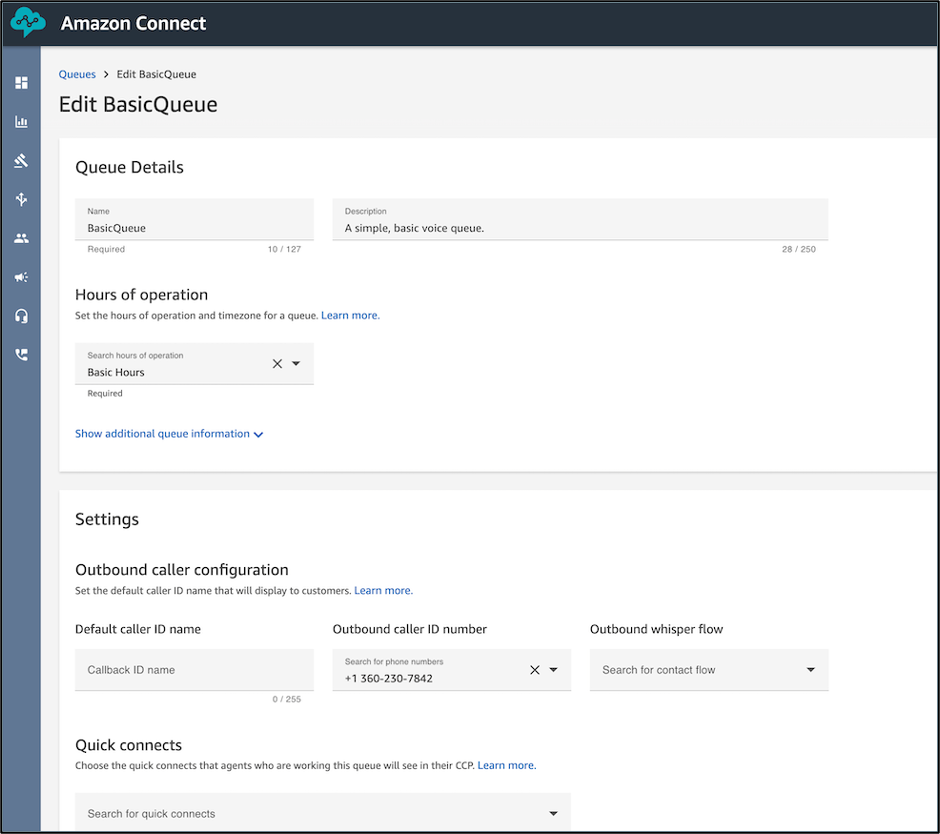
- Finally, assign the queue to a Routing Profile. The Routing Profile links the queue and agents together.
- For more information on Queues, see the Learn More section at the end of this document.
Modify Hours of Operation and Set Holiday Hours or Closures
Modify Hours of Operations
- Navigate to the Amazon Connect Login page to find your department’s URL.
- Once you click on the relevant Manager Login URL, you will be taken to the U-M Weblogin page. Log in with your U-M SSO (Shibboleth), then select the button for your department and click Sign In.
- On the navigation menu, choose Routing> Hours of Operation.
- Locate the Hours of Operation that need to be modified.
- Click on the Hyperlink Hours of Operation.
- Modify the days of the week and working hours.
- Click Save.
Set Holiday Hours or Closures
- Navigate to the Amazon Connect Login page to find your department’s URL.
- Once you click on the relevant Manager Login URL, you will be taken to the U-M Weblogin page. Log in with your U-M SSO (Shibboleth), then select the button for your department and click Sign In.
- On the navigation menu, choose Routing> Hours of Operation.
- Locate the Hours of Operation that need to be modified.
- Click on the Hyperlink Hours of Operation.
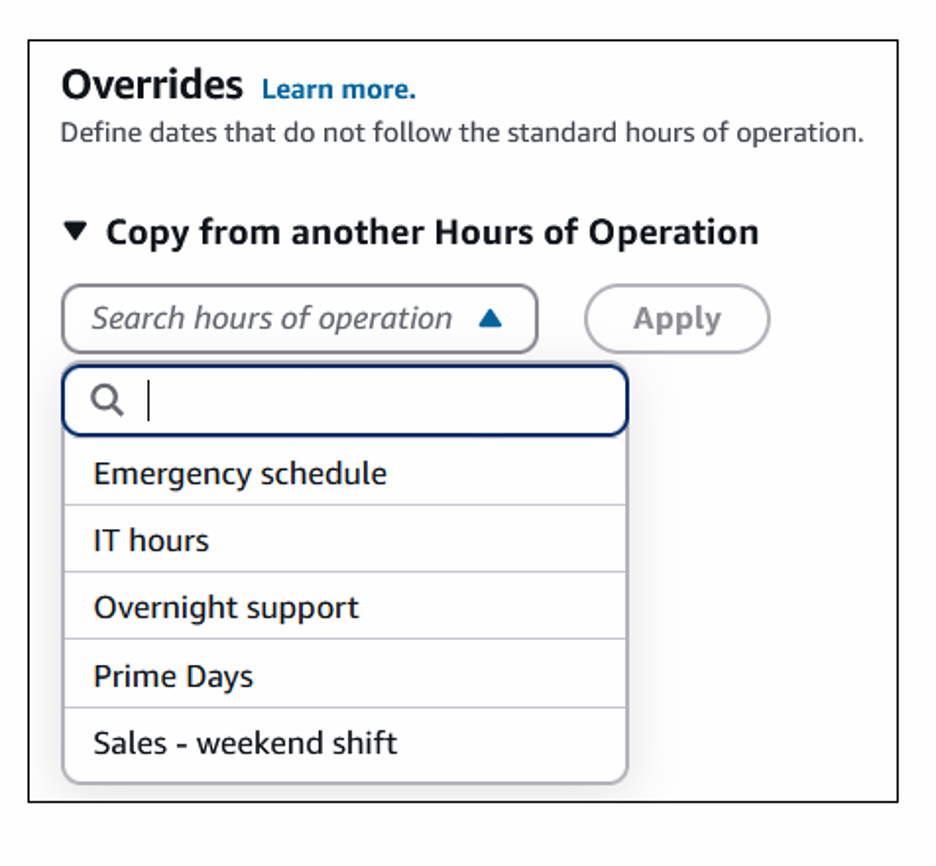
- Scroll down to the Overrides section and click +Add new override
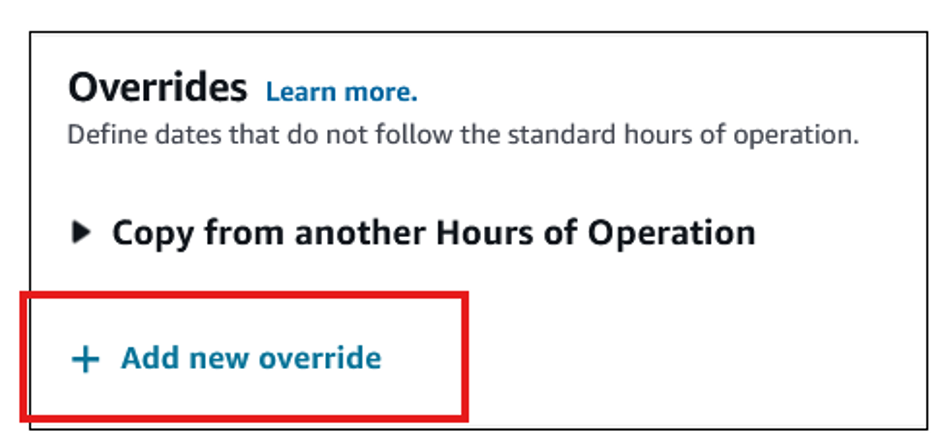
Fill out the Name, Description, Date Range, and Operations information
- Toggle on Operations closed to remain closed the entire Date Range
- Toggle off Operations closed to customize the hours of operation for the selected Hours of Operation. NOTE: You may need to repeat this process if your department has more than one Hours of Operation option. You may Copy if needed. See more: Set the hours of operation and time zone for a queue using Amazon Connect
ConnectPath Overview
Log In to ConnectPath
If subscribed, Managers can access ConnectPath Dashboard via the following browsers only: (1) Google Chrome and (2) Firefox.
- Navigate to the Amazon Connect Login page to find your department’s URL for ConnectPath
- Click Secure Login, you will be taken to the U-M Weblogin page. Log in with your U-M SSO credentials.

- When logging in for the first time,You must have microphone and pop-ups access allowed in the browser for the ConnectPath website to function properly.
- A new pop-up window will come up to prompt a login into your department’s Amazon Connect instance. Enter your U-M credentials and click “Sign In”
- Once you log in, you will have the option to click on “Go to Application”. Note: Make sure you are not logged into Amazon Connect in any other browsers or Tabs.
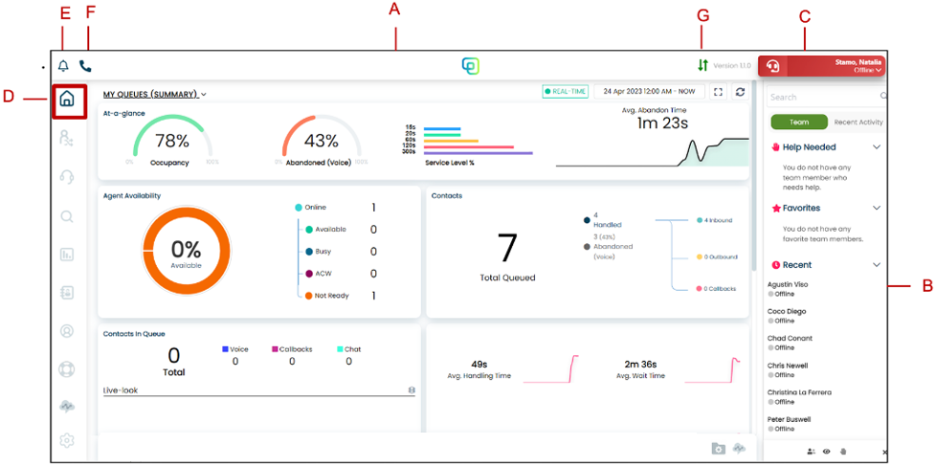
Overview of ConnectPath Dashboard
Home
Once you enter the ConnectPath dashboard, you will be able to see:
- A- Header is a global section of ConnectPath that will always be on display. You’ll see your Status, a Handset, a Bell and the Instance logo.
- B- Team Status Drawer in the right corner. It displays Your status and User Status of other supervisors and agents.
- C- Your Status in the right corner at the top of the screen. You have predefined list of statuses to select from:
- Available
- Custom status for break/lunch
- After Call Work: Important: once you end a call, you will automatically be placed in a ACW mode (status will still display Available) until you close the contact. In this mode, you will not be able to accept calls until you close the contact. No calls will be routed to you until you are available.
- Offline.Important: By default your status is set to Offline on login, so remember to change your status from Offline to Available to be able to receive/answer calls.
- D- Home Dashboard and Widgets in the left navigation bar. By default it displays the real time metrics for all queues in near real time activity. Clicking on a queue name in the dropdown will show the metrics for that specific queue while the Global view summarizes all queues. This area includes:
- Queues Summary At- a- Glance
- Agent availability
- Contacts in Queue
- Contacts
- Agent Performance
- Queue Performance
- Abandoned calls
- Duration
- Real Time and Historical Metrics.
- E- Announcements displays all the announcements related to your queue. You can post announcements by clicking the pencil icon in the bottom side, or delete them by clicking the trash icon
- F- Handset is for quick dial and you can input a phone number to make a call.
- G- Network Speed- shows the network speed and helps diagnose any issues related to call dropping or quality.
- In the top corner of Home Dashboard, you can also spot 2 icons at the right side, one for entering full screen mode and another one to rearrange your card placement.
Ad-hoc Holiday Closures
- To access the Adhoc/Holiday Closures screen in ConnectPath, you will first click the Gear, followed by Adhoc/Holiday Closures.
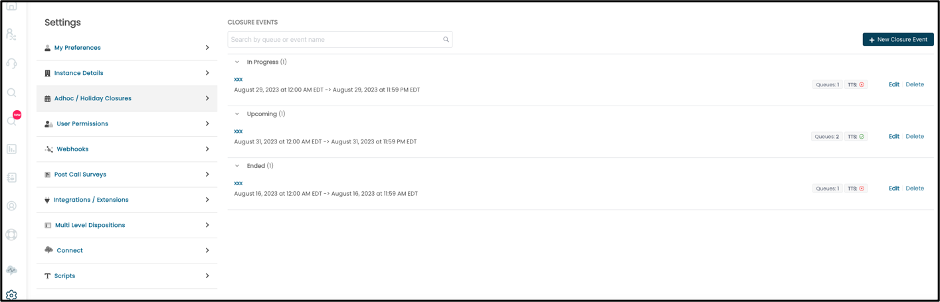
- View any In Progress, Upcoming, or Ended Closures from the main screen
- Click + New Closure Event to schedule a closure by Queue or for all Queues.
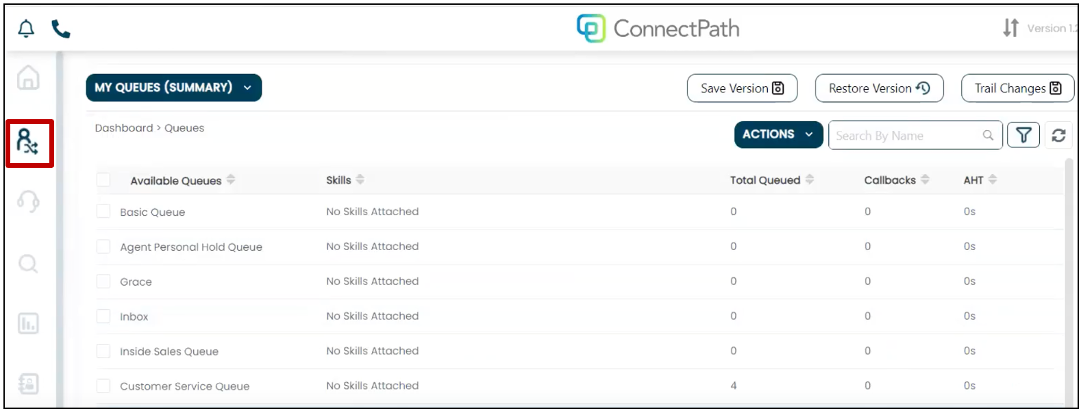
Queues
This tab allows you to view the list of your available queues. Clicking on a queue name in the list will show the available agents and calls in that specific queue.
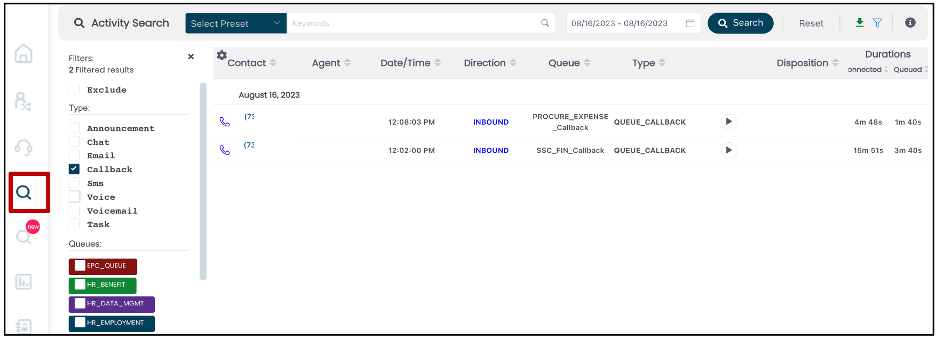
Activity Search
The Activity Search dashboard is the instance history of phone calls. You can search and filter by:
- Contact
- Date/Time
- Duration (Connected and Queued)
- Direction (Inbound, Outbound, Callback or Missed)
- Queue
- Type (Voice/Announcement)
- Disposition (if enabled in settings)
- Agent
You can search call activities, sort and filter calls, and export activity results (this includes filters applied). Once created, the activity results will be displayed on the reports page.
Historical Reports
From this tab you can create, schedule, and export (Download an Excel file) historical reports without any restrictions on time period. Reports can be run and downloaded immediately or scheduled to be run monthly or yearly (Daily reports can be scheduled to be run hourly or daily). You can also have these reports sent to an email address; a functionality that doesn’t exist in the Amazon Connect system.
Note: Each user can create their own reports. Other users cannot see your reports within ConnectPath. To share reports, you can set your reports to go to your group email or send a copy of your downloaded Excel reports to other users.
How to access Amazon Billing Information
- Login to the U-M AWS Management console
- Choose the radio button for your department with the word “Billing” in the name
- If you don’t see it, please submit a ticket to request access. REQUIRED: Include your Amazon Connect instance name or department name when submitting the ticket.
- From the Home page, Search for Billing and Cost Management, and click the hyperlink to access the section.
- On the Billing and Cost Management home page, select Bills from the left navigation menu.
- Change the Billing Period from the drop-down on the upper right corner of the page.
- Scroll to the bottom to view charges.
- NOTE: CSV download is not enabled; however, you are able to Print.
Learn More
Find more information at:
- [U-M] Amazon Connect - Agent Training
- [U-M Video] U-M Amazon Connect Manager Training Demo
- [U-M] Amazon Connect Accessibility | ITS Documentation
- Amazon Connect: Administrator Guide
- Amazon Connect: Real-time metrics definitions
- Amazon Connect: Historical metrics definitions
- Amazon Connect: Real-time metrics & Historical metrics reports
- [Video] Amazon Connect: How to create, save update and download real-time metric reports
- [Video] Amazon Connect: Using Historical Metrics and Reporting
- [Video] Amazon Connect: How to generate Login/Logout Reports
- Amazon Connect: Create Quick Connects
- Amazon Connect: Contact Lens
- Amazon Connect: Getting Started with Amazon Connect Contact Lens
- Amazon Connect: Create a queue
- Amazon Connect Concepts: Routing profiles
- Amazon Connect Concepts: Queue-based routing
- Amazon Connect: Set the hours of operation and timezone for a queue
- Amazon Connect: Set up outbound caller ID
- Amazon Connect: Set the Maximum contacts in queue limit
- ConnectPath Documentation