Content
- Overview
- Log in
- Headset Setup
- Launch the CCP
- Manage your Status
- Accept Incoming Calls
- End Calls
- Make Outbound Calls
- Transfer Calls
- Callbacks
- Handling Chat/SMS
- Log out
- Learn More
Overview
Agents can use the Amazon Connect Contact Control Panel (CCP) to receive calls from customers, make outbound calls, transfer calls to other agents or queues, and perform other tasks.
Log in to Amazon Connect
- Navigate to the Amazon Connect Login page to find your department’s URL
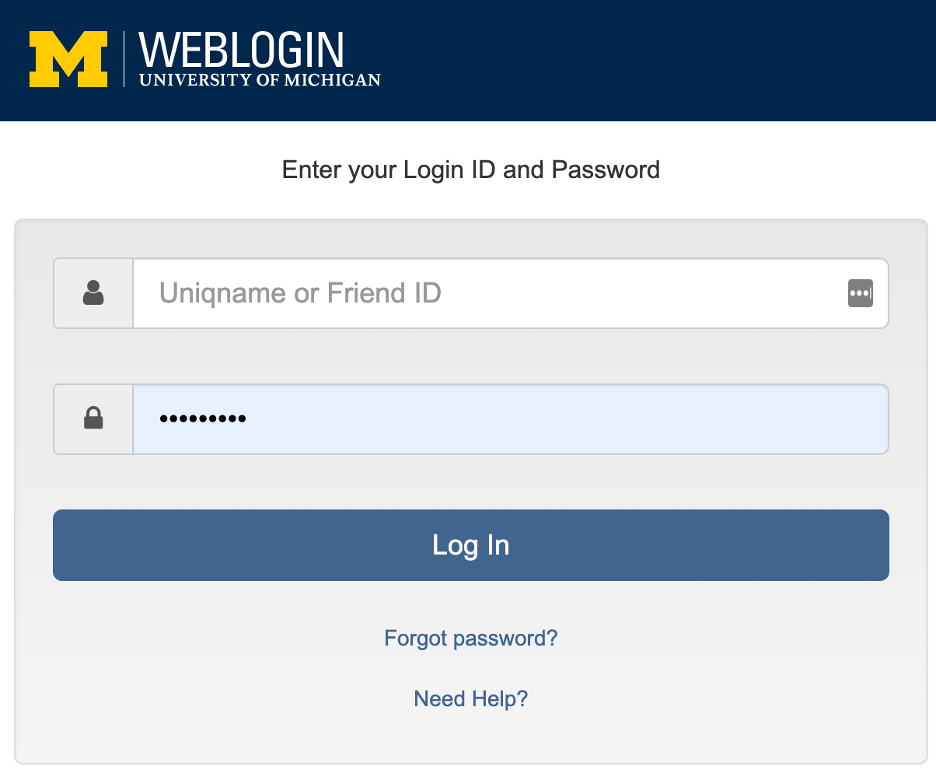
- Once you click on the relevant Agent Login URL, you will be taken to the U-M Weblogin page. Log in with your U-M SSO (Shibboleth), then select the link for your department and click Sign In.
- Once logged in, you will be taken to the Amazon Connect Contact Control Panel (CCP).
Headset Setup
- Connect your headset to your computer ahead of accessing Amazon Connect.
- When logging in for the first time, you’ll be prompted for permission to access your microphone and pop-ups in the browser. Click the “Allow” button.
- Note: This will only happen one time. If you miss this step, clear your browser's cache and cookies and log back into Amazon connect so you’ll be prompted again to give permission to your headset.
- Note: If instructed by your department, also click the Allow button for the video camera access.
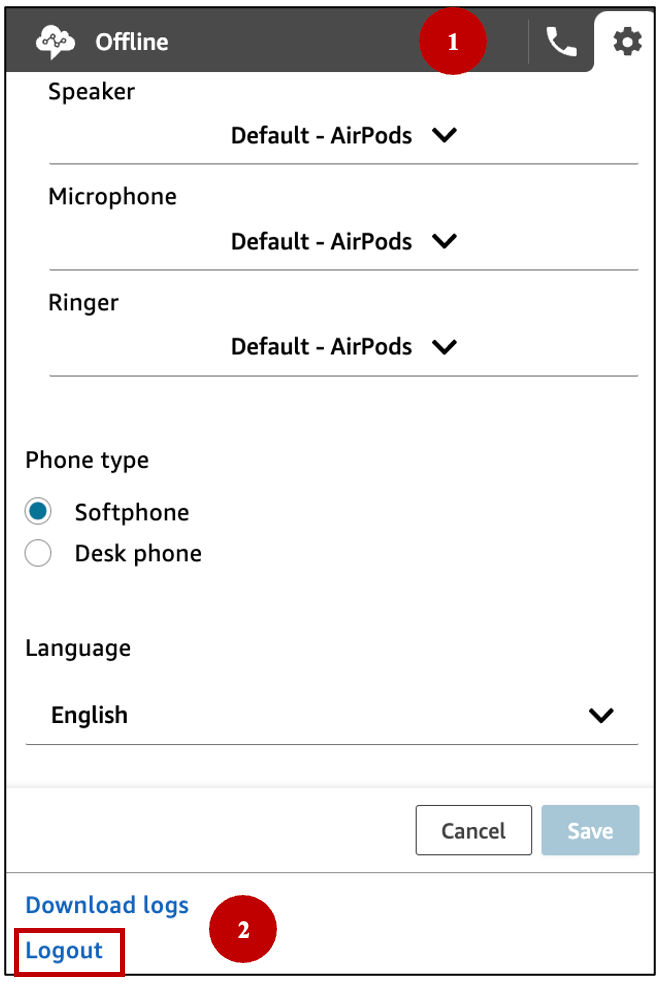
- Click the Settings Gear icon in the upper right to check the following settings:.
- Ensure your video settings are appropriate
- Scroll down to choose your headset as the Speaker, Microphone, and Ringer settings
- Make sure the Softphone radio button is selected.
- Click Save
- Click the Phone icon to proceed with taking calls after this step.
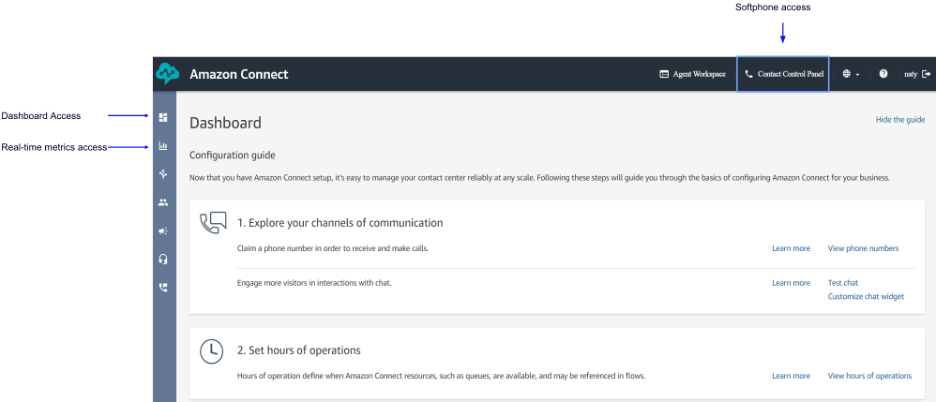
Launch the CCP (Connect Contact Control)
Click the Contact Control Panel (CCP) icon in the header of the Amazon Connect dashboard. This produces a widget which is a separate, mini window.
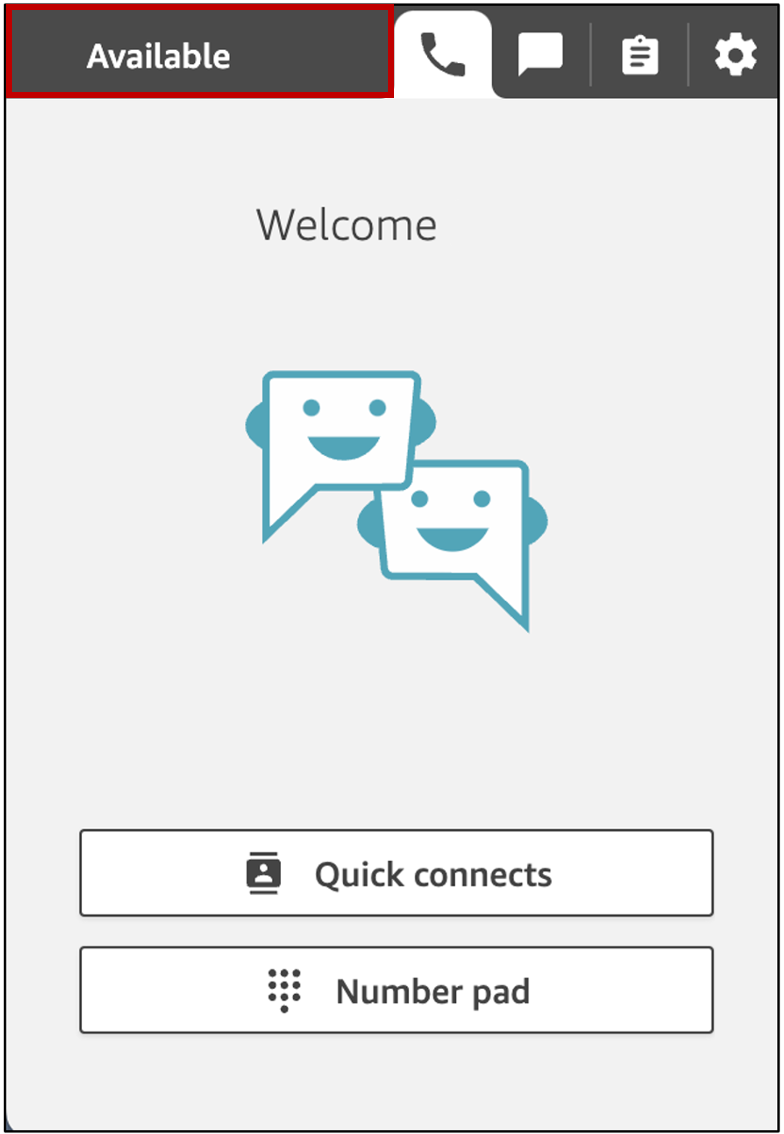
Manage your Status
In the Amazon Connect Contact Control Panel (CCP) widget, set your status to “available” by clicking the cloud icon and selecting it from the dropdown. You have a predefined list of statuses to select from:
- Available – Set this status to take inbound calls.
- Offline
- Custom status for break/lunch/Training
- After Call Work (ACW) – You will automatically be placed in a ACW mode (status will still display Available) until you close the contact in the softphone. In this mode, you will not be able to accept calls until you close the contact.
Note: Amazon Connect will remember the last call status you were in when last logged in.
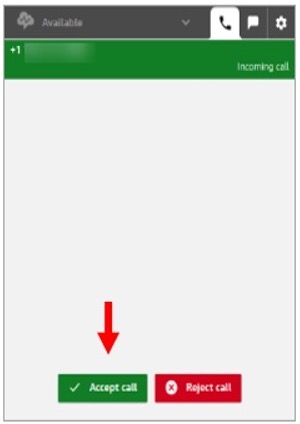
Accept Incoming Calls
- When you set your status in the CCP to Available, Amazon Connect can deliver calls to you.
- Make sure to click “Accept Call” when a new call shows up on your screen.
- Depending on the settings, before you are connected to the contact, Amazon Connect might send a whisper notification of the queue name that the call originated from.
- You have 20 seconds to Accept or Reject the call. If you miss a call, it will go to the next available agent. You will need to click the Close Contact button to receive your next call.
End Calls
- At the end of your interaction, Click End Call button to end the call.
- Once a call ends, you are placed in After contact work (ACW) status.
- During After contact work (ACW), you can finish follow-up work
- Choose Clear Contact so you can go back to available state again and accept another call.
Make Outbound Calls
To make an outbound call:
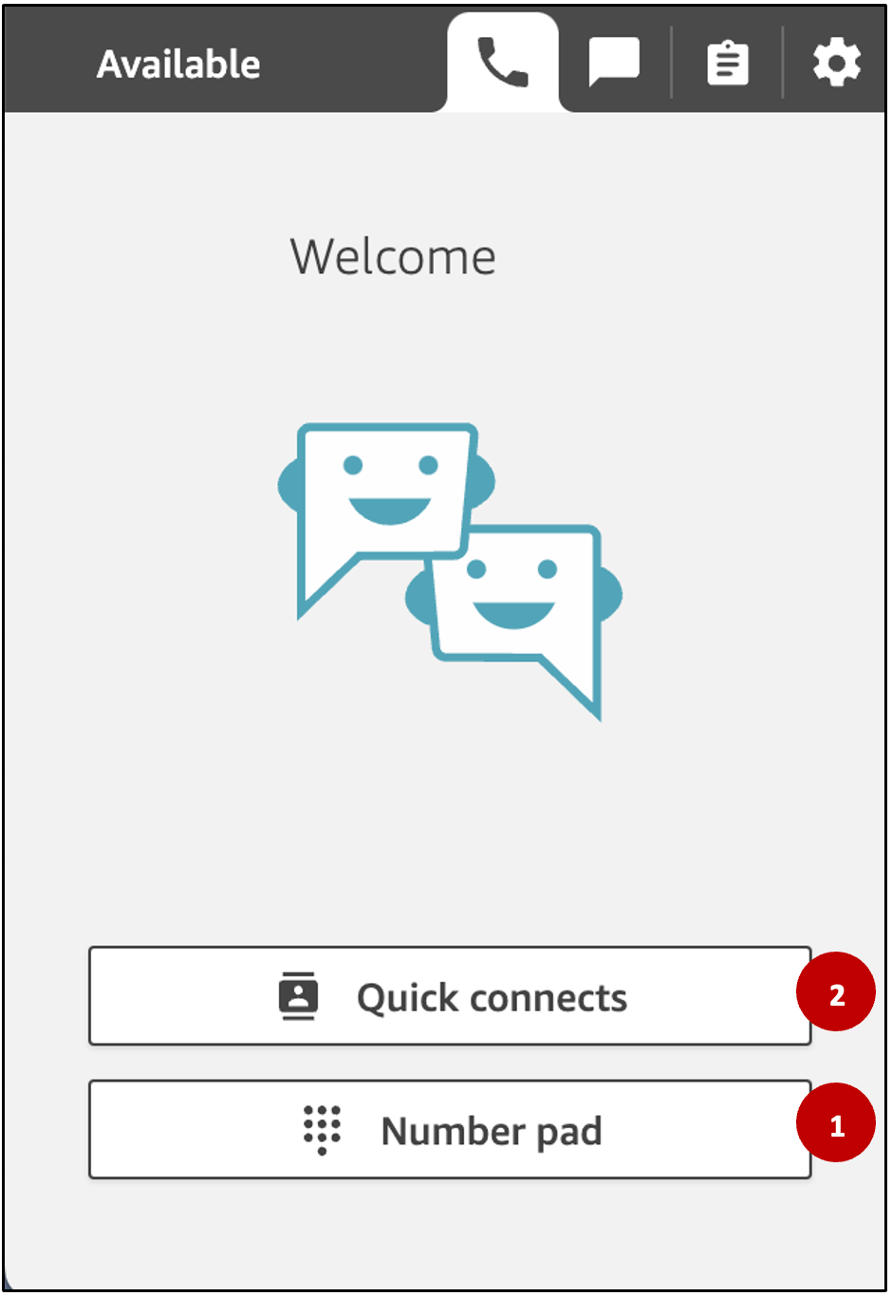
- Choose the Number pad from your Contact Control Panel (CCP).
- Enter the full 10-digit number you want to call manually and press Call. For example, 4-4357 must be dialed completely as 734-764-4357.
- Use Quick Connects based on its types:
- Quick Connects of types (Agent or Queue) are visible on the CCP only when you are on a call.
- Quick connects of type (External numbers) are available in the CCP whether you are on call or not.
-
Other Queues in your call center
-
Other Agents (user). Note that Transfers to other agents on your team using Quick Connects will only function if the other agent is Available.
-
External Numbers
You can transfer calls to people in a predefined list "Quick Connects" or to a phone number that you enter through the Number pad.
To transfer a call to a specific person or queue:
- While on the phone with the customer, let them know that you will transfer the call, and press the “Quick Connects” button.
- Select a contact or queue that you wish to transfer the customer to from the dropdown menu, and then click Call.
- From there, you and the agent receiving the call from the destination queue will receive notifications on your headsets that the call is being transferred to/from a queue.
- Note: You can also use the Number pad to enter DTMF input.
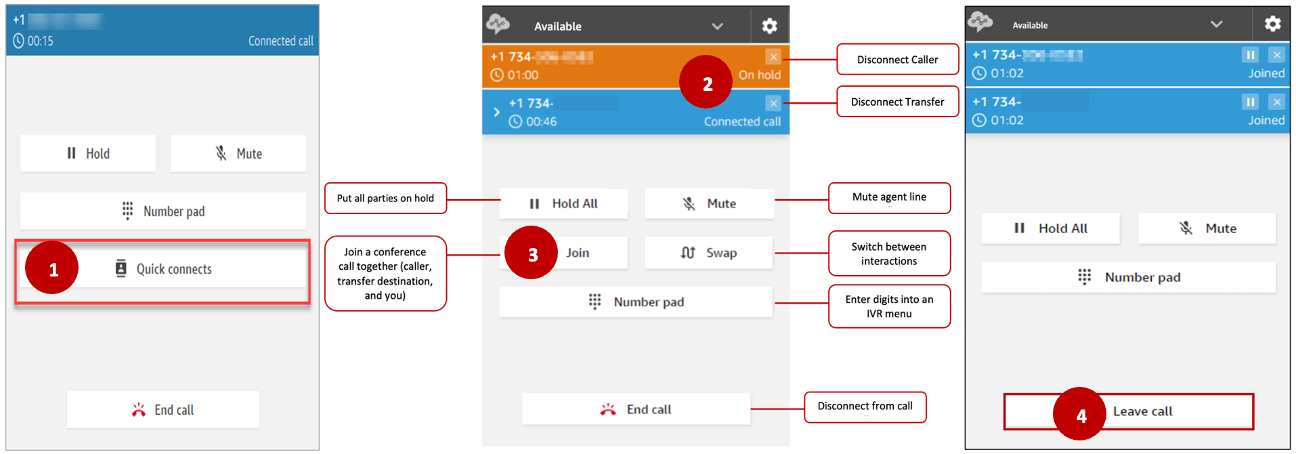
- After you initiate a transfer, the two calls are displayed at the top of the window. The customer is placed on hold and you are connected to the transfer destination.
- Click Join to put all 3 parties(customer included) in a conference call. you have the option also to:
- Hold All- to place all parties on hold.
- Mute- to mute your line.
- Swap- to swap between the 2 interactions if you would like to speak to the caller and transfer the destination one at a time.
- At any given time, click "Leave calls" to disconnect from the call and the destination agent can take care of the customer from there.
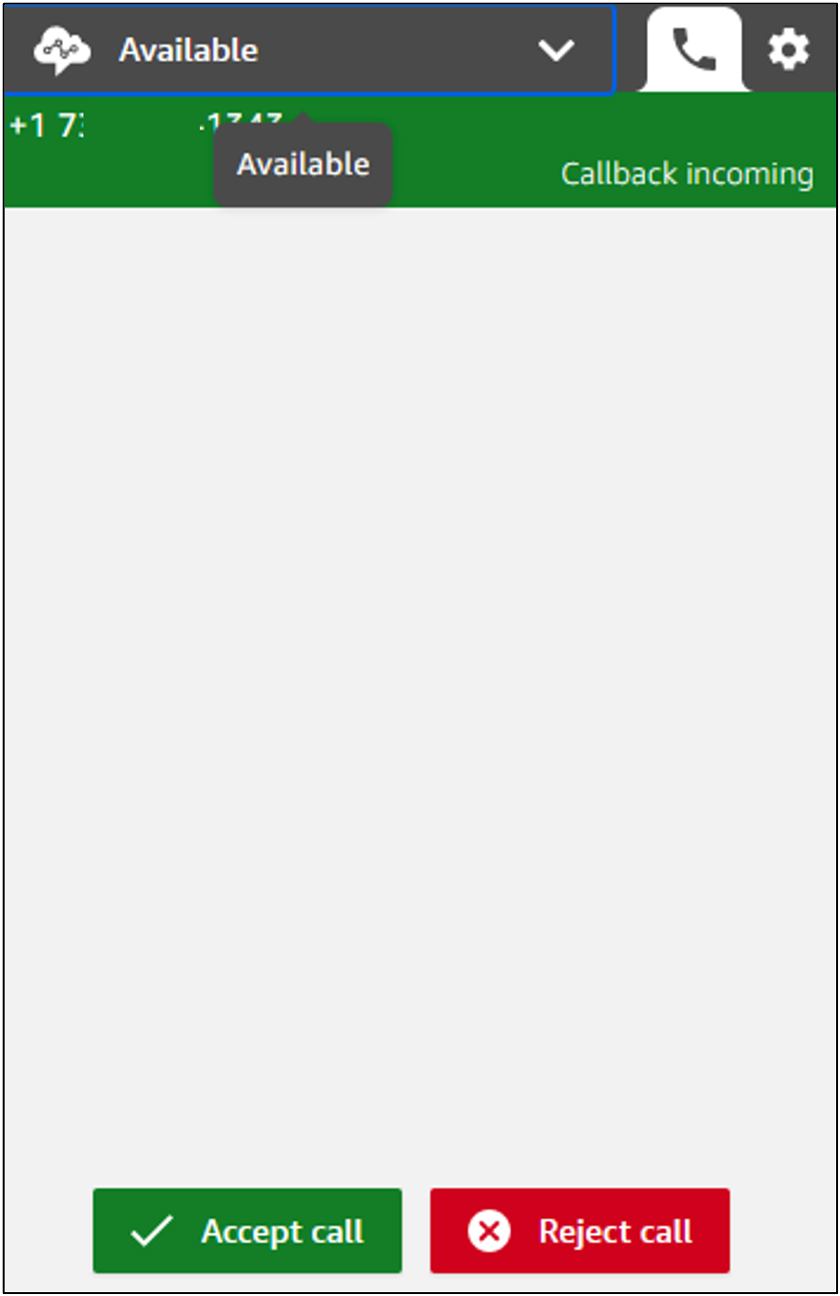
Callbacks
If the caller requests a callback, Amazon Connect will confirm the number and disconnect. But it remembers the call's position in the queue (as if the caller was still on hold). To answer a callback:
- Once the queue position for the caller comes up, the next available agent's call status will change to Callback Incoming.
- Click Accept call to have the system call the customer back.
- If they don't answer, you can leave a voicemail asking them to call back.
Handling Chat/SMS
Setting Status to Available
When you set your status to Available in the CCP, Amazon Connect can also deliver chats to you, based on the settings in your Routing Profile. Consult with your manager for additional information on whether your Routing Profile can include handling Chat/SMS messages.
Receiving SMS/Chat
When a chat/SMS contact arrives, you are notified as follows:
-
Pop-up Notification: If you have enabled notifications in your browser, a pop-up notification will appear at the bottom of your screen, like this:
- Chat tab: If you're on the chat tab, the page displays the contact's name and a button to connect to the chat.


- Phone Tab: If you're on the phone tab, a banner displays the contact's name and a button to connect to the chat.

Accepting/Rejecting Chat
- You have 20 seconds to accept or reject a contact. If a new chat arrives while you are already on a chat and you don't accept it, a tab will appear to indicate the missed chat.

- Click the Green checkmark to accept chat and connect to the contact. Note: Chat conversations must be accepted manually. There's no auto-accept for these conversations.
- You'll see the full transcript of what the contact has already typed, including input from a bot or another agent, if applicable. In the following screenshot, John is the name of the customer, BOT is the Amazon Lex bot, and Jane is the name of the agent.

Understanding Chat Timers
When you're in a chat conversation with a contact, you'll see two timers at the top of the chat tab. These timers indicate:
- How long the contact has been connected to your contact center. This includes the time spent with the bot, if you're using one.
- How long it has been since the last text was sent. This can be either from the customer to the agent, or from the agent to the customer. The timer resets with a text message between the two. It won't reset with each consecutive text message sent from a participant.

Multiple Chat Tabs
If you have multiple chat tabs open, an hourglass icon appears to indicate which chat tabs are in After Contact Work (ACW) state. The timer indicates how long the contact has been in ACW.

Managing Missed Chats
- If you miss a chat because you forget to change your status in the CCP from Available to Break when you took a break, Amazon Connect tries to route a chat to you for 20 seconds. Keep in mind that your admin can't configure this amount of time.
- After 20 seconds, the contact is counted as Agent non-response in the real-time metrics report and the historical metrics report.
- When you return from break and choose the chat tab, you'll see the missed contacts and how long they've been there. Each contact occupies a slot. When all of your slots are occupied, Amazon Connect won't route any more contacts to you. You must clear the missed contact so more contacts can be routed to you.

Formatting Messages
- When composing a chat message, you can format your message to add structure and clarity. Formatting options include:
- Bold
- Italic
- Bulleted list
- Numbered list
- Hyperlinks
- Emoji
- Attachments
- To get started, highlight the text you want to format, and then select the formatting options from the toolbar at the bottom of the chat window. You can preview the message before sending it.

Log out of CCP
- At the top of the CCP, Set your status to Offline. (Important!)
- click the Settings icon. And then click Log out.