Before using your Zoom Phone, be sure you've completed all the Day 1 Tasks. This guide shows you the basic features and functionality of Zoom Phone. The Zoom desktop or mobile application must be installed and running in order to make or receive calls. If you do not see the Phone icon on the Zoom desktop or mobile app, try logging off the application and/or rebooting your device.
Table of Contents
- Make a call
- Receive a call
- Forward calls
- In-Call Tools & Features
- Check your voicemail
- Set Do Not Disturb
- Set outbound caller ID
- Call Blocking
Make a Call
- Sign in to the Zoom desktop client or mobile app.
- Click the Phone tab.
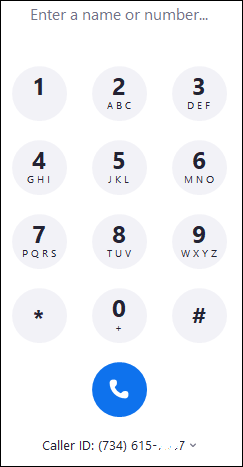
- Call a number using one of the methods below.
Note: Dialing 9 is not required to make off-campus calls.- Number pad: Dial a number using the on-screen or keyboard number pad, then click the phone icon.
- Copy and paste: Copy and paste a number in the text field, then click the phone icon.
- Search contacts: Type a name or number above the dial pad to search through your internal and synced contacts. Click a search result to make a call. If the contact has several phone numbers, click the right arrow icon to view and select the number to call.
- Click the blue phone icon.
Notes:
- 5-digit dialing works on all campuses.
- Long-distance calls from the softphone application require 10-digit dialing within the U.S. and Canada.
- Calling outside the U.S. and Canada requires 011 + country code and telephone number. First, the service must be enabled by calling (734) 763-2000.
Receive a Call
- Sign in to the Zoom desktop client or mobile app.
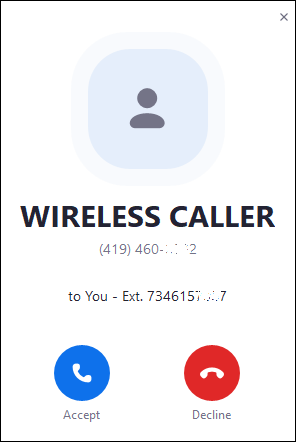
- During an incoming call, Zoom Phone will display a call notification to help you identify the caller. Note: You will not receive call notifications if you manually set your status to Do not disturb.
- Click one of these options depending on the call notification you get:
- Accept: Answer the call.
- Decline: Route the caller to your voicemail or disconnect the call depending on your settings (look for the drop-down menu called When not answered, calls will be).
- Close icon (×): Ignore the call notification. The call will continue to ring on other devices (Zoom mobile app or desk phone).
- If you are currently on a call, you will see these options in the call notification:
- Hold & Accept: Place the current call on hold and answer the incoming call. You can use the call controls to switch between or merge them into a three-way call.
- Send to Voicemail: Continue the current call and send the incoming call to your voicemail.
- End & Accept: End the current call and answer the incoming call.
Notes:
- See the Zoom Phone Settings document to learn more about call handling settings.
- There is no email notification for missed calls. You can view missed calls in the Zoom app on the History tab.
Forward Calls
Simple call forwarding can be set up in the Zoom desktop app. Follow the instructions below to forward calls:
- Sign in to the Zoom desktop client or mobile app.
- Click on your Profile photo icon.
- Click on Forward Calls in the drop-down list.
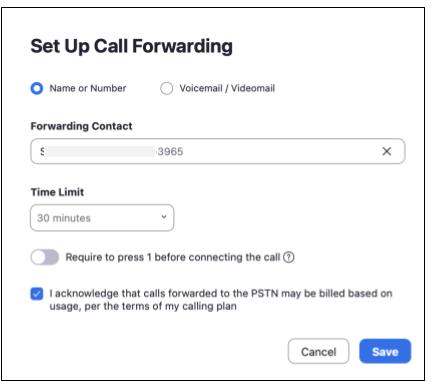
- The Set Up Call Forwarding box opens.
- Choose where you'd like to forward your calls: Name or Number or Voicemail/ Videomail.
- If choosing Name or Number, search for the appropriate Forwarding Contact. This number must be in your Zoom Contacts.
- Select the desired Time Limit: 15 minutes, 30 minutes, 1 hour, 2 hours, or Always.
- If forwarding to a Name or Number, turn off the toggle "Require to press 1 before connecting the call" and click the acknowledgment checkbox.
- Click Save.
In-Call Tools & Features
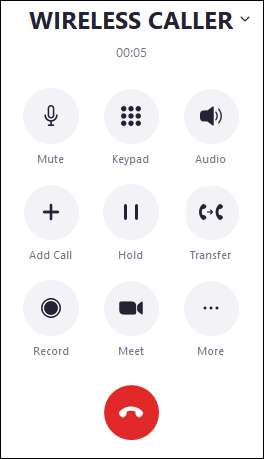
- Mute/Unmute: Mute or unmute your mic.
- Keypad: Display a dial pad to enter numbers during the call. For example, entering an extension number. To see in-call controls click <-Back to Call in the upper left corner.
- Audio: Open audio settings and change the volume of your speaker or mic.
- Add Call: Display a dial pad to enter a number and add another person to the call (three-way call). Each person will remain on a separate line. Click or tap their name or number to switch between each person.
- Hold/Unhold: Place the call on hold or resume the call. The receiving party will hear default music while they're on hold.
- Transfer: Transfer the call to another number or to voicemail.
- Record: Start or stop recording a call. U-M's audio prompt notifies both parties that the call will be recorded and requests that the user presses "1" to give permission for the call to be recorded.
- Contact the ITS Telecommunications Analysts if you need the option added.
- Once recorded, the files are stored in your Zoom web portal.
- Access the Keypad, press 1, then Press Stop Recording to end the recording.
- Meet: If you make a call using Zoom Phone, you can easily convert or elevate the phone call to a Zoom meeting.
- More: The following controls can be accessed by clicking the More icon.
- Park: Park the call for another phone user to pick it up.
- Invite to Meeting: Invite the call participant to a meeting by using the meeting ID.
- Minimize: Minimize the in-call controls while continuing the call so you can continue using the Zoom desktop client or mobile app.
Check Your Voicemail
- Sign in to the Zoom desktop app or mobile app.
- Click the Phone tab.
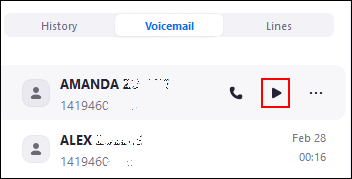
- Click the Voicemail tab.
- Locate the voicemail you want to listen to and press the Play Voicemail button.
Notes:
- You will receive email notifications of voicemails.
- If you're calling your direct number from a desk set or a third-party phone service, you'll need the PIN code you set up during the Day 1 tasks to access your voicemail.
- Refer to Zoom Phone Voicemail for details on setting up or changing your voicemail.
Set Do Not Disturb
- Sign in to the Zoom desktop client.
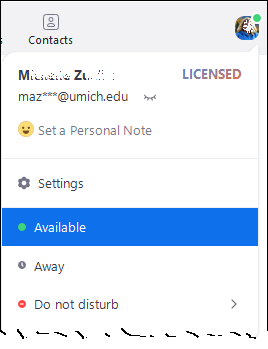
- In the top-right corner, click the photo/initial icon and choose Do not disturb.
- Select how long you want to have Do not disturb enabled. Choices are 20 minutes and 1, 2, 4, 8, or 24 hours. Your phone will not ring for the duration selected. Note: The Set the time period option to set a custom duration is not supported at this time.
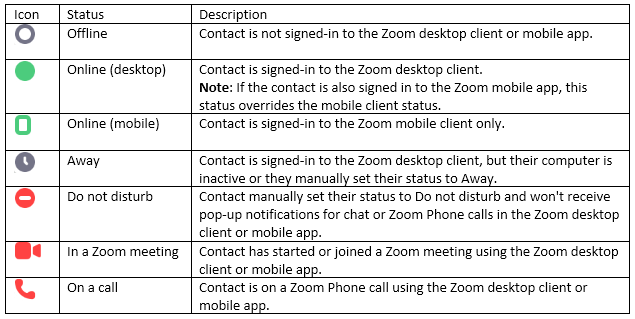
Note: The following icons will appear by your photo/initial icon when using Zoom Phone. You can see your presence status only; other Zoom Phone users cannot see your presence status.
Set Outbound Caller ID
Set your default caller ID in the Zoom web portal. Refer to Zoom Phone Caller ID for more information. The default caller ID cannot be changed on the Zoom mobile app.
Zoom Web Portal
- Log in to the U-M Zoom web portal.
- In the left navigation menu, select Phone.
- Click the Settings tab.
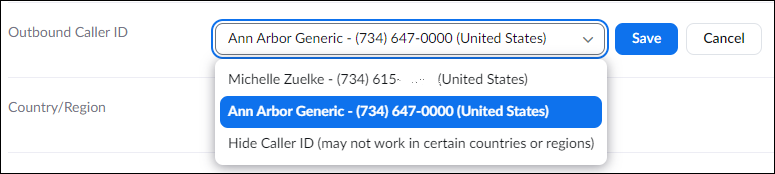
- In the Outbound Caller ID section, click the drop-down arrow.
- Select the number you'd like to display when making an outgoing call.
- Click Save.
Zoom Desktop App

- Open the Zoom app on your desktop.
- Select the Phone tab.
- On the number pad, click the drop-down arrow.
- Select the number you'd like to display when making an outgoing call.
Call Blocking
This section covers how to block a call and how to manage blocked calls.
Block a Number
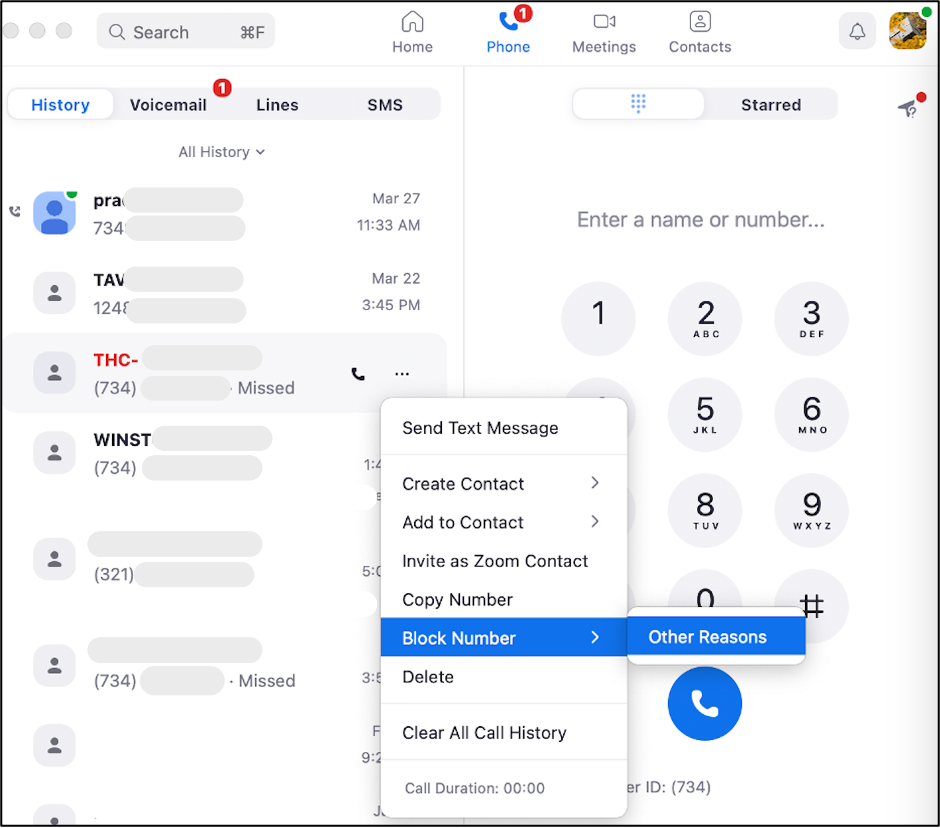
- Open the Zoom app and select the Phone icon.
- Right-click the inbound number or place the cursor over the date/time stamp and select the three ellipses (more).
- Move the cursor over Block Number.
- Select the reason for blocking the call: Spam or Other Reason.
- Click Block.
Manage Blocked Numbers
- Log in to the U-M Zoom web portal.
- In the left navigation menu, select Phone.
- Click the Settings tab.
- Scroll down to the Others setting section and locate Blocked List.
- Select Manage Blocked List.
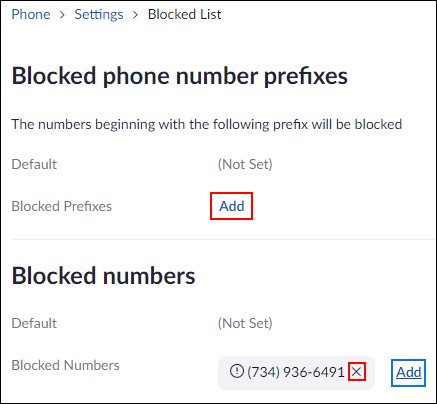
- Clicking Add next to Blocked Prefixes will allow you to enter a specific country and area code to block.
- Clicking Add next to Blocked Numbers will allow you to enter a specific phone number to block.
- Clicking the X next to any number in the Blocked Numbers list will remove that number from the list so you can receive calls from that number again. You will be asked to confirm the deletion by clicking Delete.
Last Updated
Friday, August 22, 2025