Overview
This procedure is a supplement to the rest of the reference materials about completing the Proposal Approval Form (PAF). It covers the overall steps you need to complete when working with Grants.gov in eResearch:
- PAF Worksheet – Grants.gov Submissions
- Complete the Grants.gov specific questions
- Determine if your FOA is supported (all required forms are supported – available in the eRPM system)
- Copy PAF Info to Grants.gov Form Set
- Steps to copy information mapped from PAF to Grants.gov forms
- Complete Grants.gov Forms
- Explains the overall Grants.gov Workspace
- Navigation tips when working with Grants.gov forms
- Assign Editors and Readers (Optional)
- Assign editors if you have Reviewers that need to edit the Grants.gov forms (Must have access to the PAF)
- Assign readers if you have additional individuals who have access to the PAF who need the ability to read the Grants.gov forms (e.g., Ad Hoc Reviewers)
- Validate Grants.gov Form Set
- Level 1 Validation – checks completed required fields
- Submission Pre-check (Recommended)
- Level 2 Validation – checks against Grants.gov validation rules (requirements of Grants.gov forms)
- Generate PDF Version (Optional)
- Steps to generate a PDF version of all information entered on Grants.gov forms with attached documents
- Finalize Grants.gov Forms for ORSP Submission
- Steps to inform ORSP that the proposal is finalized and ready for submission
The Proposal Management and Grants.gov section below provides additional information and explains how eRPM and Grants.gov are connected.
Navigation
Role: PI & Project Team > PAF Worksheet
PAF Worksheet – Grants.gov Submissions
eRPM allows for direct system to system submission for supported Grants.gov opportunities (FOAs).
This section explains how to:
- Select that the proposal is a Grants.gov funding opportunity.
- Select the Grants.gov opportunity.
- Determine if the FOA forms are supported in eResearch.
Refer to Create a PAF: Basics for more information about the other fields on the PAF Worksheet.
- Select Yes in response to question 1.3 Is this a Grants.gov funding opportunity that is available for electronic submission?
Notes- Selecting yes on this question requires electronic submission through either Grants.gov Workspace or eResearch.
- If the Grants.gov forms for this opportunity are not yet supported by eResearch, you still have to submit via Grants.gov Workspace.
- By answering yes, you will be directed to Grants.gov-specific PAF questions.

- Click Continue.
Note You will be redirected to the Federal Grant Information page to look up the opportunity. - Enter the FOA Number.
Notes- Enter the CFDA Number and/or Competition ID to further refine your search.
- Enter the FOA number as specified by the sponsor, using upper and lower case letters, dashes, etc.
- If the FOA number is unknown, search for it on the Grants.gov website.
- If you use the Grants.gov finder, you must return to eRPM to complete your application.
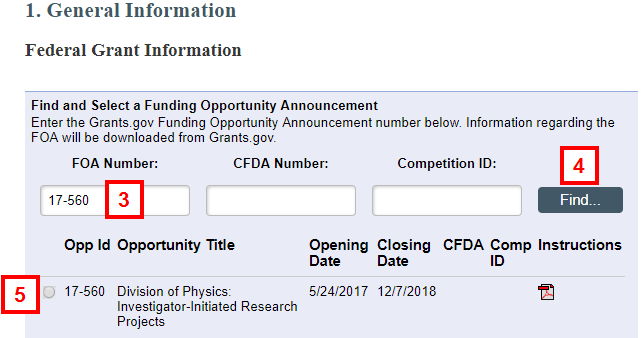
- Click Find.
- Select the applicable Opportunity Number.
- Click Continue.
- Complete the remaining fields on the General Information page using the instructions on the page.
Notes- Verify the default FOA Deadline date.
Refer to Create a PAF: Basics for more information.
- Review the FOA Information.
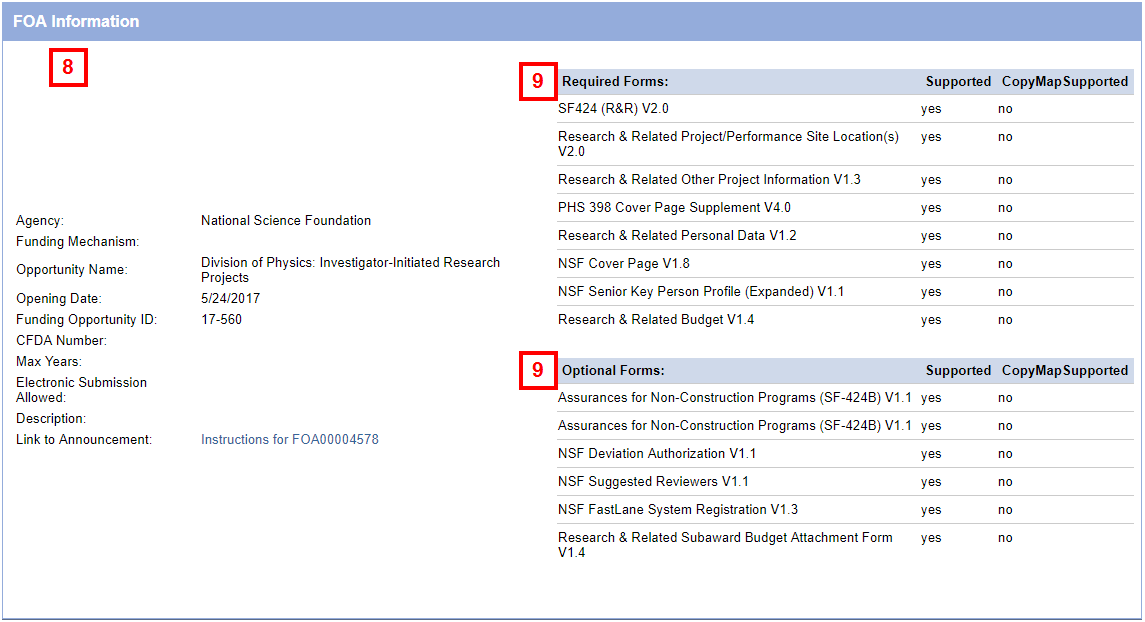
- Determine if your Required Forms and Optional Forms are supported.
Notes- Yes displays for supported forms.
- Supported forms are forms that are available in the eResearch system. Not all Grants.gov forms have been created for eResearch by our vendor Click Commerce. You will find the majority of NIH, NSF, and DOD forms in eResearch.
- If any Required forms are NOT supported, you must submit to Grants.gov outside of eRPM.
- If any Optional forms are NOT supported and you need to use them, you must submit outside of eRPM.
- Click Continue.
- Complete the rest of the pages of the PAF Worksheet using the instructions on the pages. Refer to Create a PAF: Basics for more information.
Notes- Assign rights to Edit and Read Grants.gov forms in sections 2.3 U-M Investigators and 2.6 Administrative Personnel of the PAF Worksheet.
- When a person does not have any Grants.gov rights, they will not see Grants.gov links in the PAF workspace.
- Read permission is required to view SF-424 Summary (either the print version or the PDF version after the PDF version is generated). Accessed from the PAF workspace.
- Edit rights give access to edit the Grants.gov Forms. Accessed from the PAF workspace.
- If all of your required Grants.gov forms are supported, you will notice a delay when you Save or click Continue to save and move to the next page after completing the People page. The reason for this delay is that Grants.gov forms are automatically generated for you in the background.
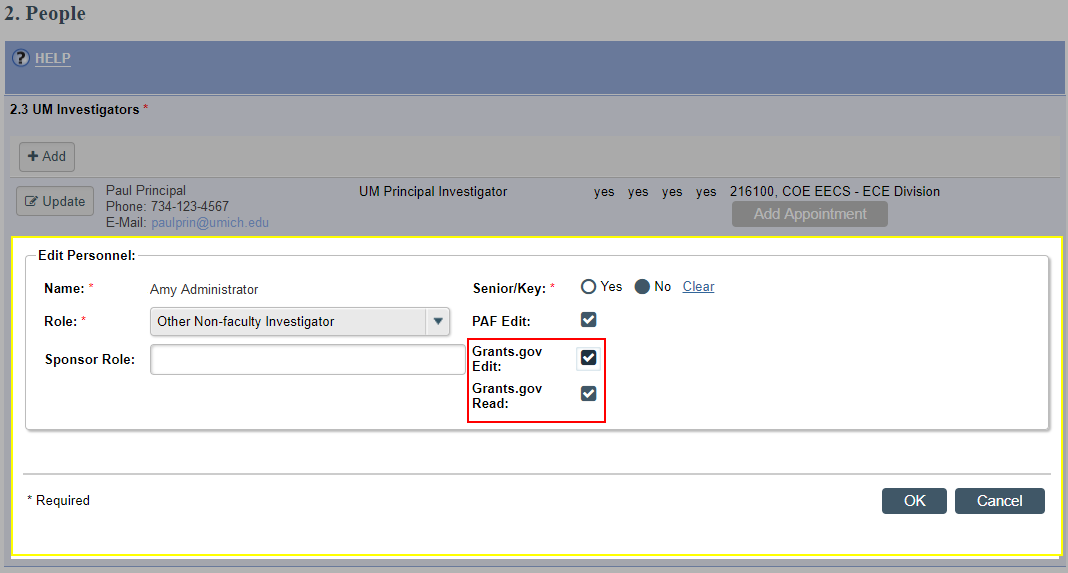
- Assign rights to Edit and Read Grants.gov forms in sections 2.3 U-M Investigators and 2.6 Administrative Personnel of the PAF Worksheet.
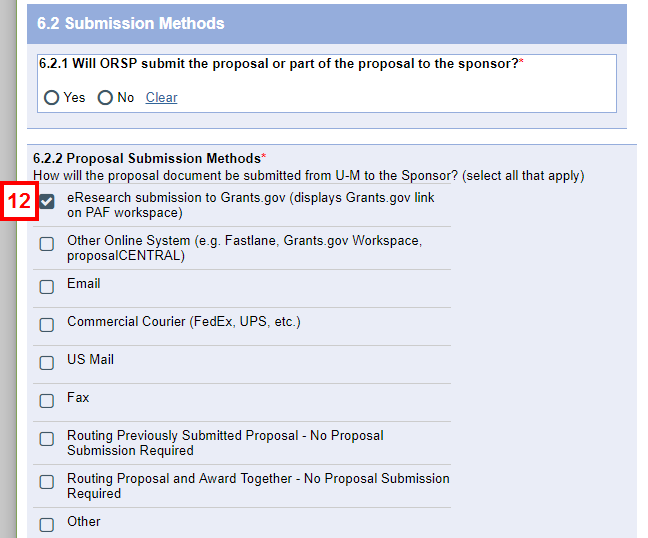
- Check the eResearch submission to Grants.gov box on question 6.2.2 Proposal Submission Methods of the PAF Worksheet.
- Click Save.
- Click Exit.
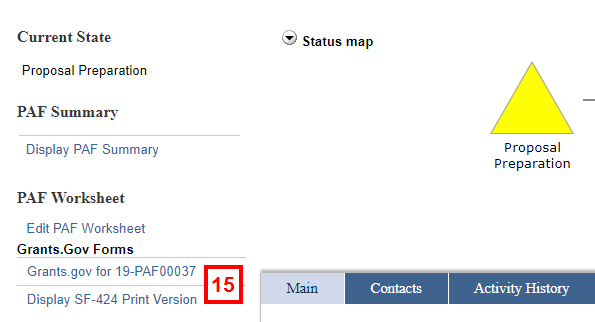
Note Remember to click to Save your changes before exiting. - A link to the Grants.gov Forms displays in the PAF workspace.
Notes- You have not copied any of the information entered to your PAF Worksheet to the Grants.gov forms yet. This is described in the next section.
- The link to the Grants.gov forms includes the ORSP number for your proposal (i.e., 19-PAF00037).
Copy PAF Info to Grants.gov Form Set
Refer to Copy PAF Info to Grants.gov Forms (Automapping) for detailed instructions.
Complete Grants.gov Forms
When completing the grants.gov forms, remember to copy information from PAF Worksheet first.
After completing the forms, you will need to:
- Validate (check that all required fields completed)
- Submission Pre-Check (check that you meet the Grants.gov validation rules (recommended)
- Generate a PDF version to review the information entered (optional)
- Finalize proposal (Required to let ORSP know that the proposal is ready for submission)
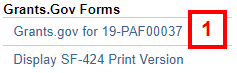
- Click the Grants.gov Forms link in the PAF workspace.
Note As you are completing the Grants.gov forms, individuals with Grants.gov Read access can view a printable version from the PAF workspace, using the Display SF-424 Print Version. After you validate and generate the PDF, the SF-424 PDF is available from the PAF workspace.
- If you have subawards, download the zip file and send to appointees. Instruct appointees to validate the file. Use Import Subaward to upload a copy of the PDF. Upload as many times as needed. PDF must have a Valid for Submission status in order to be uploaded.
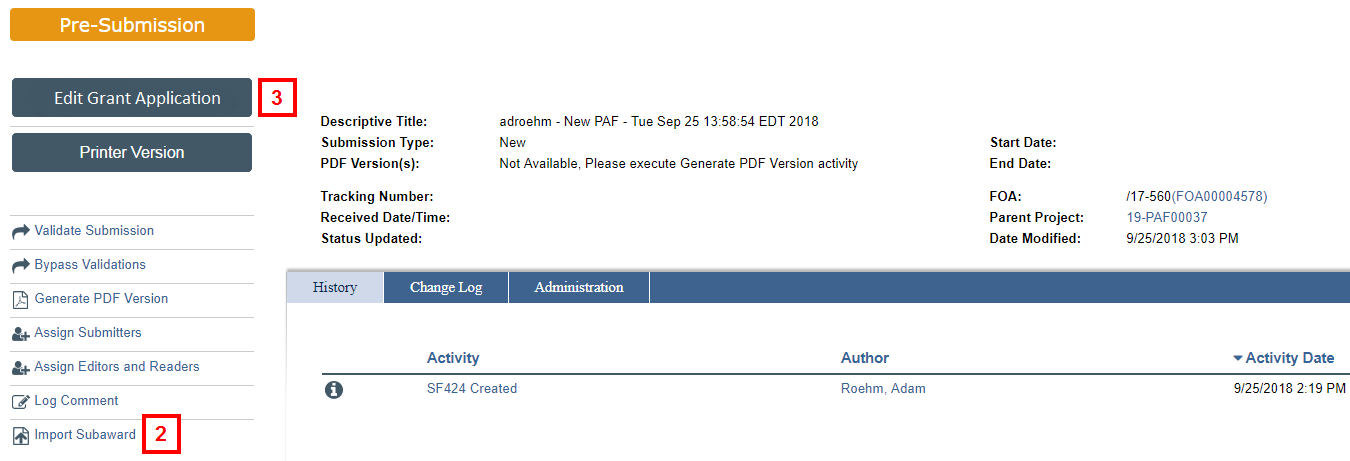
- Click Edit Grant Application to edit your Grants.gov forms.
- Enter the Application Filing Name.
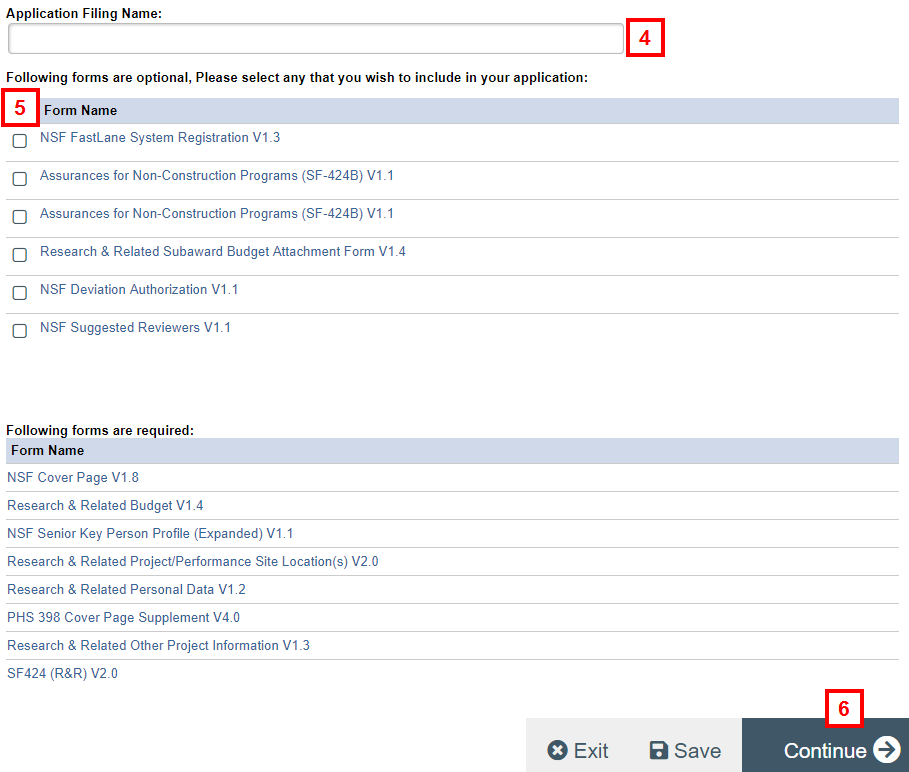
- Check applicable boxes to select optional Forms you want to include in your application.
Notes- When you check a box, the system automatically adds the form to your application and performs two actions:
- The title of the form transforms into a hyperlink allowing you to navigate directly to the form.
- A link to the form displays in the left-navigation Forms menu.
- It takes a few seconds for the system to complete these actions. You cannot select additional forms until the process is complete.
- Required forms are listed below Optional forms.
- When you check a box, the system automatically adds the form to your application and performs two actions:
- Click Continue.
- Complete all pages of the Grant Application.
Tips- Use the left-navigation Forms menu to skip between different pages if you have not completed all required fields on a page.
- Pay attention to submission instructions.
- Position title is pulled from “Primary Work Location” in M-Pathways Human Resources.
Workaround: Change this on the Research & Related Senior Key Person (with Expanded) Profile page. (Unless you completed a Sponsor Title; Sponsor Titles overwrite this field.) - Budget page heading rows include two lines.
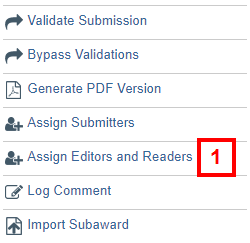
Assign Editors and Readers (Optional)
Assign editors if you have Reviewers that need to edit the Grants.gov forms. (Must have access to the PAF).
Assign readers if you have additional individuals who have access to the PAF who need the ability to read the Grants.gov forms (e.g., Ad Hoc Reviewers).
- Click the Assign Editors and Readers activity.
- Click Browse... to lookup and select Project Readers and Project Editors.
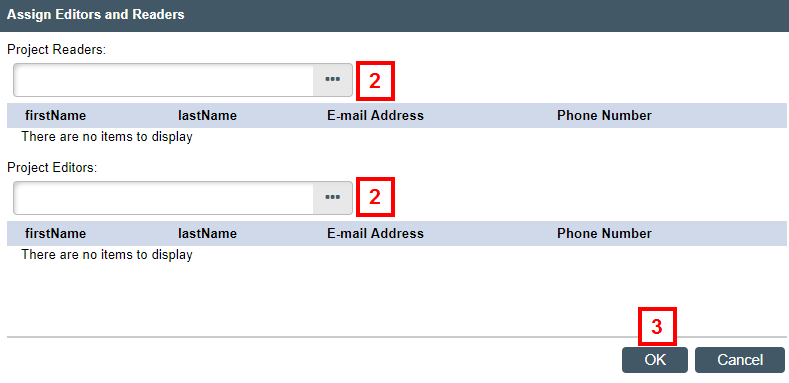
- Click OK.
Validate Grants.gov Form Set
After completing the forms, you will need to validate to check for errors. You must successfully validate (no errors) before you can run the Submission Pre-Check activity or Generate a PDF version.
You are performing a level 1 validation to determine if fields marked with a red asterisk (*) are completed. For NIH proposals, the validation is against NIH rules.
It is recommended that you always complete Submission Pre-Check (level 2 validation) to validate the submission package against the Grants.gov XML schema. As always, the Sponsor will review the application data in greater detail and validate using their criteria.
You must Finalize the proposal before ORSP can submit.
- Click the Grants.gov Forms link in the PAF workspace.
- The Grants.gov Workspace displays and the status of your application is Pre-Submission.
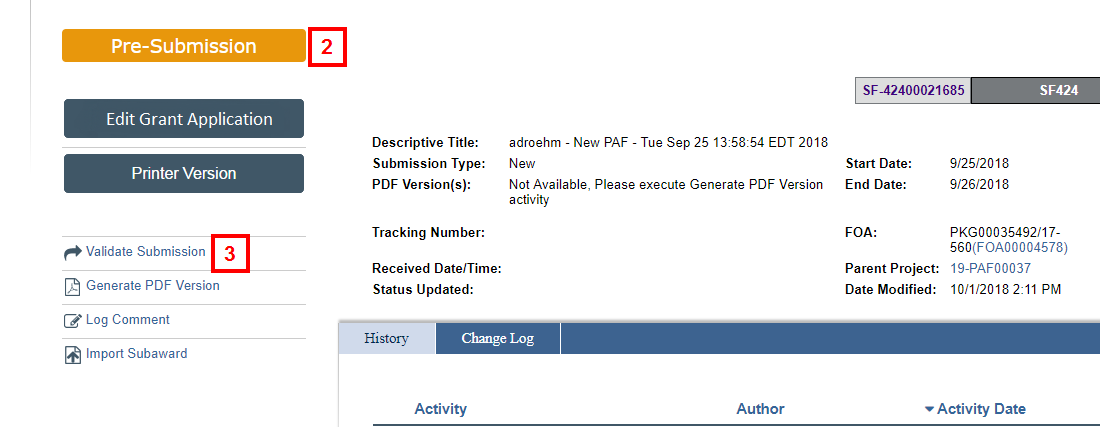
- After completing all pages of the grant application, click Validate Submission.
- If the Error/Warning Messages window displays, review your list of errors.
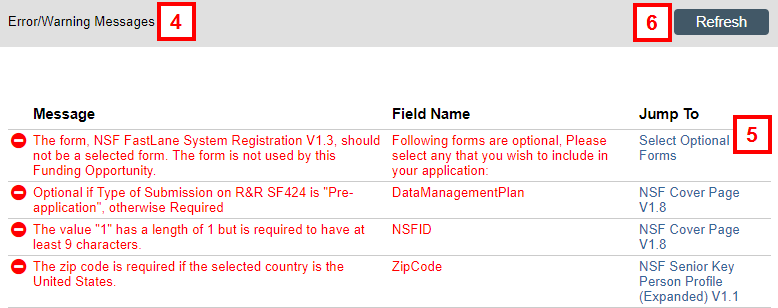
- Correct errors using the Jump To on each error line.
Note Although all errors do not have to be validated, it is recommended that you correct as many errors as you can. Click Save after correcting errors. - Click Refresh to determine if you have corrected the errors.
- Click Validate Submission to revalidate after you have corrected all errors.
- If it is not an NIH submission, check the Skip PDF unique file name check box.
Notes- The NIH’s eRA Commons checks all file names to ensure that each file has a unique name.
- If it is an NIH submission, the checkbox option will not display.
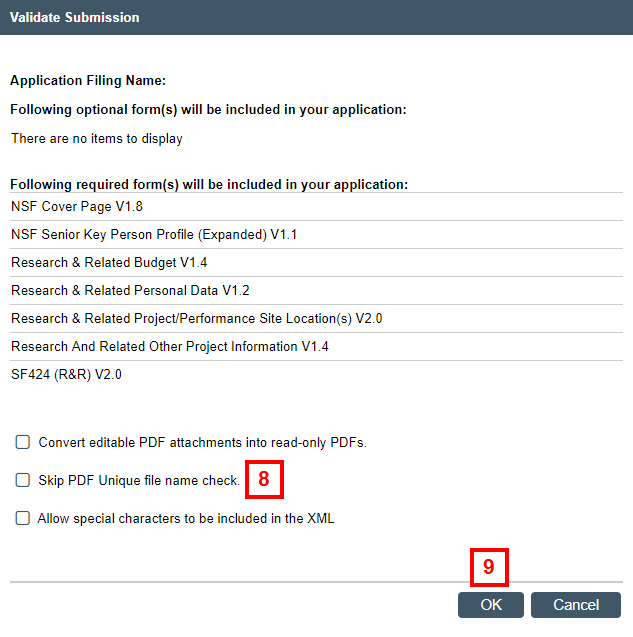
- Click OK.
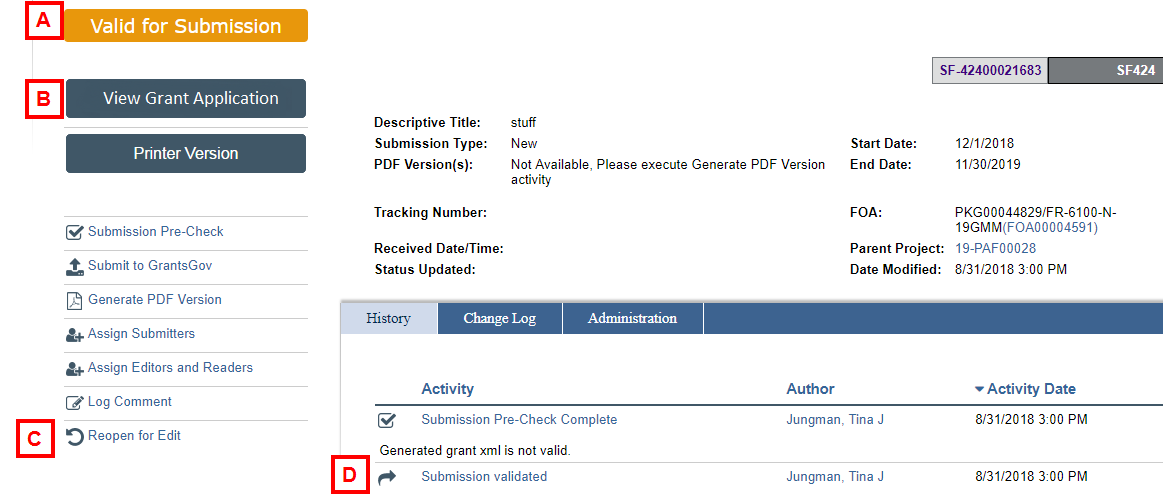
- The Grants.gov Workspace displays.
- The Application Status displays Valid for Submission.
- You no longer have the option to edit the grant application. You can View Grant Application.
- If you need to make changes, click Reopen for Edit. (You will need to validate again after making changes.)
- Submission validated is logged in the History, noting who validated it and when.
Submission Pre-check (Recommended)
After validating (performing your level 1 error check), you can:
- Generate PDF Version to review the final application.
- It is recommended that you complete a Submission Pre-Check to validate your data against the Grants.gov validation rules. You must validate first to transform your data into an XML file that can be read by the Grants.gov validation rules.
- Click Submission Pre-Check.
Note You cannot run the Submission Pre-Check until you have successfully validated. The Application Status must be Valid for Submission.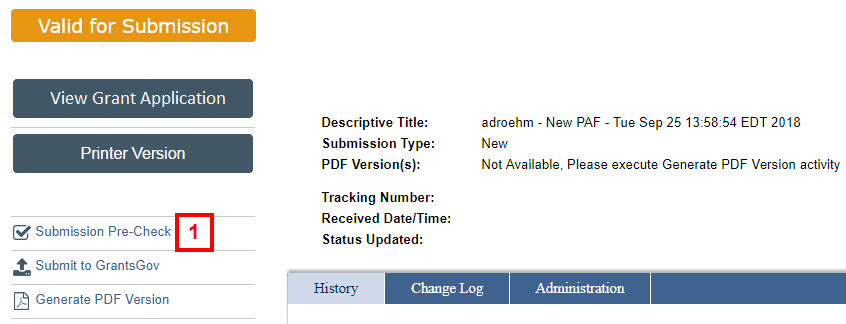
- If errors are returned, re-open the forms for editing, make corrections, revalidate, and then run the Submission Pre-Check again.
OR
If the XML file is valid, double check your sponsor submission instructions to ensure that all sponsor requirements have been met.
I.e., some sponsors require that attached documents (PDFs) must be in a specific order. - Click OK.
Generate PDF Version (Optional)
After validating (checking for errors):
- Use the PDF Version to review the final application.
- Generating a PDF will show the PI/Project Team the final application (all information entered on the Grants.gov forms and the attachments), but it does NOT interleaf the attachments in the correct order.
- The PDF version is not what is submitted. The underlying data entered on the forms and attachments is the application information submitted. It will be submitted in the correct order.
- It is recommended to generate a PDF version for review before finalizing the proposal (letting ORSP know that the proposal is ready for submission).
- If the submission is going to NIH or a partner agency that uses eRA Commons, you can Generate PDF Version.
- Click Generate PDF Version.
Note You cannot generate a PDF version until you have successfully validated.
- If applicable, check the Include Attachments box.
Note It takes longer to create a PDF with attachments. The attachments must be PDF read-only documents.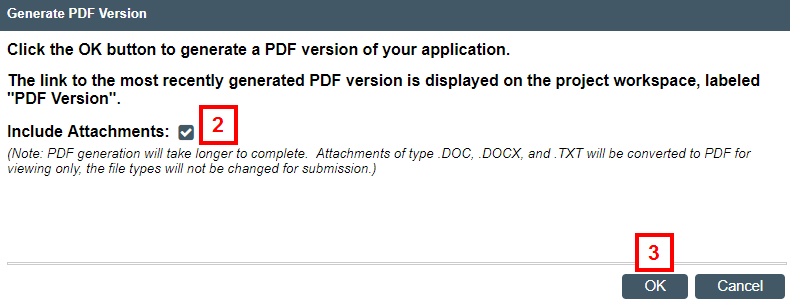
- Click OK.
- Generated PDF Version displays under History.
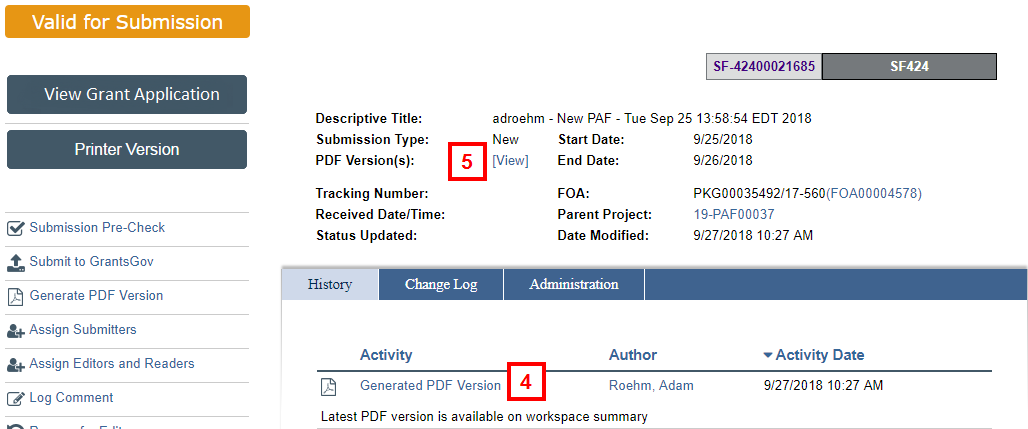
- Click [View] to see the PDF Version.
The PDF version of the Grants.gov application is a copy preview of the eRA Commons application.
When ORSP submits your application to Grants.gov, the actual data you entered on the application and supporting attachments are submitted, not this PDF. It is a system to system transmission of the data you entered. - After generating the PDF version, Display SF-424 PDF is available on the PAF workspace under SF-424 Summary.
Finalize Grants.gov Forms for ORSP Submission
After completing your Grants.gov application, validating your submission, and generating your SF-424 PDF to review your submission, you are ready to finalize the Grants.gov forms for ORSP submission.
Finalize Submission is not available until you route the proposal for approval and the state of the proposal is in Unit Review.
- Click Finalize for Submission to Sponsor under Manage Data.
Notes- This allows you to update/enter information to Finalize the Proposal. You originally saw this page when completing the PAF Worksheet.
- Using Finalize Proposal under Manage Data, you do not need to make changes to the PAF Worksheet.
- Please wait to Finalize Proposal until you are ready for ORSP to submit.

- Check the box to confirm that your Grant.gov forms in eResearch are ready for submission to the sponsor.
Note To be ready for submission they must be complete and validated successfully (no errors). The state in the Grants.gov workspace is Valid for Submission.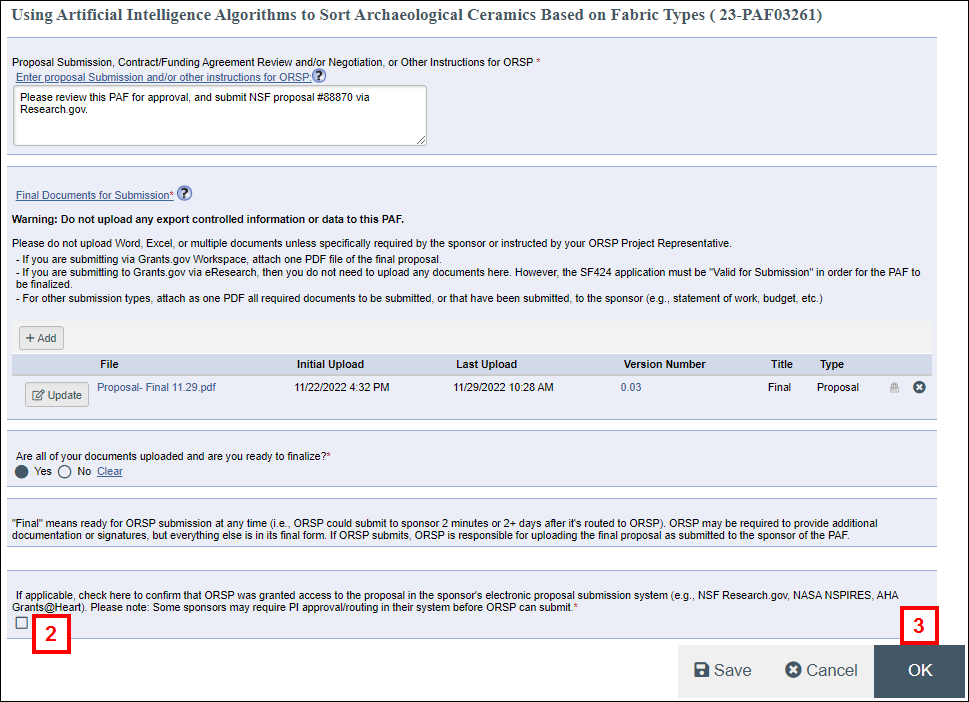
- Click OK to finalize for ORSP submission.
Proposal Management and Grants.gov
How do I determine if the Grants.gov opportunity is available electronically?
While all Federal Agencies must post their funding opportunities in Grants.gov, not all opportunities are available for electronic submission through Grants.gov (i.e., cannot be submitted via Adobe Forms Package or eResearch submission to Grants.gov). If the FOA is not available for electronic submission to the sponsor select "no" to PAF question 1.3 and you will enter the FOA on another page.
To determine if your FOA is available for electronic submission, either:
- On the Grants.gov web site, Search Grants to find the FOA. It will indicate if it is available for electronic submission.
- In eRPM, select "yes" to PAF question 1.3 and enter the FOA on the next page. If you can't find it in Grants.gov, return to this page and select 'No," You will enter the FOA in question 1.7.4 Sponsor Solicitation Number.
Are the forms for my Grants.gov opportunity supported and what does that mean?
Once you type in the FOA Number in you will find out if all required forms are supported and what optional forms are supported.
There are over 200 forms used in Grants.gov applications. Each opportunity has a subset of those forms that are either required or optional. Many, but not all of these forms are supported by the eRPM system. If all the forms you wish to submit (those that are required plus optional forms you want to include) are supported, then you can select the eResearch submission to grants.gov (also known as system to system).
What is the difference between Workspace and system to system submission methods?
eResearch Submission to Grants.gov (also known as system to system)
- This is referred to as the system to system (S2S) submission. This means the data is sent in an XML stream directly from our server to the Grants.gov server. The forms are filled out in eRPM by clicking on the link that appears on the PAF workspace.
Note In order to see the link you must select “eResearch submission to Grants.gov” on the routing instructions screen in the PAF. - This link allows you to edit the application. The forms are the same SF424 forms that you would see if you were filling out the Workspace application.
- A response from Grants.gov regarding the submission status is usually received by eRPM in a few seconds. Busy proposal periods may take a little longer. The proposal status can be viewed in the SF424 workspace.
- Advantages: better error checking, fewer submission errors, and option to copy map.
Workspace Submission to Grants.gov -
Important As of December 31, 2017, Grants.gov officially retired Adobe PDF application packages as a method to apply for federal grants.
- A response from Grants.gov is sent via an email to the ORSP Staff member. This may take anywhere from a few minutes to 48 hours. Responses are generally slower than a S2S submission.
In either case, the same proposal forms are filled out by the PI/Project Team and the same information is sent to Grants.gov. ORSP submits the proposals.
What is Copy PAF Info to Grants.gov (aka copy mapping)?
Copy mapping means that the data entered on the PAF, along with some standard University of Michigan info will be transferred to the FOA forms. Not all forms that are supported by eRPM can be copy mapped. Copy mapping is only available if eResearch submission to grants.gov submission method is selected.
Who can I contact for help with Grants.gov forms?
For submission or sponsor specific questions, contact an ORSP Staff member. For technical support, contact the ITS Service Center.
Related Links