Overview
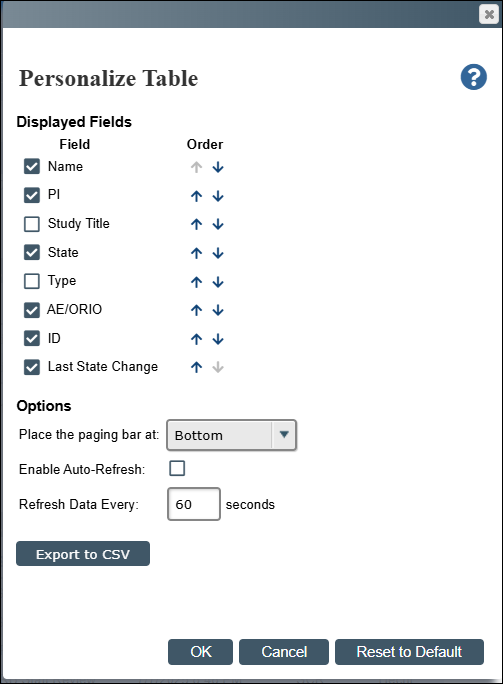
In addition to filtering information in a table to search for an entry or a list of related entries, you can further personalize how data is displayed in a table using personalization. Available on project listers, activity logs, and custom searches, you can use this feature to choose to:
- Show or hide fields in a table
- Change the order of fields
- Change the position of the paging bar
- Auto refresh the table data
- Export table data to a Comma Separated Value (CSV) format for analysis and reporting
Notes
- Logging out of the system will not affect your saved preferences. The personalization preferences you select are saved in your browser and they will only go back to the default when you reset them or delete the browser cache.
- Any customizations you make only affect your view of the lister. Anyone else who accesses the same lister will not see the same customizations.
Step-by-Step Process
To personalize how data is displayed:
- Click the Gear
 icon.
icon.
Note The Gear icon is only available if personalization features are enabled on that table.
To hide or show fields:
- To hide a particular field in the table, uncheck the box next to the field name.
Alternatively, check the box next to the field name you want to show in the table.
Note By default, all the field name check boxes are selected. - Click OK.
To change the order of fields:
- In the Order column, click the up arrow next to a field name and the field moves one level up, which corresponds to one column left in your table.
Alternatively, click the down arrow next to a field name and the field moves one level down, which corresponds to one column right in your table. - Use the up and down arrows to arrange fields the way you want them displayed in the table.
- Click OK.
To change the position of the paging bar:
- Click the Place the paging bar at dropdown and select where you want to display the paging bar.
Note By default, the paging bar always displays at the bottom of the table listing (e.g., < page 1 of 2 >). You can change it to display at the top or bottom or both. If you have an extensive list, then having the paging bar at both (top and the bottom) helps in viewing the data across pages and controlling the number of items displayed on each page. - Click OK.
To enable auto refresh of table data:
- Check the Enable Auto Refresh box if you want the system to refresh data in the table automatically.
Note If you do not check this box, data will not be refreshed until you have an interaction with the page. - In the Refresh Data Every field, enter the time in seconds to specify how often you want the table data to refresh.
- Click OK.
To export the table data to CSV:
- Click Export to CSV.
Note Using the personalization options you have currently selected, the entries in your table get exported to a CSV file and downloaded to your system downloads folder. From there, you can open the file with Microsoft Excel to view and manipulate the data further.
To reset to default:
- In the bottom right corner of the form, click Reset to Default to go back to the original default table settings.
Last Updated
Wednesday, December 10, 2025