
Content
Overview
Contact Center Supervisor at the U-M can access ConnectPath dashboard to manage agents, receive and make calls, view call status, schedule Adhoc / Holiday queue closings and access Real Time and Historical Metric for Amazon Connect Contact Center.
Log Into ConnectPath
-
Supervisor can access ConnectPath Dashboard via the following browsers only: (1) Google Chrome (2) Firefox. You must have microphone access allowed in the browser.
-
All Supervisors must change their status to “Offline” and log out of the system at the end of the day. Make sure you close the window or the tab in your web browser when you sign out as well.
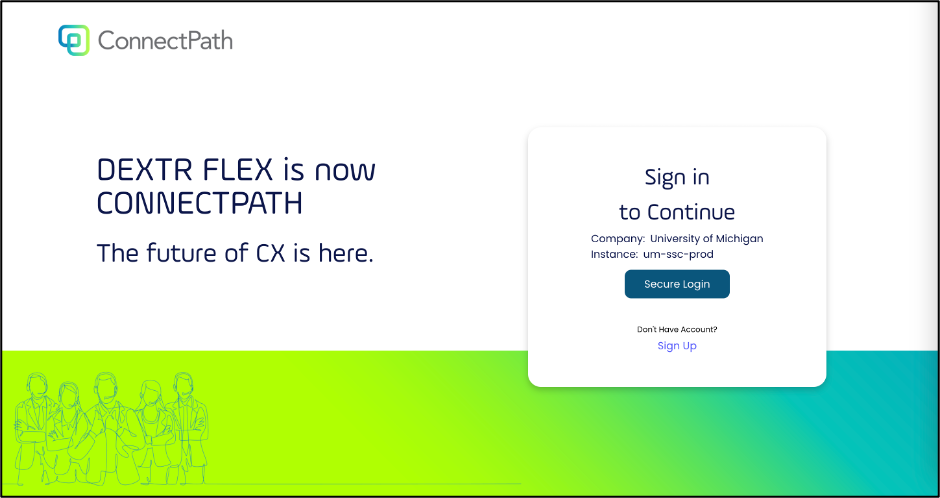
- Navigate to ConnectPath.
- Click Secure Login, you will be taken to the U-M Weblogin page. Log in with your U-M SSO credentials.
- When logging in for the first time, you will be prompted to allow microphone and pop-ups in the browser.
- A new pop-up window will come up to prompt a login into Amazon Connect instance
- Enter your U-M credentials and click “Sign In”
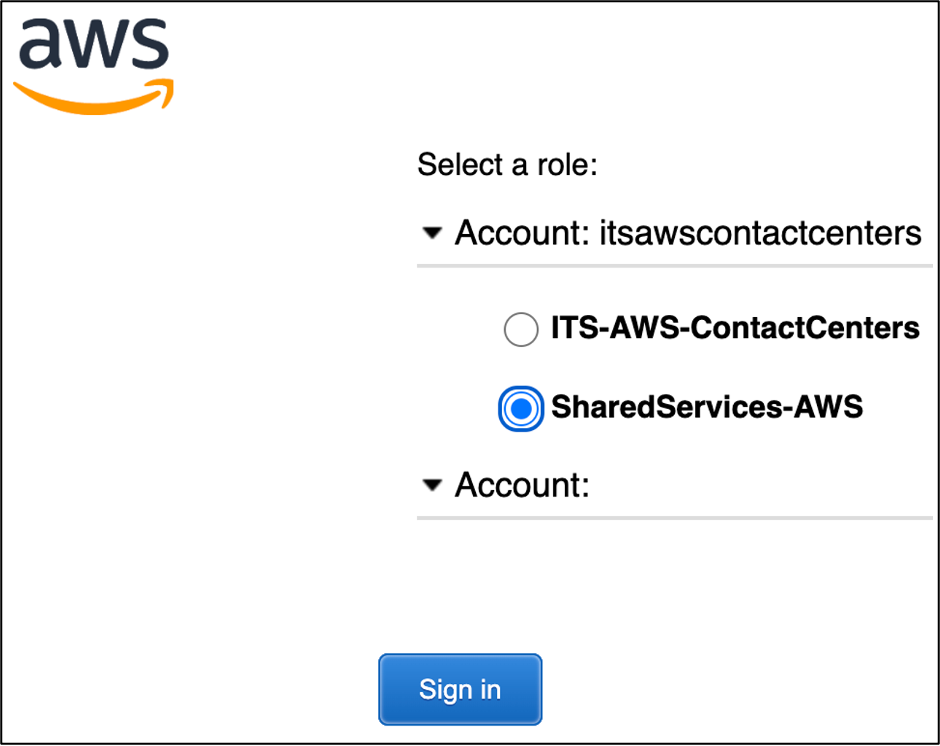
- Once you log in, you will have the option to click on “Go to Application”. Note: Make sure you are not logged into Amazon Connect in any other browsers or Tabs.
ConnectPath Dashboard
Once you enter the ConnectPath dashboard, you can see:
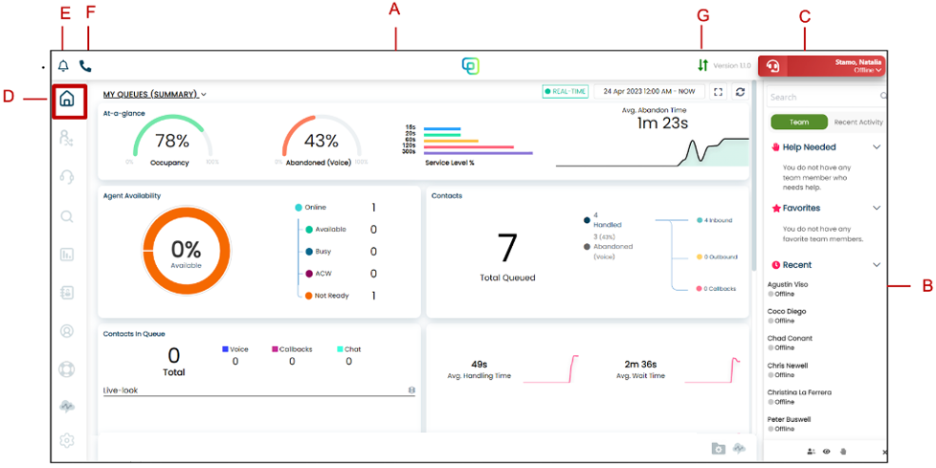
- A- Header is a global section of ConnectPath that will always be on display. You’ll see your Status, a Handset, a Bell and the Instance logo.
- B- Team Status Drawer in the right corner. It displays Your status and User Status of other supervisors and agents.
- C- Your Status in the right corner at the top of the screen. You have predefined list of statuses to select from:
- Available
- Custom status for break/lunch..
- After Call Work: Important: once you end a call, you will automatically be placed in a ACW mode (status will still display Available) until you close the contact. In this mode, you will not be able to accept calls until you close the contact. No calls will be routed to you until your are available.
- Offline. Important: By default your status is set to Offline on login, so remember to change your status from Offline to Available to be able to receive/answer calls.
- E- Announcements displays all the announcements related to your queue. You can post announcements by clicking the pencil icon in the bottom side, or delete them by clicking the trash icon.
- F- Handset is for quick dial and you can input a phone number to make a call.
- G- Network Speed- shows the network speed and helps diagnose any issues related to call dropping or quality.
Home
- D- Home Dashboard and Widgets in the left navigation bar. Clicking on a queue name in the dropdown will show the metrics for that specific queue while the Global view summarizes all queues.
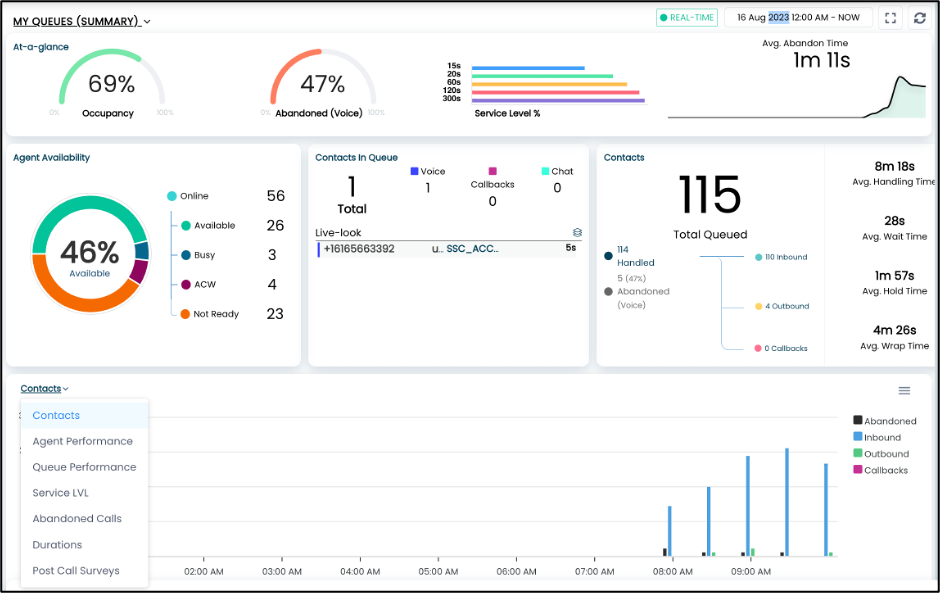
- This area includes:
- At- a- Glance
- Agent availability
- Contacts in Queue
- Contacts
- Agent Performance
- Queue Performance
- Service LVL
- Abandoned calls
- Duration
- Post Call Surveys
- Real Time and Historical Metrics: By default this area displays the real time metrics for all queues in near real time activity. Find a calendar at the top right side of the dashboard and switch between Real Time and Historical metrics.
- 2 icons at the top right corner, one for entering full screen mode and another one to rearrange your card placement.
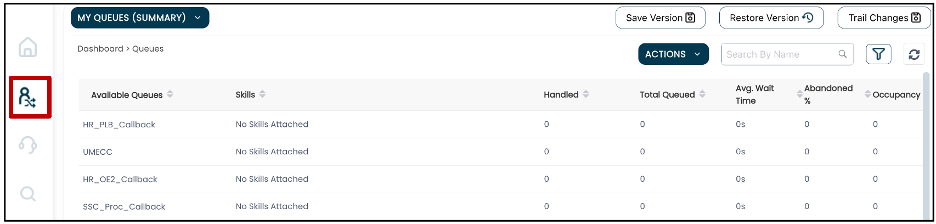
Queues
This tab allows you to view the current state of available queues, agents associated with those queues (via routing profiles), and change, if needed, the routing profile that one or more agents of those queues are associated with.
- Click Save Version to create a snapshot of the current agent, routing profile and queue configuration. The purpose of Saving a version is to allow you to restore the saved version in the event you wish to undo a change made through the feature.
- Define Skills by selecting Actions -> Create Skills.
- Click Actions-> Assign Skills to assign one or more skills to a queue.
- Assign that skill to one or more agents. to do that, while in the Agents view, select Actions-> Assign Skills.
- Use the skill as a filter. click the Filter icon to filter and view queues by skills. For more details, view: ConnectPath - Queue Management
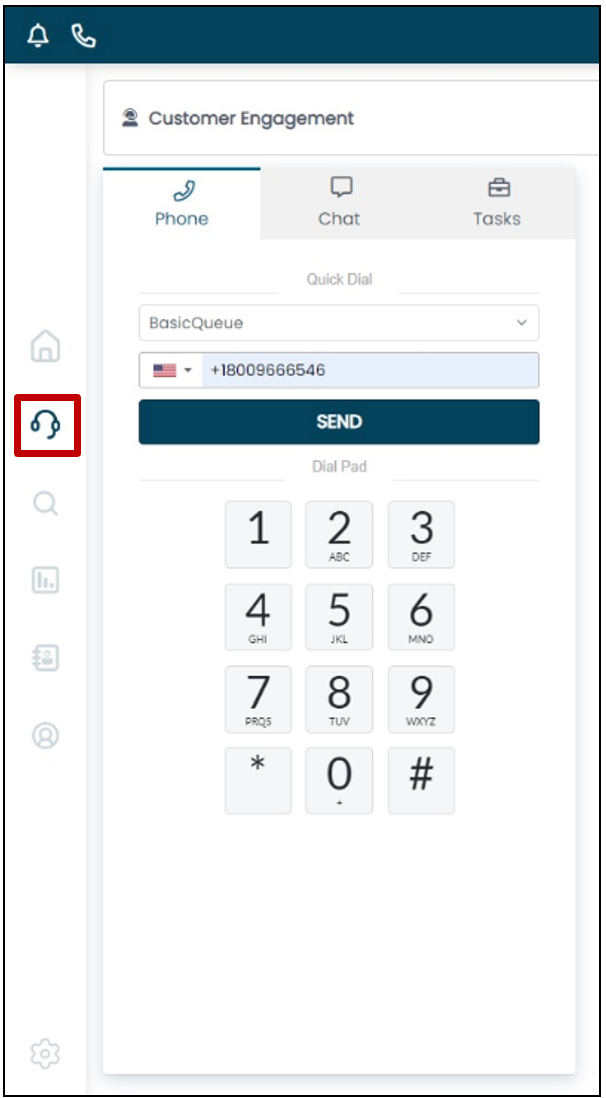
Customer Engagement
It’s the place where you can interact with customers, however, we recommend that you use Amazon Connect CCP instead to interact with customers if needed. Engagement tab includes:
- Phone Tab: To make a call or do call transfers. It also displays the details of incoming calls in the Customer Profile area.
- Note: Chat & Tasks: These features are NOT currently available for supervisors.
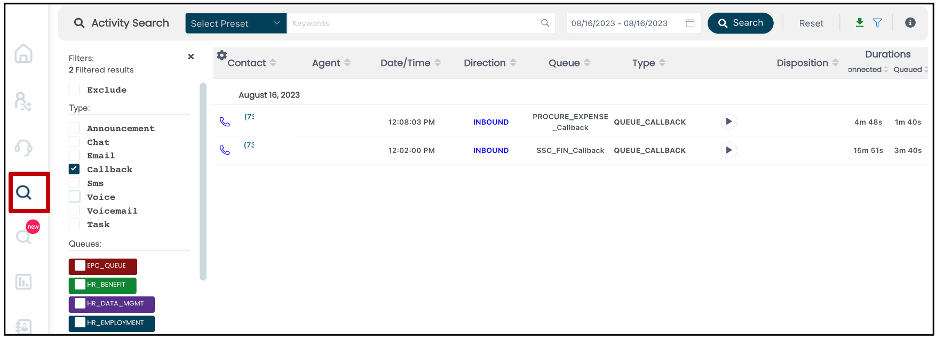
Activity Search
The Activity Search dashboard is the instance history of phone calls.
- Use Date Range, and Keyword Filter located at the top / header of the Activity dashboard to display specific call activities in-between 2 particular dates.
- Use the Filter bar, at the left corner to search and filter by:
- Type.
- Queues.
- Users.
- Dispositions.
- Initiation method.
- Click the Export Activity button at the top left corner to export your activity results (this includes filters applied). Note: Once created, the activity results will be displayed in the reports page.
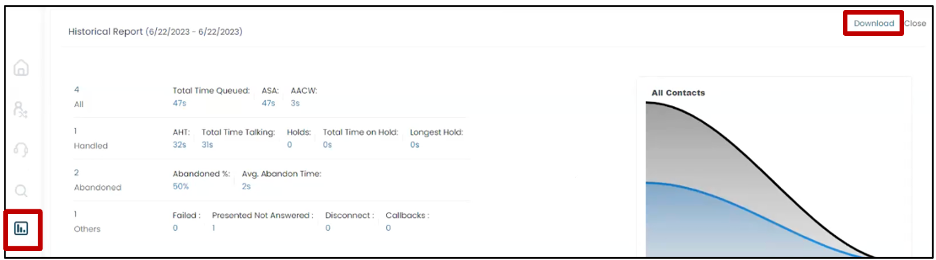
Historical Reports
From this tab you can create, schedule, and export (Download an Excel file) historical reports without any restrictions on time period. Reports can be run and downloaded immediately or scheduled to be run monthly or yearly (Daily reports can be schedules to be run hourly or daily).
To create a report:
- Click Create Report button at the top right corner of the dashboard to build an historical report.
- Fill out the Name, Report Period, and language fields.
- Click on the Run report now button. You can also filter reports by Queues.
- You can toggle on Schedule button to schedule the release of reports (by day, week, month) and set up the delivery of these by sending a notification to an Email.
- Click Create
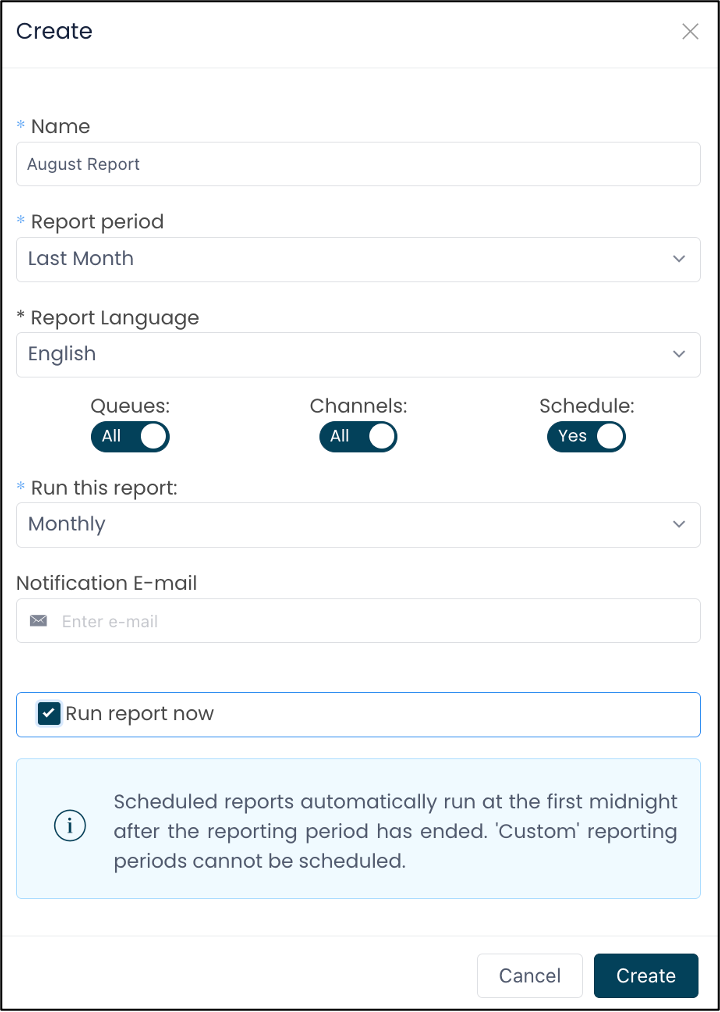
- Click the download button to download an Excel file of your report.
Directory
Manage Users
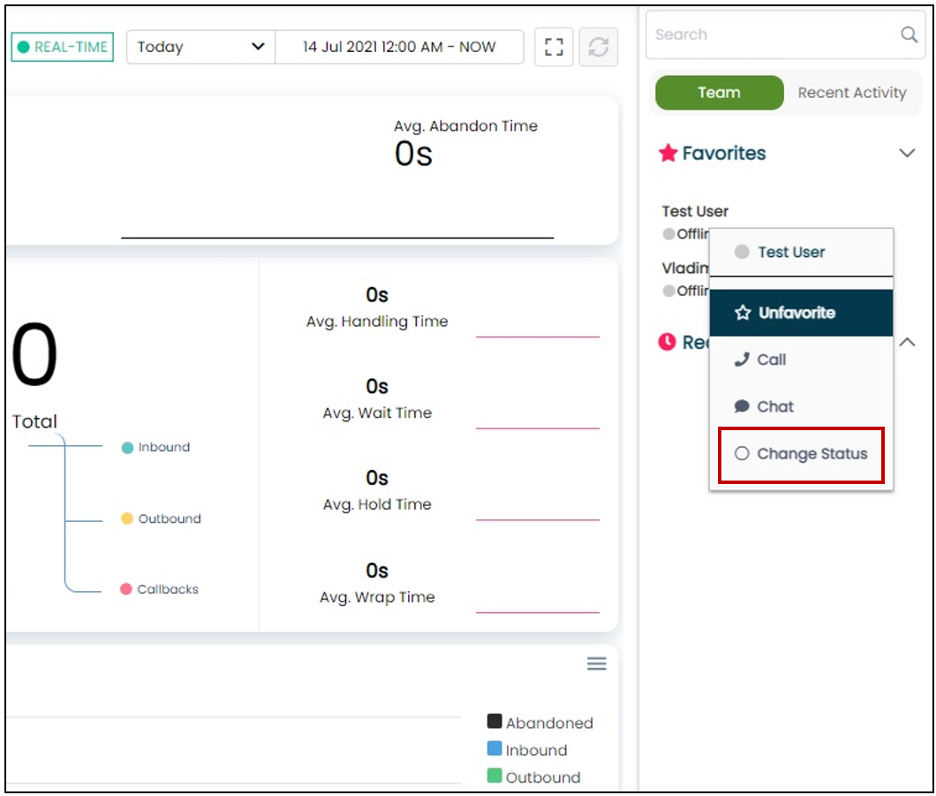
Change Agent Status
Supervisors can manually change the availability status of an agent in ConnectPath or Amazon Connect. This overrides what the agent has set in the CCP. To change the status of an agent:
- Log into ConnectPath Dashboard
- Navigate to Team Status Drawer.
- Right-Click the Agent's name and select "Change Status" then select the desired status (Available, Offline, etc..).
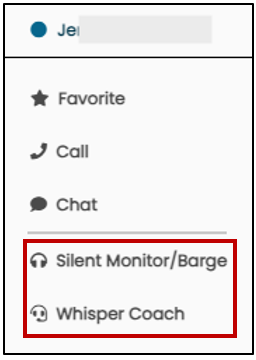
Silent Monitoring and Whisper Coaching
As a supervisor, you have the option to silently monitor your agent calls and join the calls if needed to take over or provide Whisper coaching (without the caller hearing your conversation with the agent).
- Log into ConnectPath Dashboard
- When an agent is on call, you'll see the Connected status in the Team Drawer,
- Right click the agent name and select one of the options:
- Silent Monitor/Barge allows you to silently hear the call between the agent and the contact.
- Whisper Coach allows you to whisper/speak with the agent without the contact being able to hear you.
-
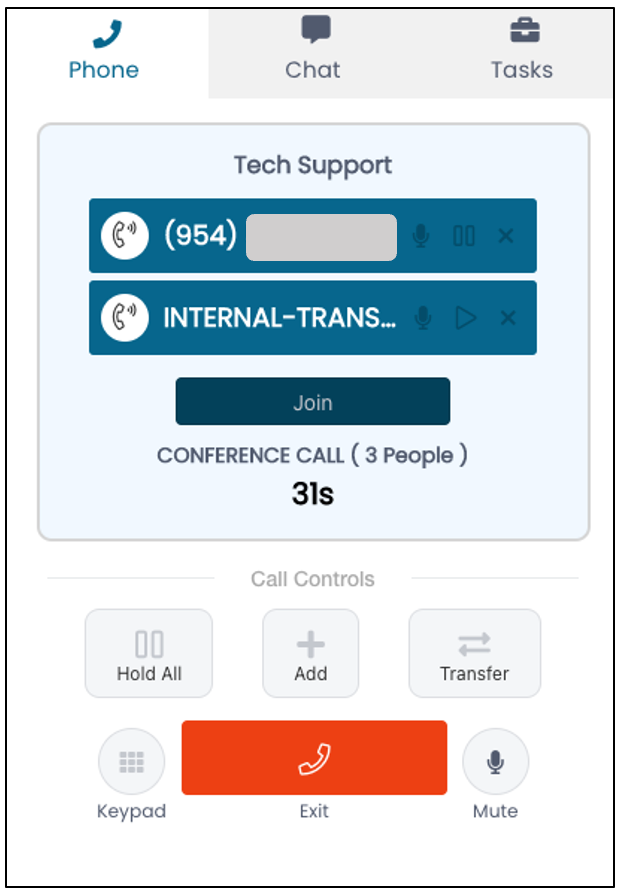
Upon Clicking Silent Monitor/Barge, you will see the following on the Engage Page, receive an Auto-Accepted Contact and be placed in a busy status. You may then click Exit to end the Silent Monitor session or Barge to introduce yourself into the call, as if you were conferenced in.

- Upon clicking Barge, you will see the following options in the screenshot below:

Note: The Exit button turns into End Call, and additional options are enabled for you again, enabling you to participate in the call as if you were conferenced in.
- When you enable Barge, the agent will note their Engage page changes as well, again, as if you were conferenced in, however, the agent may proceed to handle the call as if it were any other conference call and additional actions are not required on behalf of the agent.
Support
This tab provides helpful information about the System Requirements, Release Notes, Best Practices, and some Troubleshooting tips to resolve any issues you might encounter. Diagnostics and Ticket Management are not applicable for Shared Services Center.
Amazon Connect Link
To access Amazon Connect Dashboard, click the AWS icon in the left navigation of ConnectPath and select Real-Time metrics or other Amazon Connect links.
Settings
From the Settings tab
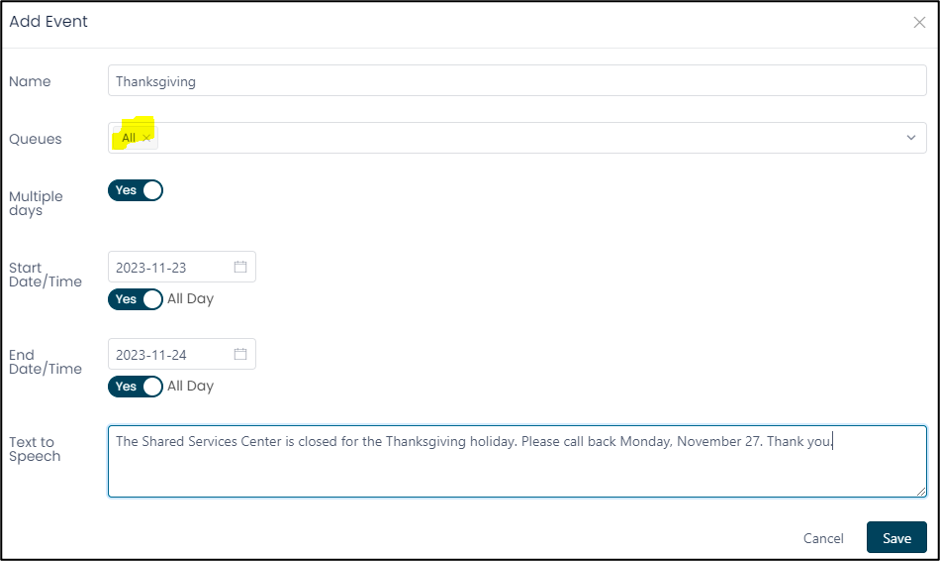
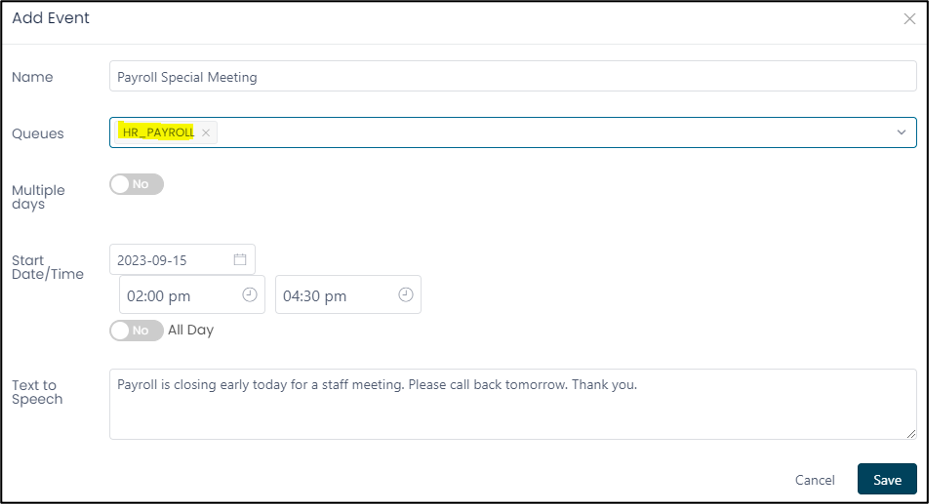
Schedule Adhoc / Holiday queue closings
From this tab you can schedule, edit or delete Adhoc / Holiday closings for your contact center. To establish holiday and “Ad Hoc” queue closings:
- Click +EVENT button
- Enter Name, select a Queue, and then select if this is a single day or multiple day event by clicking the All day switch.
- Select specific date and start/end time.
- If needed, enter a TEXT to SPEECH prompt which will be played to the caller during the closed period.
- Click Save.

The screenshot below shows an example of how to shut down the entire call center for the next University Holiday:
The screenshot below shows an example of how to close a call center early:
Additional sections under the Settings tab include:
- My Preferences- to modify user information and ringtone.
- Post Call Surveys - not currently available.
- Connect- to provide direct links to Amazon Connect native features such as User Management and Agent hierarchy.
- Scripts - not currently available.
For details, see Connectpath Settings
Learn More
Find more information at: