Overview
The Chartfield Change Request form is an application within the Service Request System (SRS). This application allows you to make or request a change to existing Chartfields for phone line services.
Using the Application
- Navigate to the Service Request System and log in with your U-M Credentials.
- At the top of your SRS dashboard, select Chartfield Change Request from the Permissions & Billing drop-down list.

- Select one of the two options available:
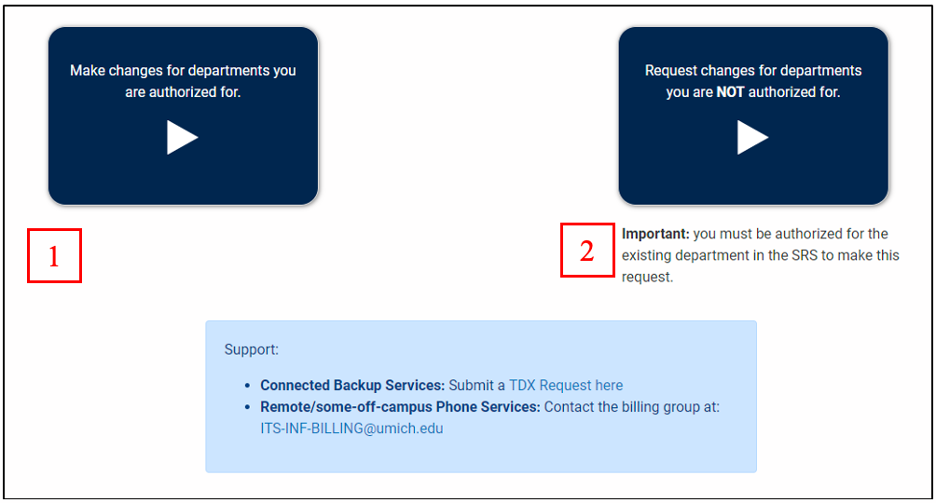
Chartfield Change Request: Make changes to phone services for existing departments you are authorized for
The Chartfield Change Request form allows you to make changes to current Chartfields for phone line services managed by departments you are authorized for. Follow the steps below to make changes:
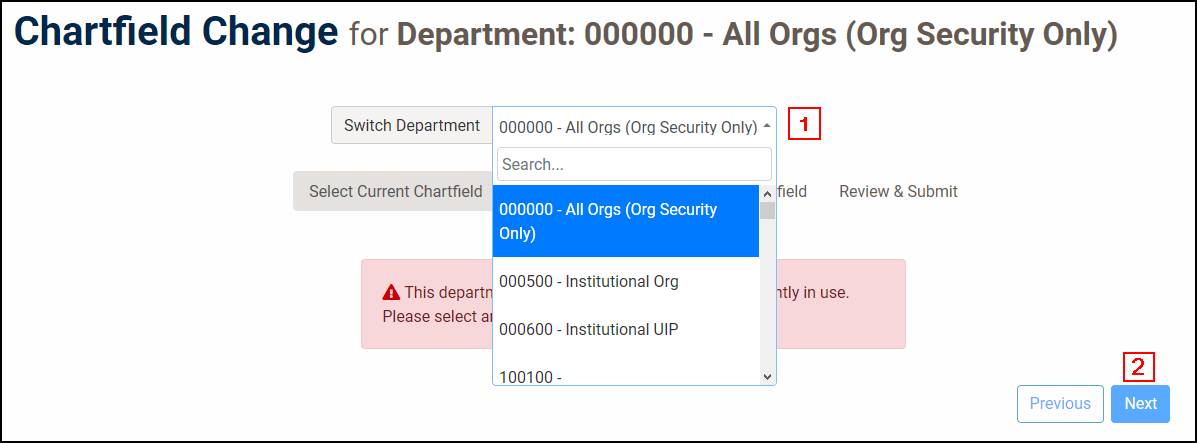
1. Select Existing Chartfield
This page allows you to select the departmental Chartfield(s) that existing services are being billed to.
- Click the drop-down arrow in the Switch Department box to select the existing department that services are being billed to.
- Click Next.
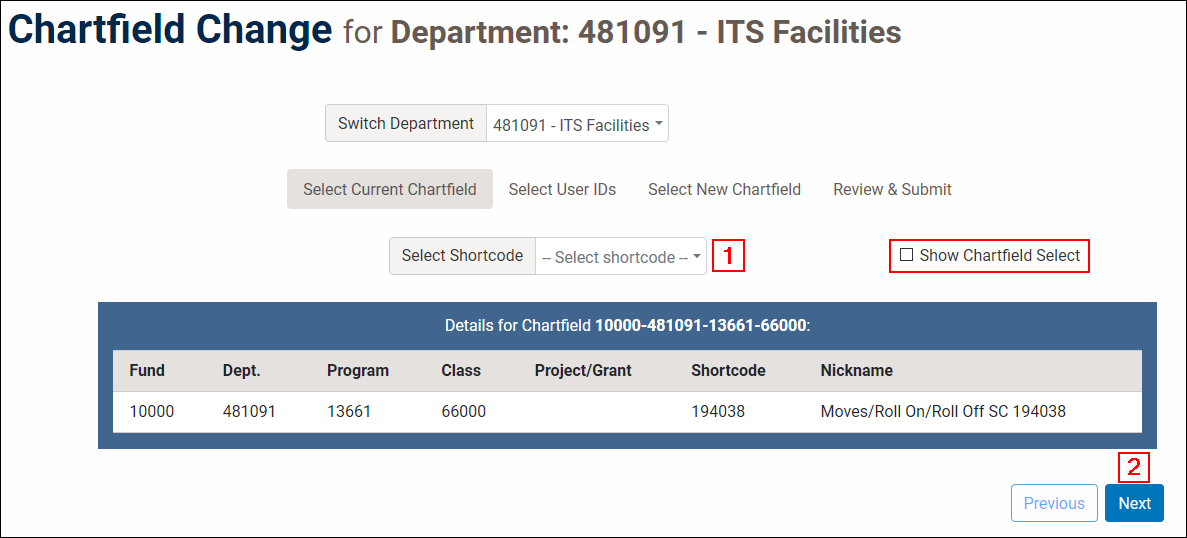
2. Select Existing Shortcode
This page allows you to select the departmental shortcode for Existing services.
- Click the drop-down arrow in the Select Shortcode box to select the correct departmental shortcode for Existing services.
- Note: If the shortcode you're looking for is not visible, click on the Show Chartfield Select box to see more details.
- Click Next.
Important: You can only choose Chartfields for which you are currently authorized. If you are not currently authorized for the correct Chartfields, follow the process found here to request the changes.
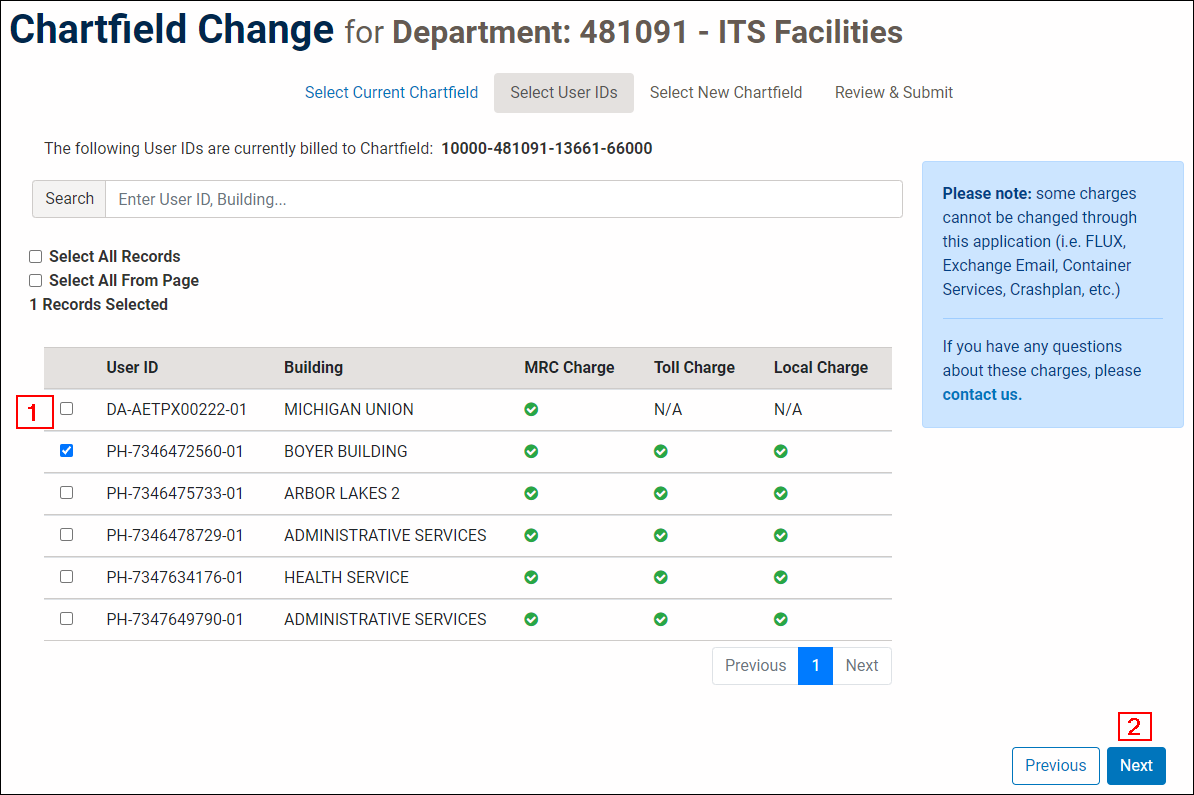
3. Select User IDs
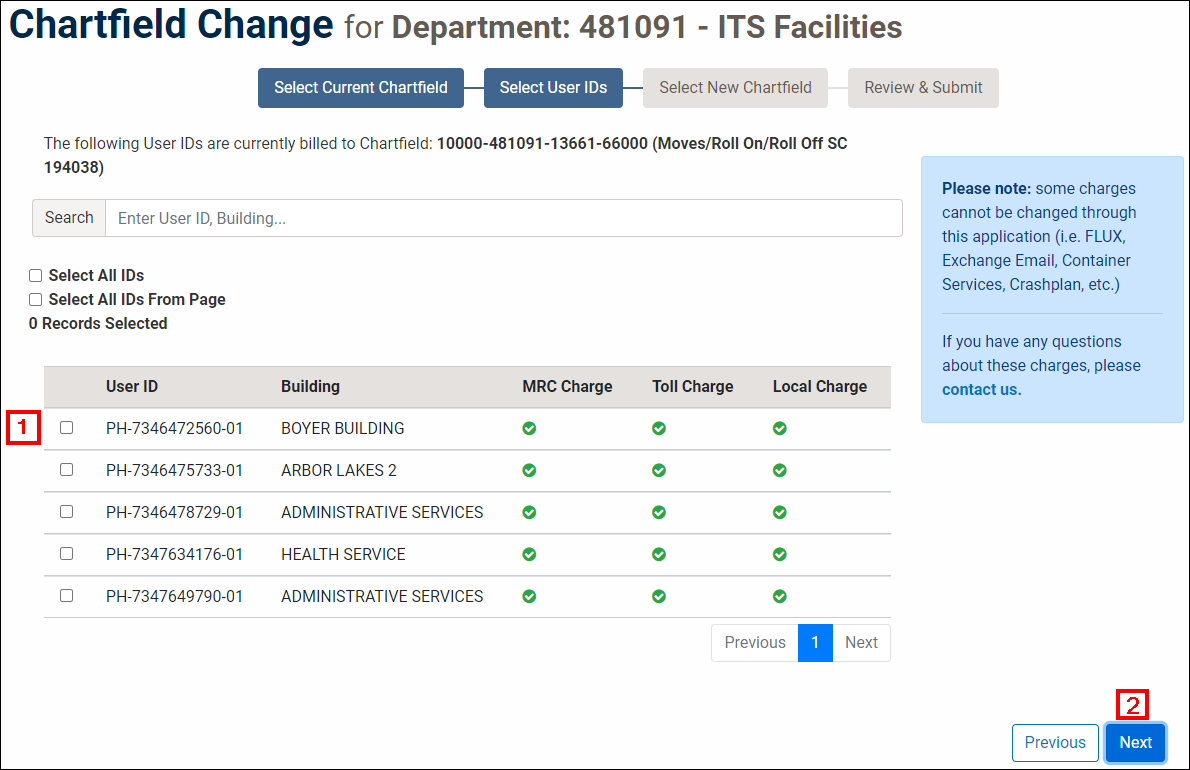
This page provides you with a list of the user IDs associated with the Chartfield selected on the previous page.
- Select the user IDs which need to be changed by checking the box beside each one. Alternatively, check the box for Select All Records or Select All From Page, if applicable.
- Click Next.
Notes:
- To search for a specific set of user IDs or buildings, use the Search box.
- Toll and local charges are only available for user IDs with Phone Lines (PH) and AuthCodes (RA). User IDs with anything else (e.g., DA) will only include a Monthly Recurring Charge (MRC).
- If a service has Toll/Local/MRC charges billed to a different Chartfield than the one that was selected, it will be indicated by a red “X” icon. Alternatively, if a service has Toll/Local/MRC charges billed to the selected Chartfield, it will be indicated by a green check icon.
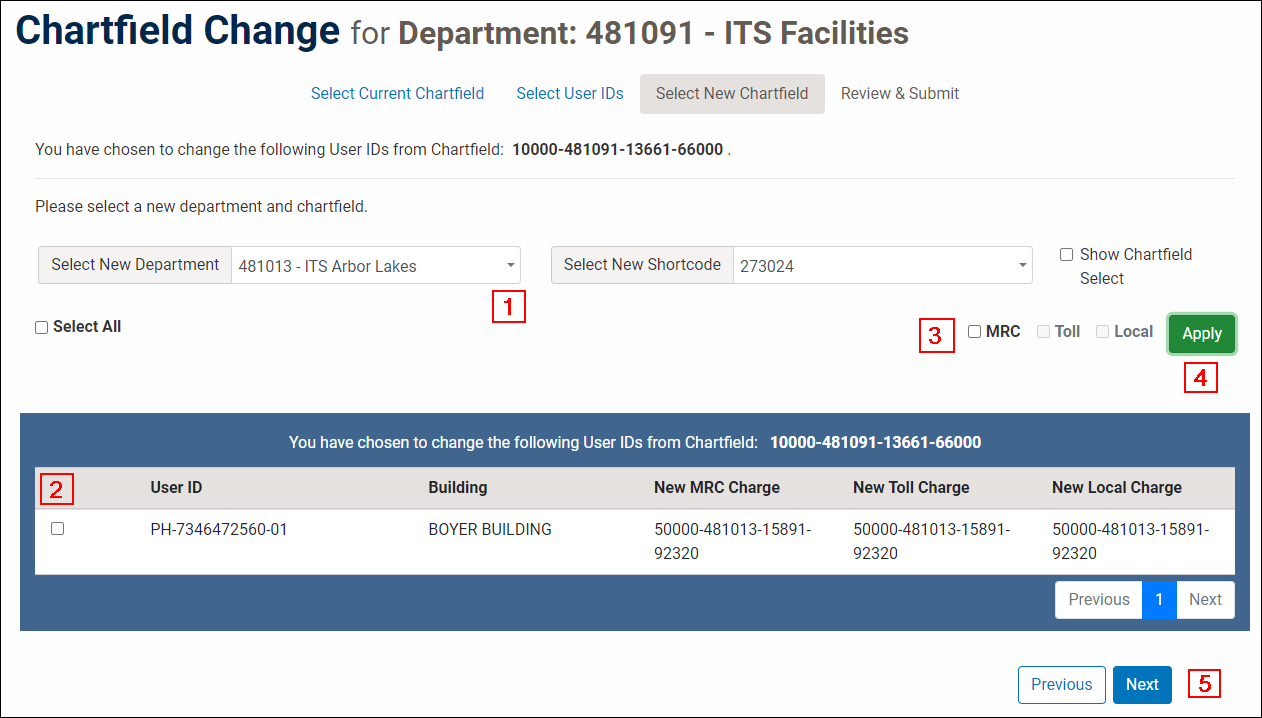
4. Select New Chartfield
This page provides you with the ability to select a new Chartfield where you want existing services to be billed to.
- Use Select New Chartfield to choose a new Chartfield from the drop-down list.
- Note: You can optionally choose to select a different department from the drop-down list other than your own next to Select New Department. However, most users will want to keep their current department.
- Check the box(es) beside the user IDs you wish to reassign. You can pick and choose where the charges go for different user IDs as you move through the list.
- Check the box(es) for applicable charges (i.e., MRC, Toll, and Local).
- Click Apply after each reassignment. Notes:
- You can specify a new Chartfield or keep the same one as before.
- Toll and local charges will be greyed out if the user ID(s) selected do not include a “PH” or “RA”.
- After you have finished selecting the new departments and Chartfields for each user ID, click Next to proceed to the final step.
5. Review & Submit
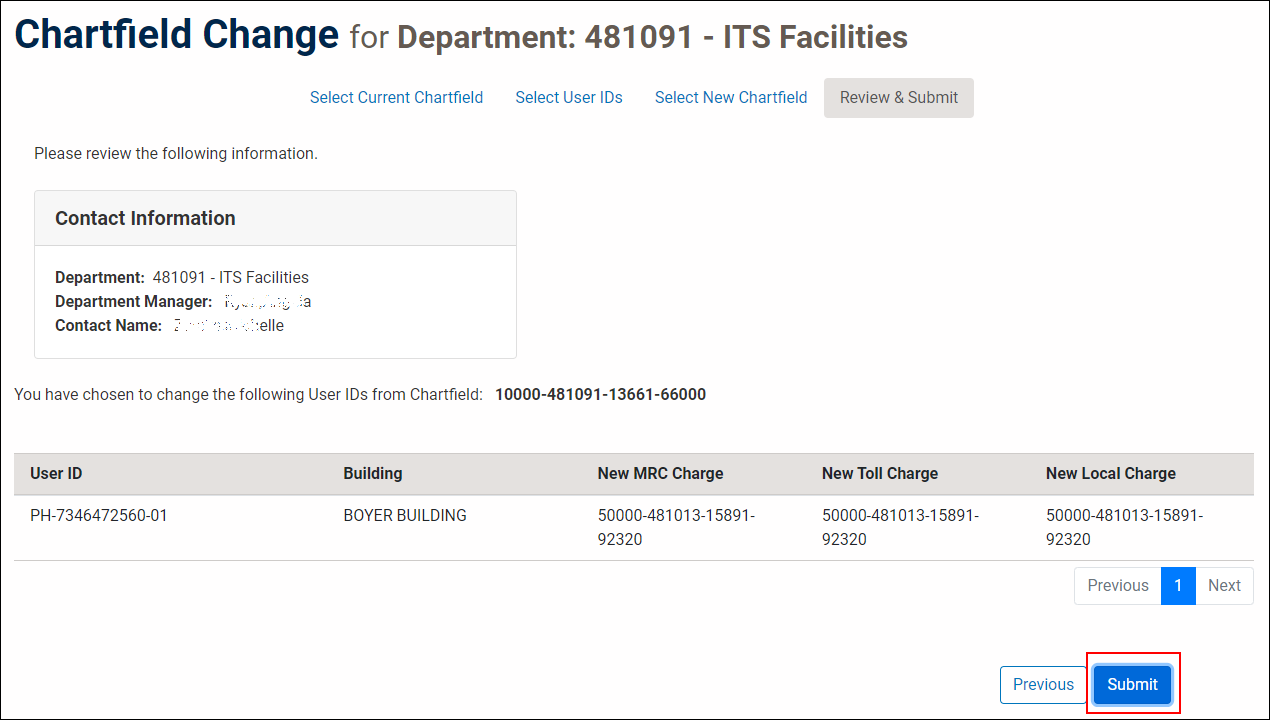
This page lets you review the changes you have made and double-check that everything is correct.
- Once you’ve reviewed and confirmed your changes on this page, click Submit. You will be taken to a confirmation page. If you need to repeat this process for a different Chartfield, you can select Submit Another Request, and the system will take you to the beginning of the application.
Tips
- Toll and local charges cannot be changed for any Chartfields except for those with user IDs that contain “PH” or “RA”. Note: If you click Select All on the Select New Chartfield page, you may see local and toll charge boxes become available to check because the Chartfield list includes “PH” and/or “RA”.
- You can only choose Chartfields for which you are currently authorized. If you are not currently authorized for the necessary Chartfields, follow the steps found here, to request authorization.
Chartfield Change Request: Request changes to phone services for departments you are NOT authorized for
The Chartfield Change Request form allows you to request a change to existing Chartfields for phone line services that are managed by departments you are NOT authorized for. Follow the steps below to request a change: Important: You must be authorized for the existing department in SRS to make this request.
1. Select Existing Chartfield
This page allows you to select the departmental Chartfield(s) that current services are being billed to.
- Click the drop-down arrow in the Switch Department box to select the current department that services are being charged to. Note: If you do not find the chartfields you wish to use for your Request, please refer Manage Chartfields documentation for instructions.
- Click Next.

2. Select Existing Shortcode
This page allows you to select the departmental shortcode for existing services.
- Click the drop-down arrow in the Select Shortcode box to select the correct shortcode. Note: If you do not see the shortcode you're looking for, click on the Show Chartfield Select box to see more detail.
- Click Next.

3. Select User IDs
This page provides you with a list of the user IDs associated with the Chartfield selected on the previous page.
- Select the User ID(s) which need to be changed by checking the box beside each one. Alternatively, check the box for Select All Records or Select All From Page, if applicable.
- Click Next.
Notes:
- If you would like to search for a particular set of user IDs or buildings, use the Search box.
- Toll and local charges are only available for user IDs with Phone Lines (PH) and AuthCodes (RA). User IDs with anything else (e.g., DA) will only include a Monthly Recurring Charge (MRC).
- If a service has Toll/Local/MRC charges to a different Chartfield than the one that was selected, it will be indicated with a red “X” icon. Alternatively, if a service has Toll/Local/MRC charges to the selected Chartfield, it will be indicated with a green check icon.
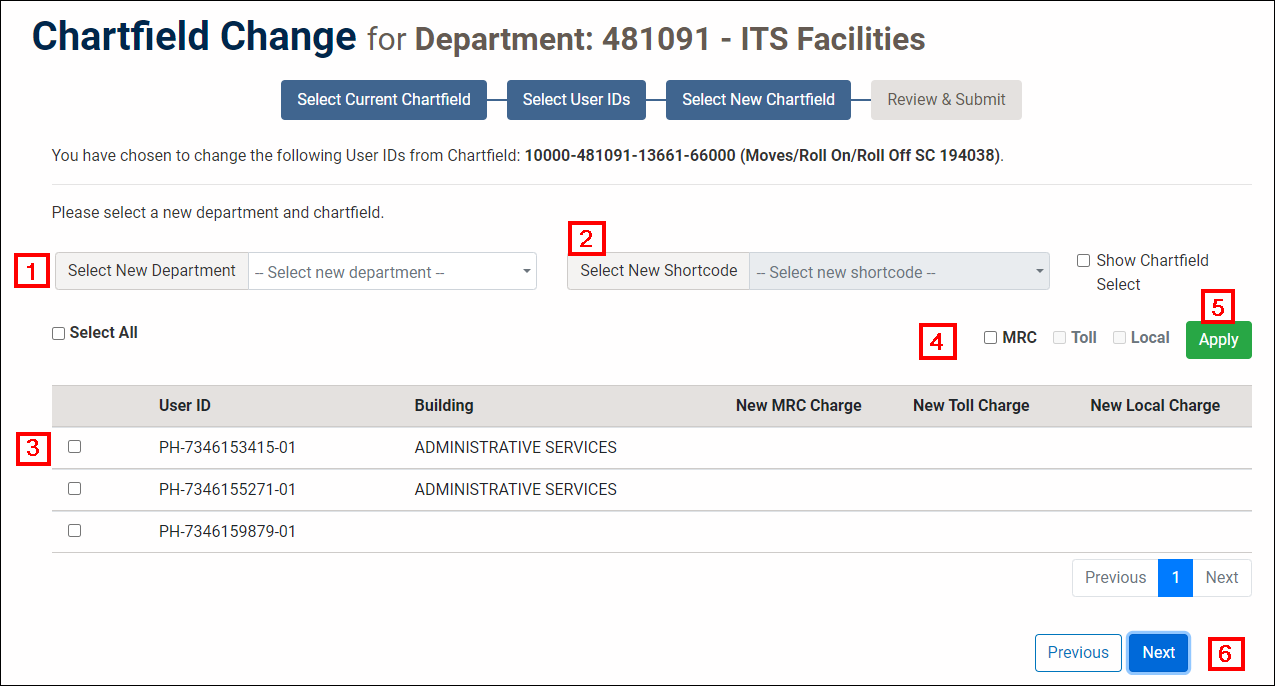
4. Select New Chartfield
This page provides you with the ability to select a new Chartfield where you want existing services to be billed to.
- Click the drop-down arrow in the Select New Department box and locate the new department.
- Click the drop-down arrow in the Select Shortcode box to select the correct shortcode.
- Check the box(es) beside the User ID(s) you wish to reassign. You can pick and choose where the charges go for different user IDs as you move through the list.
- Check the box(es) for applicable charges (i.e., MRC, Toll, and Local).
- Click Apply after each reassignment. Note: Toll and local charges will be greyed out if the user ID(s) selected do not include a “PH” or “RA”.
- After you have finished selecting the new departments and Chartfields for each user ID, click Next to proceed to the final step.
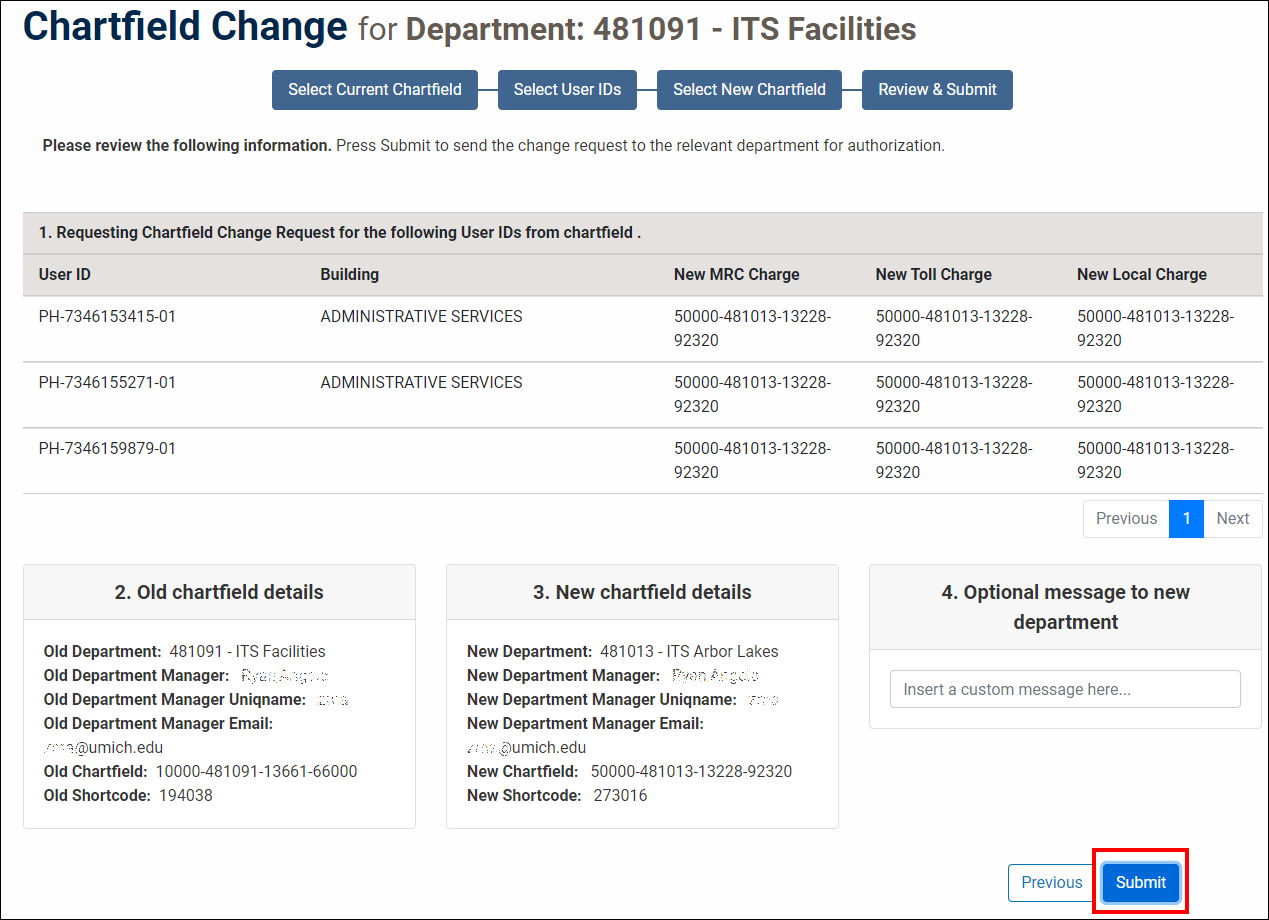
5. Review & Submit
This page lets you review the changes you are requesting and double-check that everything is correct.
- Once you’ve reviewed the changes, click Submit to send the request for approval.
Tips
- Toll and local charges cannot be changed for any Chartfields except for those with user IDs that contain “PH” or “RA”. Note: If you click Select All on the Select New Chartfield page, you may see local and toll charge boxes become available to check because the Chartfield list includes “PH” and/or “RA”.
- A confirmation page will display. If you need to make another request, you can select Submit Another Request and return to the beginning of the application.

Authorization
- Once you've submitted the request, the department ID manager will receive an email with a link to accept or reject the request.

- The Chartfield change will display for acceptance or rejection.
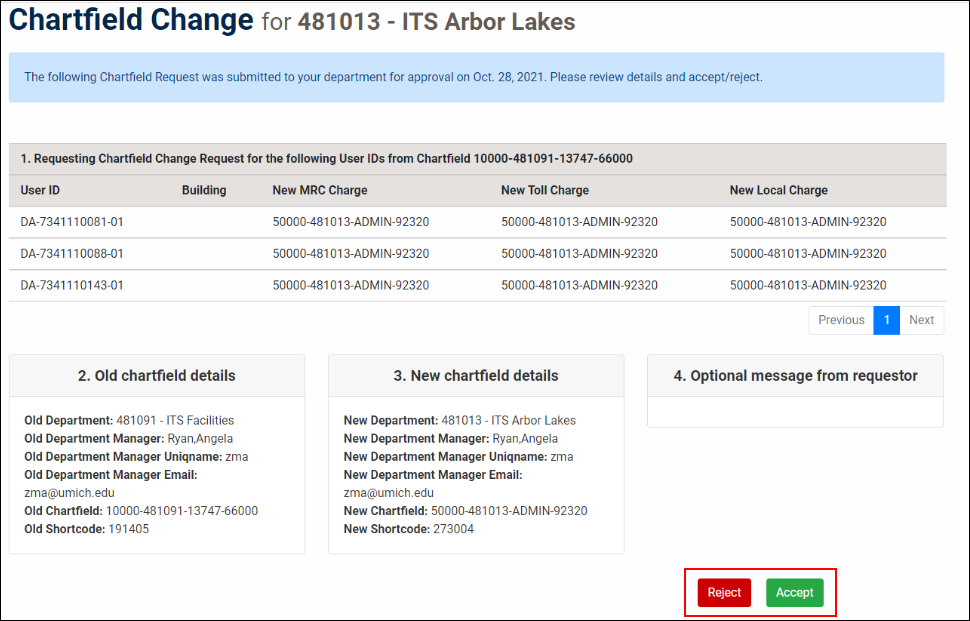
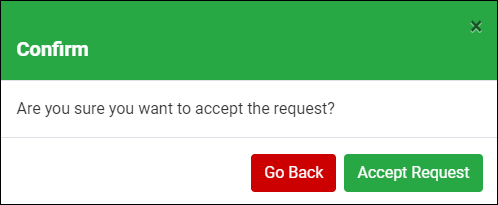
- Once the user clicks Accept or Reject, they are asked to confirm their selection.
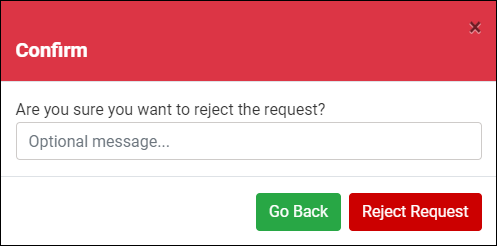
- The requester will receive an email with the approval or denial message.


