Overview
The Bill of Materials (BOM) Infrastructure app replaces ServiceNow for creating customer estimates, ordering materials, and managing the ordering process. This document includes steps for creating and editing a BOM, creating a customer estimate, adding attachments, assigning/routing the order, and updating the U-M Net status.
Notes:
- The following steps are done after the Infrastructure Project Manager (PM) has opened a Preorder or Workorder in Pinnacle.
- If you have not logged in to the Service Request System (SRS) before, you will be redirected to an SRS login page, where you can enter your credentials. You will then be navigated to the BOM homepage.
- When information is updated in Pinnacle, it will immediately show up in the BOM app.
- Network Engineers, to add APs to a BOM from Netbox, see the Add Wi-Fi Inventory Items from NetBox to the SRS BOM ITS Document.
Table of Contents
- BOM Landing Page
- Create a New BOM
- Edit Material for a BOM
- Edit Material Location for a BOM
- Edit Estimate Label
- Estimate Actions
- Attachments
- Network U-M Net Status
- Add a Contingency Budget
BOM Landing Page

When you log in to the BOM tool, you will see a number of options from which to choose.
Located across the top navigation bar, you will see the following:
- Search:
- Open Preorders/Workorders - Displays all open orders, regardless if they have an estimate or not.
- Estimate Search - Displays only Preorders/Workorders that have at least one estimate.
- All Preorders/Workorder w/Estimates - Displays all open and closed orders with an estimate.
- Warehouse - Orders with a status of Warehouse.
- U-M Net Projects-Displays all projects with an “Open” U-M Net Projects status.
- Engineering-Only visible to Network Engineers. Displays all open projects assigned to members of this team.
Note: Warehouse is only visible to Procurement staff or SRS Admins.
- Assigned to Me: Lists the projects that are assigned to your unique ID.
- Item Lookup Search: Gives you the option to search for an item by Z-Code, description, subclass, manufacturer number, or price.

- Hover over the item code to view its estimated quantity directly on the screen.

Located under “What do you want to do?”, you will see the following:
- Find a Preorder or Workorder: Displays all open orders, regardless of whether they have an estimate. (Similar to “Open Preorders/Workorders” in the Search drop-down.)
- Show my Assignments: Lists the projects that are assigned to your unique ID.
All searches will start with the most recent orders at the beginning of the list.
Create a New BOM
Search for an order
- Log in to the BOM tool at https://srs.it.umich.edu/apps/bom/.
- Click Find a Preorder or Workorder.
- Begin typing in the Search Open Preorders/Workorders field to filter results by Preorder number, Workorder number, description, employee name, or keywords.

Note: In each row that matches your search, you will see the number of estimates that have already been created, including “0” for no estimates created.
Add a new estimate for an order with no existing estimates
- Click the row where you want to add the new estimate and enter the Estimate Label for the new BOM (e.g., Estimate1-tb)
- Click Submit. You will be redirected to the project page.
Notes:
- This project page allows you to add materials, labor estimates, contingency, Pinnacle notes, run reports, change the Estimate Label, and add a link to a folder to upload attachments (i.e., Scope of Work).
- Under the Preorder number, click the link to display the project information details imported from Pinnacle. Click it again to close the display. You will see the Estimate Label you just created.

Add a new estimate for an order with existing estimates
- Click the row where you want to add the new estimate. You will be redirected to the project page.
- Click Add Estimate and enter the Estimate Label for the BOM (i.e., Estimate2-tb)
- Click Submit. A new tab with the Estimate Label will appear.
Notes:
- This project page allows you to add materials, labor estimates, contingency, Pinnacle notes, run reports, change the Estimate Label, and add a link to a folder to upload attachments (i.e., Scope of Work).
- Under the Preorder number, click the link to display the project information details imported from Pinnacle. Click it again to close the display. You will see the Estimate Label you just created.

Add parts
- Click the Material By Location tab. There are three ways to add parts: Add Existing Part, Add New Part, and Import from CSV.
Notes:
- Material can be added in the Estimate, Warehouse, Approved and Ordered status. If you add material in the Warehouse or Order status, you will need to notify Warehouse through SRS.
- A Location field (e.g., room number) is available for each part. If all the parts are associated with one location, you cannot leave the field blank. “Main” is automatically available to use.
- Add Existing Part
- Enter the location of the part in the Location field or use “Main.”
- Begin typing in the Z-Code field to search for a part by Z-Code number, description, manufacturer number, or price.
- Select the part, enter the Quantity, and click Submit.
- Add New Part
- Enter the location of the part in the Location field or use “Main.”
- Complete all the remaining fields.
Note: It is advised to add a link to the part in the Item Description section as it is helpful to ITS Warehouse
- Click Submit. The part is saved, and the screen will refresh displaying the list of parts.
Note: The new part will be listed with the Item (Z-Code) field as “New.” Once ITS Warehouse adds the part into Pinnacle, the Z-Code will display.
- Import from CSV
- Click Choose Files. Navigate to the location of the file and select it.
- Click Submit. The screen will refresh, displaying the results of the import. It will list the parts and show the summary at the bottom.
Notes:
- The .CSV file must include three columns: location, z-code, and quantity. There should be a new row for each location, Z-code, quantity.
- If there are errors during the import, correct the information, and import a new .CSV file with only the corrected parts.
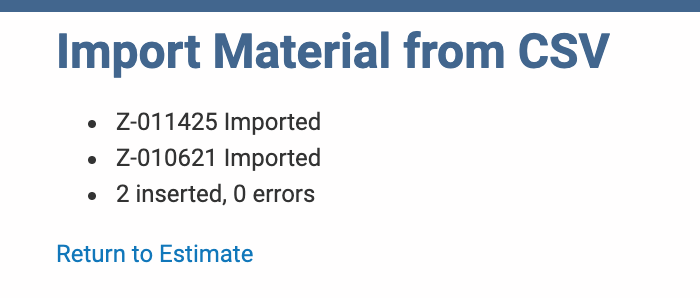
- Click Return to Estimate.
The list of parts will be displayed in the Materials By Location tab. The Estimated Material and Estimated Total will be updated to reflect the added parts.
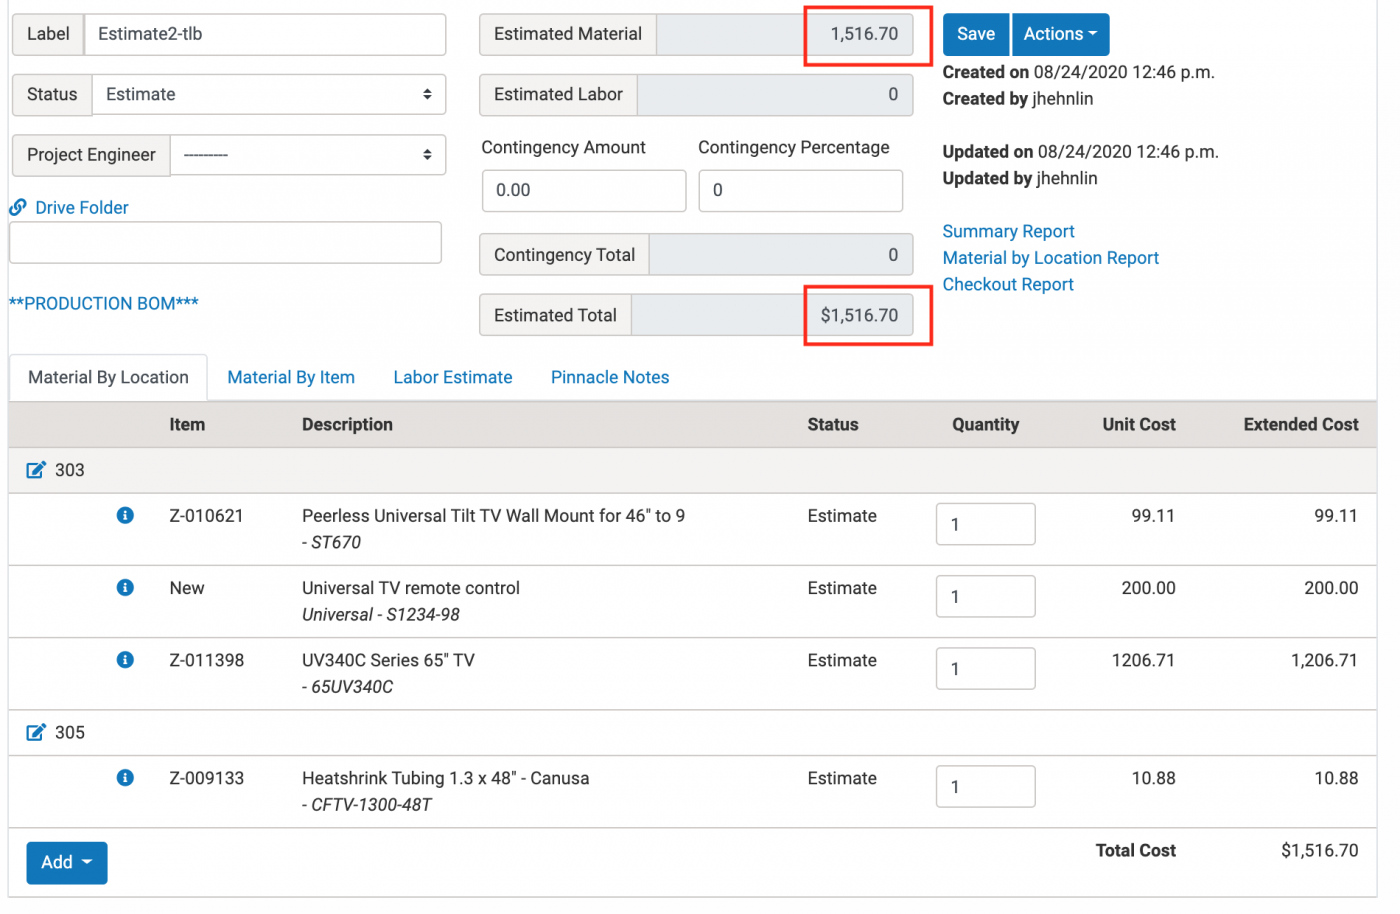
- Click Save.
Note: Remember to Save multiple times during the editing process if additional changes are made.
Add labor to estimate
- Click the Labor Estimate tab.
- Select Group from the drop-down menu, enter the description and estimated hours.
Note: As you add hours, the Estimated Labor and Estimated Total will update accordingly.
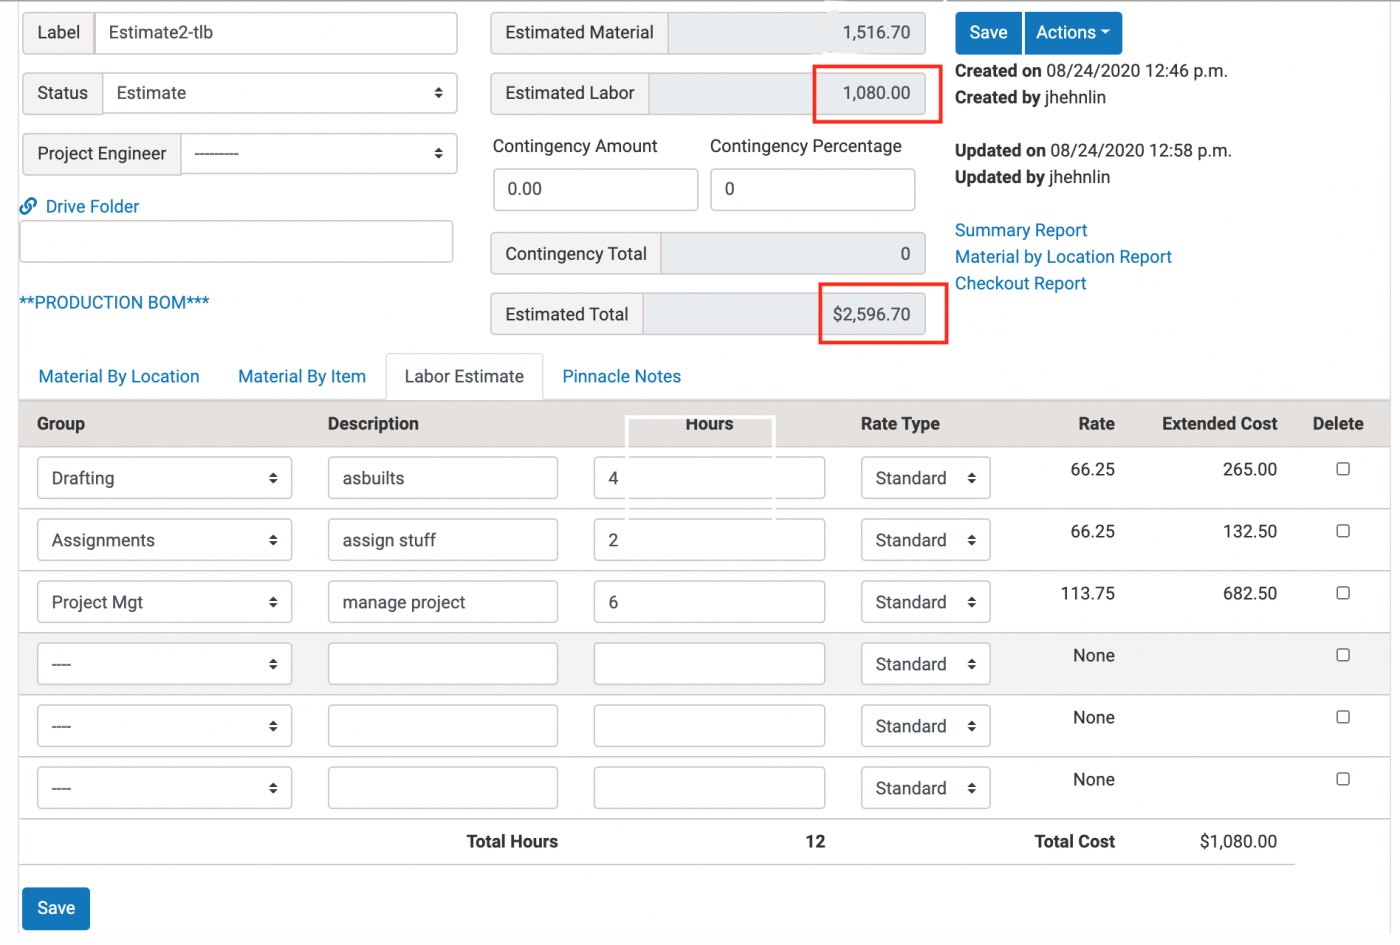
- Click Save.
Edit Material for a BOM
- Click Material By Location to add parts, change the quantity, or delete parts by changing the quantity to “0”.

- Click the pencil icon to the left of the room name to change the name or description, and click Submit.
- Click Save.
Notes:
- Once the status of the Estimate changes to Warehouse and you need to edit the materials, change the status to Estimate or Approved. After making edits, change the status to Warehouse. If the status is Ordered, please contact the Warehouse to make edits.
- Remember to Save multiple times during the editing process.
- Once material is added to the project, you may also view material by item by clicking Material By Item.

Edit Material Location for a BOM
- Click the pencil icon to the left of the room name to change the name or description of the material location.
- Click Submit and then click Save.
Edit Estimate Label
Click in the Label name field, make changes, and click Save.

Estimate Actions
Use the table below to Notify Warehouse, Route to Project Manager, and Create Pinnacle Notes.
| Action | Notify with Additional Information | Notify |
|---|---|---|
| Notify Warehouse | Before hitting the action button Notify Warehouse, you have to send the additional information. Select Create Pinnacle Note from the Action drop-down menu and select the subject line “BOM - Notify Warehouse (Sends Email).” Add the information in the Body section and click on submit. | When you select Notify Warehouse (Sends Email):
Note: No additional information is sent to the Warehouse. |
| Route to Project Manager | Before hitting the action button Route to Project Manager (Sends Email), you have to send the additional information. Select Create Pinnacle Note from the Action drop-down menu and select the subject line “BOM - Route to Project Manager (Sends Email).” Add the information in the Body section and click Submit. | When you select Route to Project Manager (Sends Email), a line is added in Pinnacle Notes, and an email notification is sent to the Project Manager. Note: No additional information is sent to the Warehouse or Project Manager |
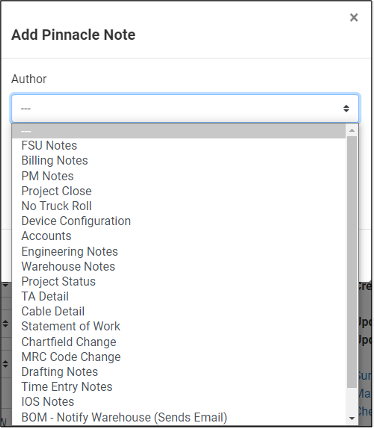
| Create Pinnacle Note | Not applicable. | When you select Create Pinnacle Note, it allows you the ability to create a Pinnacle note. Note: A drop-down menu for the subject will be displayed. |
Notes:
- If additional information is not added to an action (see Estimated Actions table above), choose the work group that is submitting the note.
- The Pinnacle Notes tab shows the notes that have already been added to Pinnacle and added in this tool.
Attachments
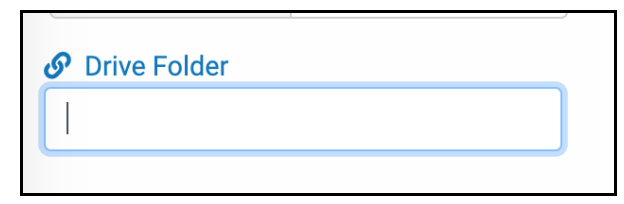
Provide the link to the Google Drive folder
Under Drive Folder, paste the path to the project folder in the field provided and click Save.
Note: The link must be a fully qualified path that starts with “https://.” Anything else will give you an error in Chrome or Firefox browsers.
Add attachments to the project
Click Drive Folder and upload the attachment to Google Drive.

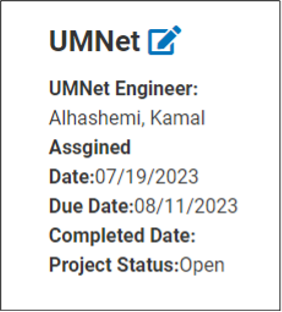
U-M Net Updates
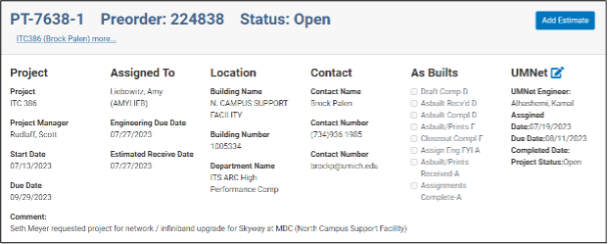
- Under the Preorder number, click the link to display the project information details imported from Pinnacle.
- Click the pencil icon next to U-M Net and complete the relevant fields. Note that Status is required.
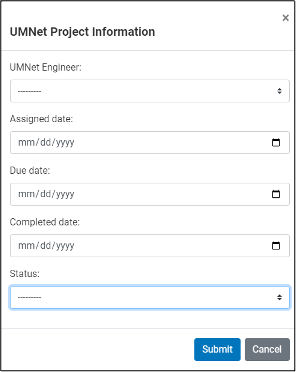
- Click Submit and Save.
Note: After you submit, the fields can still be updated by clicking on the pencil icon next to U-M Net. An email will be sent to the assigned U-M Net team member.
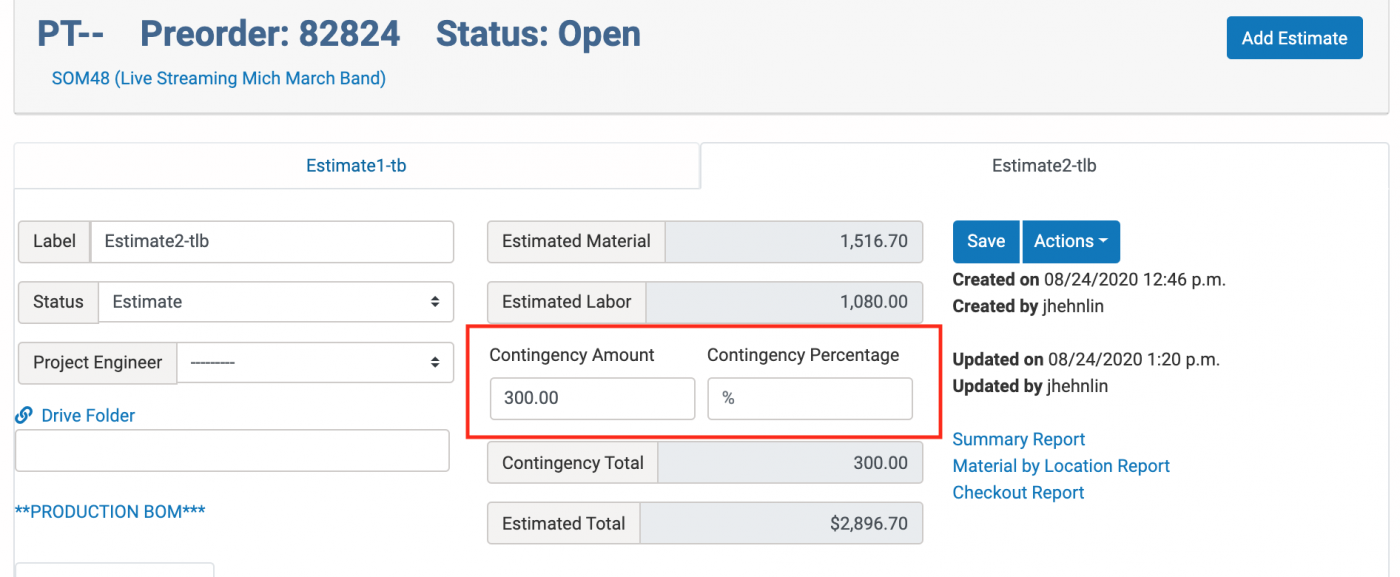
Add a Contingency Budget
A contingency percentage or dollar amount can also be added to the BOM. Once you enter a number in a field, the other one is no longer valid. Click Save after making any changes. The estimate will update with the new total amount.