Overview
Zoom webinar licenses allow you to broadcast to an audience of up to 500 participants, up to 1000 participants, or, with a special license, up to 10,000 participants. To request any of these types of webinar licenses, you will need to complete the U-M ITS Meeting vs. Webinar form.
Webinars allow for a host, co-host(s), panelist(s), and attendees. As a host, co-host, or panelist, you can share your screen, video, and audio, and attendees can use the chat or Q&A to interact with the host and panelists. This guide is intended to help you schedule and manage your own webinar with ease and confidence. We also recommend you review Roles in a webinar. If you are conducting a large webinar (over 300 people), we recommend having more than two people on hand to help with Q&A, the Raise Hand feature, and the presentation.
Scheduling a Webinar
It's possible to schedule a webinar with registration or without registration for your participants, depending on your preference. We also recommend you review How to Secure Meetings in Zoom before scheduling your webinar. Editing the settings on your webinar is possible up until the start time of your event.
- Sign in to the Zoom web portal and click Webinars.
- Click Schedule a Webinar.

- Choose the appropriate webinar settings, which include:
- Topic
- Description (provide some details)
- Use a Template (webinar templates)
- Date and Time
- Duration
- Recurring webinar
Registration Registrations require attendees to complete a brief form before receiving the link to join your webinar. This enables the host to collect the names, email addresses, and more from the attendees. It is possible to approve anyone who registers automatically or manually approve attendees. Refer to Scheduling a Webinar with Registration for a short video on scheduling a webinar with registration.
- Host Video (on or off when joining the webinar)
- Panelist Video (on or off when joining the webinar)
- Audio options
- Require Webinar Password (or schedule without requiring a password)
- Q&A (participants ask questions during the webinar for the panelists, co-hosts, and host)
- Enable Practice Session (start the webinar practice session instead of a live broadcast to set up and get acquainted with webinar controls)
- Advanced Options (Scheduling Privilege and Alternate Host)
- Click Schedule.
Inviting Panelist(s) to a Webinar
Panelists are full participants in the meeting, which are different from attendees, who are muted and cannot activate their cameras or share their screens. They can view and send videos, screen share, annotate and make use of the whiteboard. A panelist must be assigned this role by the webinar host. The host can also turn off some features for panelists, including starting videos, screen share, and recording.
- Sign in to the Zoom web portal and click Webinars.
- Click the topic of the webinar to which you want to add panelists.
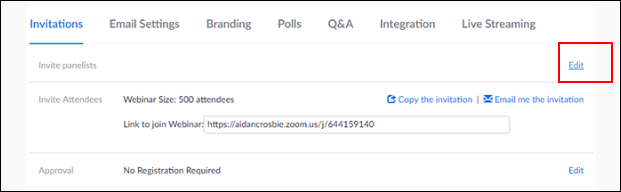
- Click Edit in the Invite panelists section under the Invitations tab.
- Enter the name(s) and email address(es) of the panelist you want to invite.
- Click Save. An email will be sent to all panelists.
Inviting Attendees to a Webinar
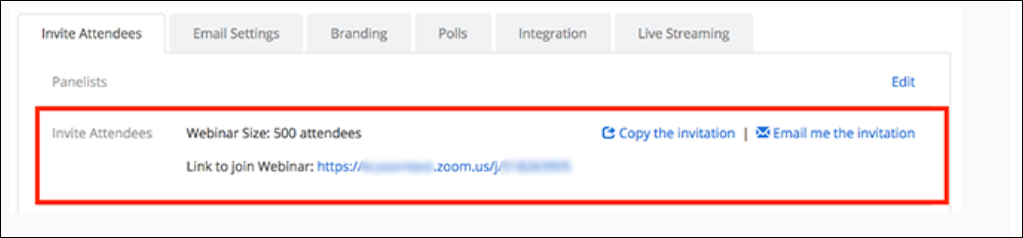
Attendees are view-only participants who can be unmuted only if the host chooses. Their view of the webinar is controlled by the host. Attendees can interact with the host and the panelists through the Q&A and the chat. There are three different ways to invite attendees to register:
- Copy the registration URL and share via email.
- Click Copy the invitation to view and copy the invitation to send out to attendees.
- Click Email me the invitation to receive a copy of the invitation that you can forward to potential attendees.
Starting a Webinar
There are three different ways to start a webinar:
- Sign in to the Zoom web portal and click Webinars. Find the appropriate webinar and click Start.
- Click the Meetings tab in the Zoom client. Find the appropriate webinar and click Start.
- If you have added this to your calendar, click on the link displayed on your calendar reminder. Make sure that you are logged into your Zoom account before clicking the link.
Managing Participants
The Participants option in your webinar toolbar at the bottom of your screen is to manage the panelists and attendees in your webinar. Options include promoting to a co-host or panelist, demoting panelists to attendees, unmuting participants, stopping participant videos, and more.
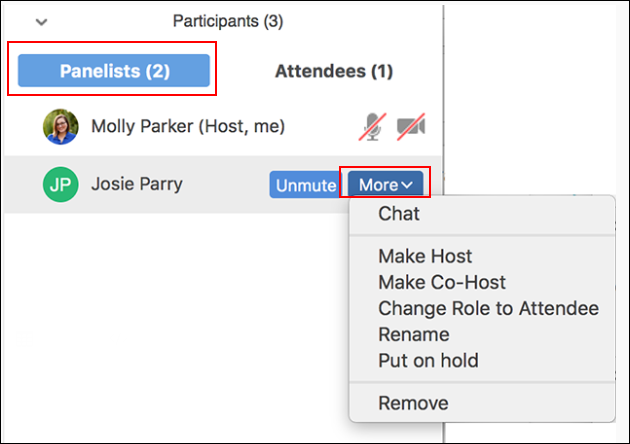
Panelists
Hover over the panelist name and click More. You will find the following options:
- Chat
- Make Host
- Make Co-Host
- Change Role to Attendee
- Rename
- Put on hold
- Remove
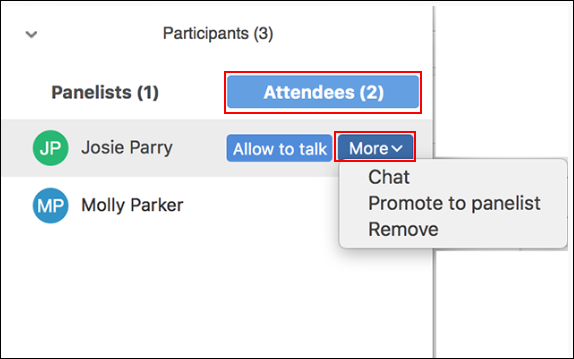
Attendees
Click on the Attendees tab, hover over the attendee's name, and click More. You will find the following options:
- Chat
- Promote to panelist
- Remove
Livestream a Zoom Webinar
You may livestream your Zoom Webinar if it is a public event.
— No sensitive data can be included.
— Livestreaming may not be used for teaching, learning, or research activities.
— If any individuals appear in the livestream (video and/or audio), those individuals:
— Must be notified in advance that the event will be livestreamed.
— Given the option to opt out.
Please refer below for the applicable Zoom Help Center instructions for each streaming service:
Participants in the meeting will see the event is being streamed live.
Tips for Running Your Webinar
- Schedule a practice session that provides time for you and your panelists to get comfortable with the flow, content of the meeting, and technology. This is an option within your scheduled webinar. Note that you can only have one practice session per webinar event. We recommend including as many participants as can join.
- Consider the security of your meeting by requiring registrations. We recommend reviewing How to Secure Your Zoom Meetings/Webinars.
- Consider your viewers' accessibility needs. Do any need Closed Captions? Refer to Videoconferencing Captioning Tools for Zoom and Videoconferencing Accessibility at the University of Michigan.
- Use visuals to keep participants interested. Consider using classic Zoom whiteboards (not the same as Zoom Whiteboard) and/or annotation tools.
- Take advantage of the many features offered by Zoom:
Only the host, co-host, and panelist can share their screen during a webinar.
Polling allows a host to create single-choice or multiple-choice polling questions for a webinar. Hosts can create these polls prior to the webinar or during and choose when to launch the poll during the webinar. You can create a maximum of 50 polls for a single webinar, with each poll having a maximum of 10 questions.
This feature allows an attendee, panelist, co-host, or host to click an option to raise their hand during a webinar to indicate they need something from the host or panelist. Hosts have the ability to Lower the hand.
The question & answer (Q&A) feature allows attendees to ask questions during the webinar and for the panelists, co-hosts, and the host to answer their questions.
This feature can be useful when holding a large webinar. We recommend at least two people to help run the webinar, which can be an alternate host (if they also have the webinar license) or co-hosts. If you are conducting a large webinar (over 300 people), we recommend having more than two people on hand to help with Q&A, raised hands, and the presentation. There is no limitation on the number of co-hosts you can have in a webinar.
You can record your Zoom Webinar in two ways: to the cloud or your local computer.