
Overview
This document covers the basics of creating a minimal UFA or PAF record in eRPM so that an Ironclad workflow can be created, linked, and worked while the project team completes the rest of the PAF or UFA entry.
The process involves:
Creating the UFA or PAF record from the Innovation Partnerships workspace in eRPM
UFA - Entering Project Team personnel and any other desired data
PAF - Entering Project Team personnel and any other desired data
Creating the Ironclad workflow using the Launch Ironclad Workflow acitivty
Notifying the Project Team via the Post a Comment for the Entire Project acitity
Navigation
Role: Innovation Partnerships
Step-by-Step Process
Creating the UFA or PAF Record
- From the Innovation Partnerships workspace, click Create New UFA or Create New PAF.
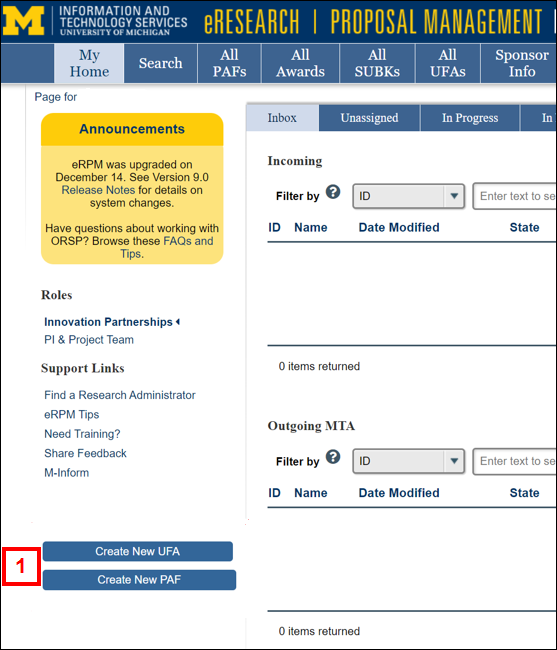
- To Create a New UFA, enter the Project Title.
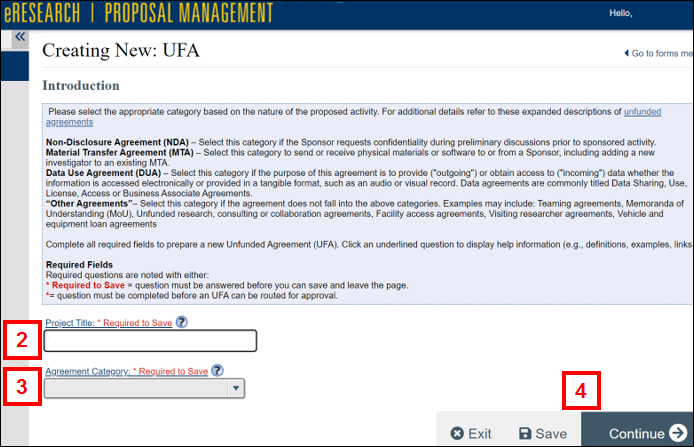
- Select the appropriate Agreement Category.
Note Additional required fields will display based on the selected Category and Type. - Once all required fields are complete, click Save or Continue to save the form and create the record.
- To Create a New PAF, enter the Project Title.
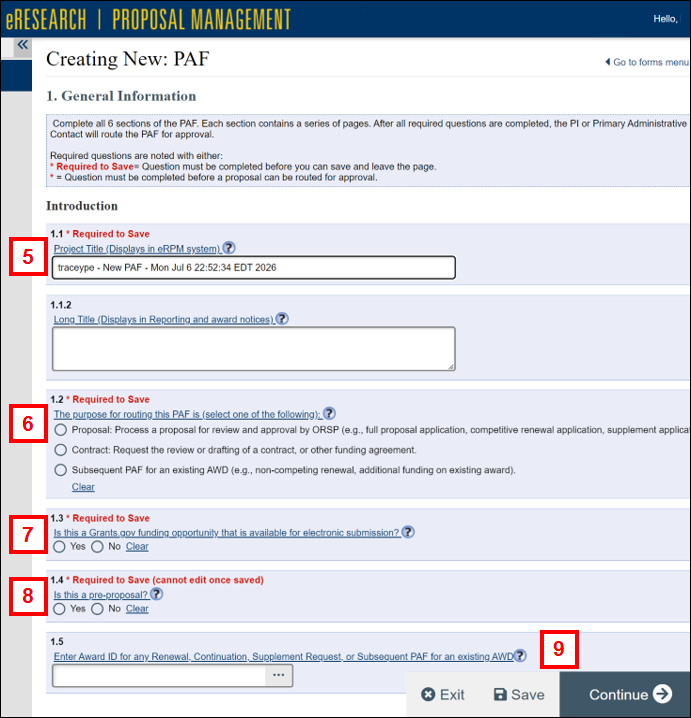
- Select the purpose for the PAF.
- Select if the PAF is being submitted via Grants.gov.
- Select if the PAF is considered a pre-proposal.
- Once all required fields are complete, click Save or Continue to save the form and create the record.
UFA - Enter Project Team Personnel
Use the Personnel page to add the project team members.
Note: At least one PI and one administrator are required.
- On a new UFA record, the project creator will automatically be added as an Administrative Contact and set as the Contact PI behind the scenes until the PI is added.
- Click Add to add project team members.
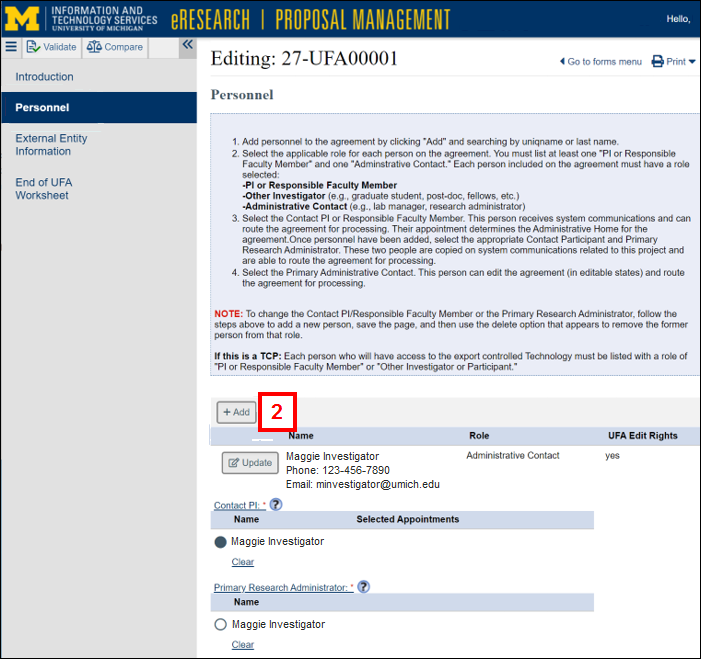
- Search for the person using a uniqname or last name in the Name field.
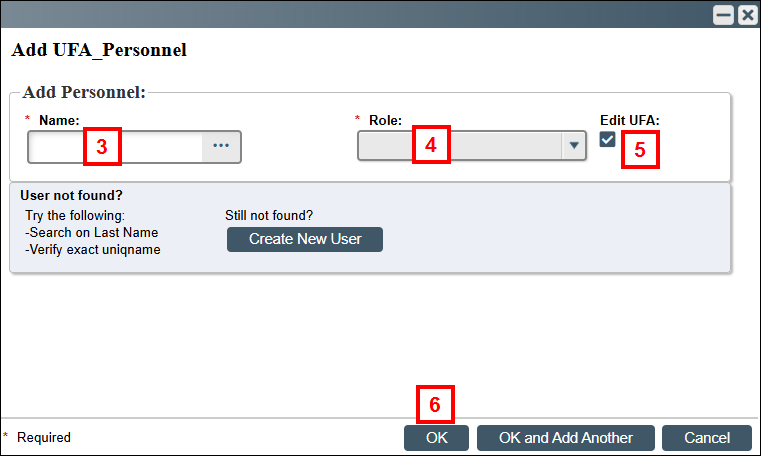
- Select the appropriate Role.
- Check the Edit UFA box if they should have edit access to the UFA.
- Click OK.
- To select the person as the Contact PI, appointment selection is required. Click Add Appointment.
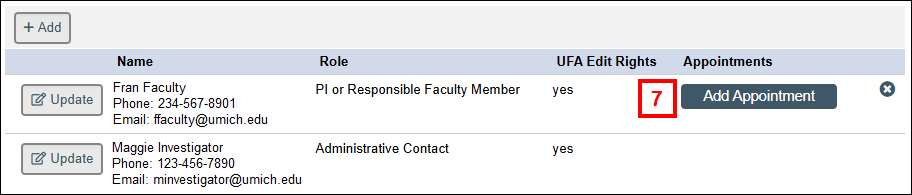
- Click Add to UFA for the desired appointment,
OR
Enter a Title and Department ID for a future appointment.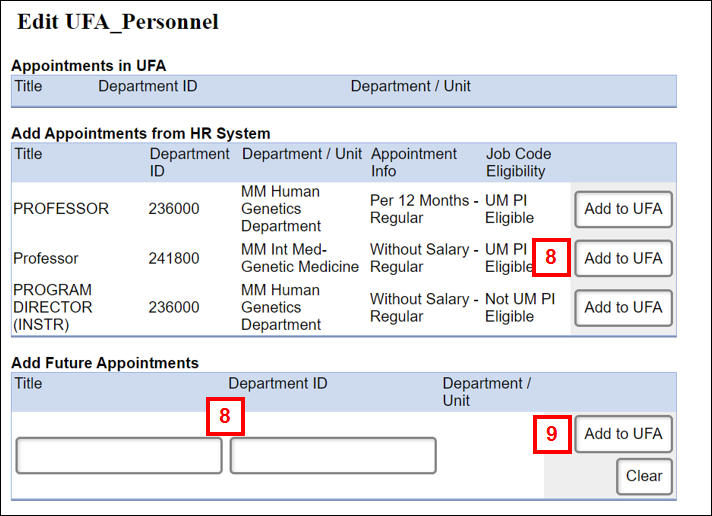
- If applicable, click Add to UFA for the future appointment.
- Click OK.
- Once an appointment is entered, click the radio button to select the person as the Contact PI.
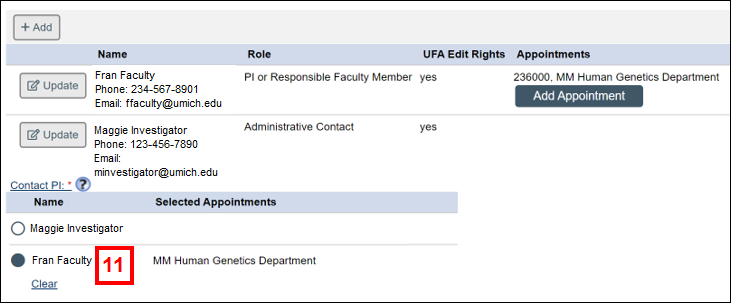
- Repeat steps 2-11 to add Administrative Contact(s) and select a Primary Research Administrator. Once a Contact PI and PRA are selected, you can remove yourself from Personnel by clicking Delete in the table.
- Additional fields can be entered on other UFA smartform pages as needed. Click Exit when you are finished entering data to return to the UFA workspace.
PAF - Enter Project Team Personnel
- From the UM Investigators page, click Add to add an investigator.
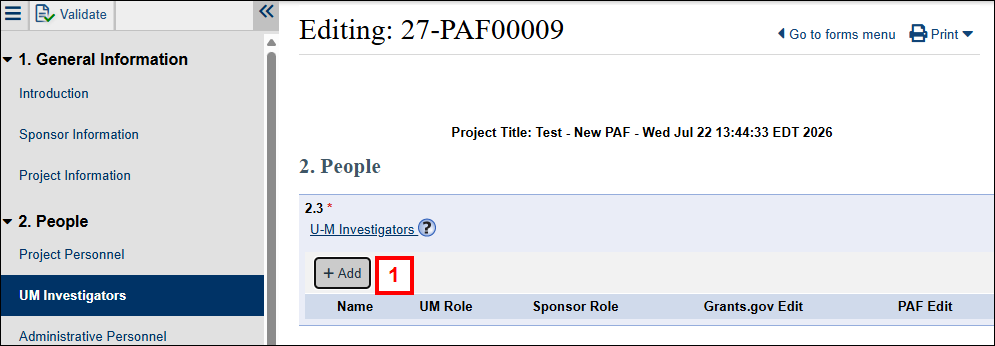
- Search for the person using a uniqname or last name in the Name field.
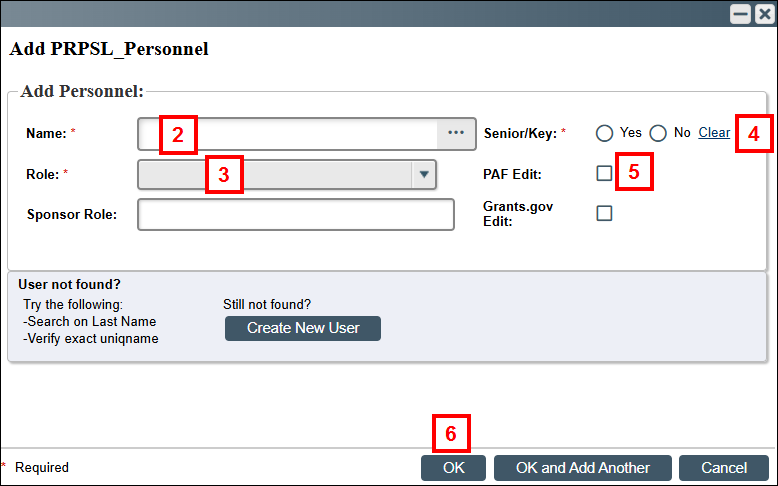
- Select the appropriate Role (UM Principal Investigator for the Contact PI).
- Select if they are Senior/Key.
- Check the PAF Edit box if they should have edit access to the PAF.
- Click OK.
- If applicable, click Add Appointment to select the appointment for the PI, and complete the necessary steps.
Note This is not required to save the PAF, but will set the Administrative Home Department (and include those contacts as “Post a Comment” recipients).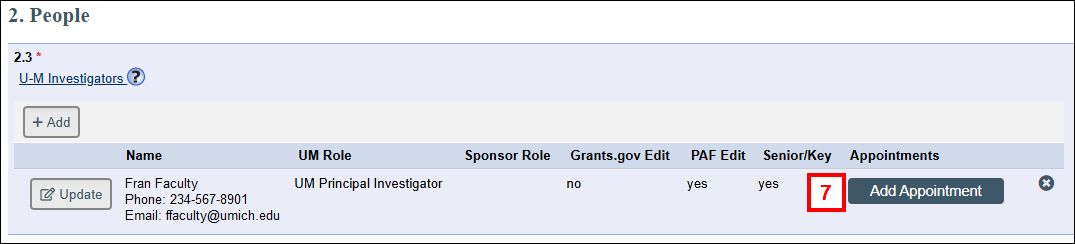
- Click the Administrative Personnel page.
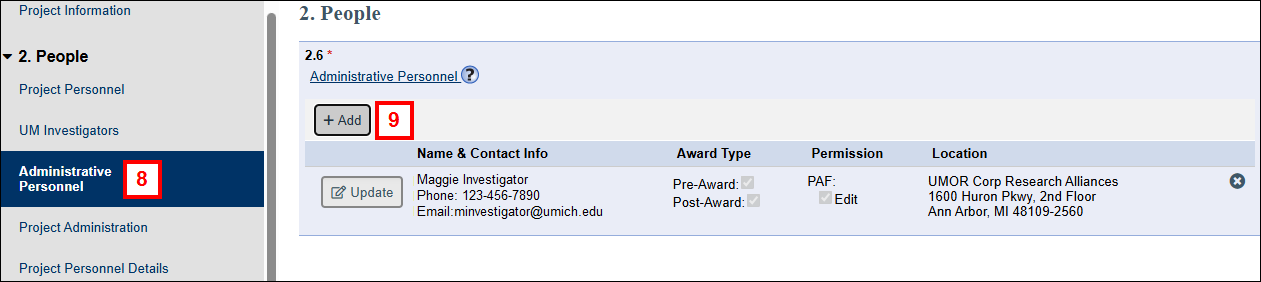
- Click Add to add an administrator.
Notes- By default, you will be added as an administrator when creating the PAF.
- Do NOT remove yourself as an administrator; this will remove your edit access to the record. Instead, add the department administrator(s) and advise them to remove you when turning the PAF over to the department.
- Search for the person by uniqname or last name in the Name field.
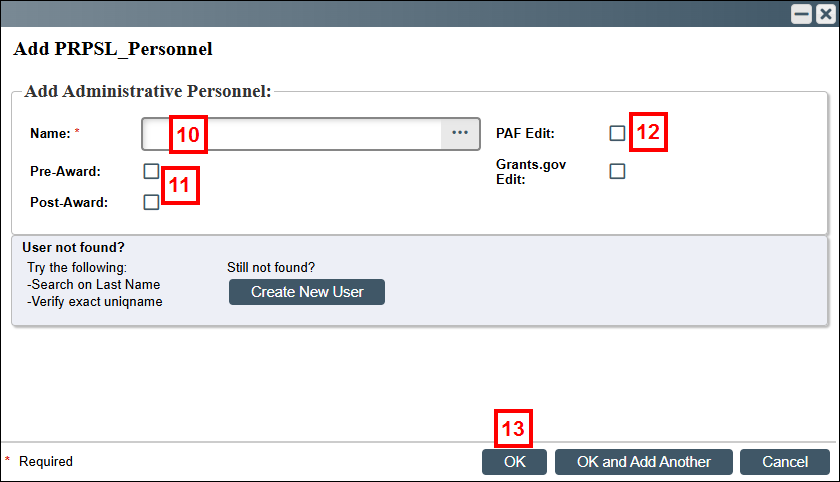
- Check the Pre-Award and/or Post Award check box.
- Check the PAF Edit box if they should have edit access to the PAF.
- Click OK.
- Click the Project Administration page.
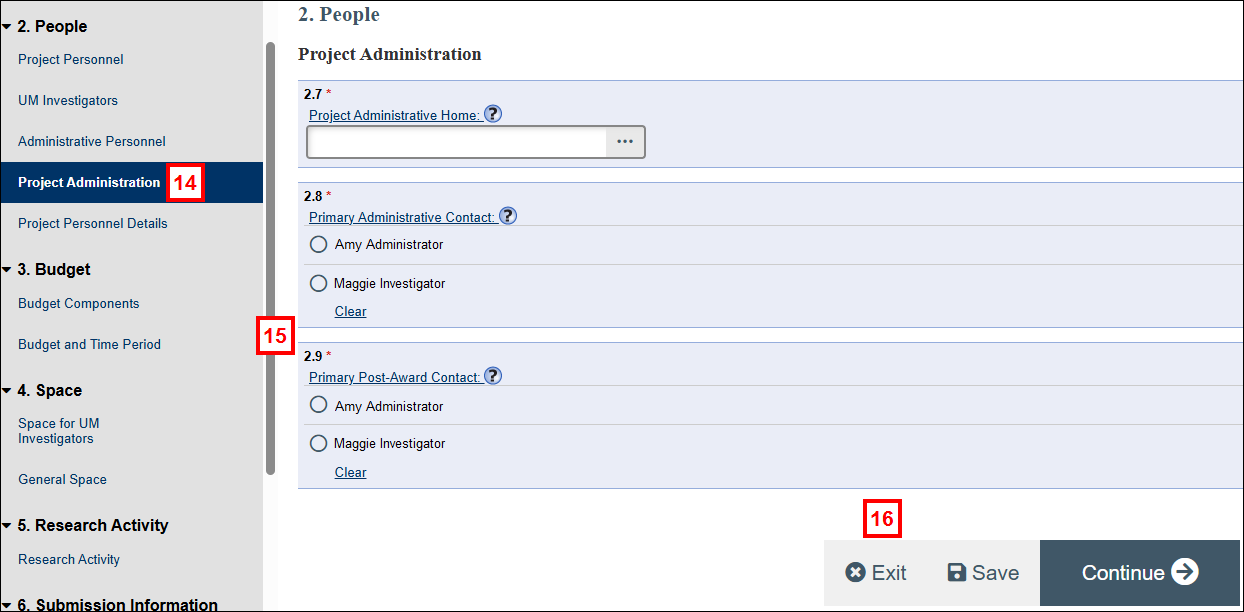
- Click the radio button to specify the Primary Administrative Contact and Primary Post-Award Contact.
- Additional fields can be entered on other PAF smartform pages as needed. Click Exit when you are finished entering data to return to the PAF workspace.
Creating the Ironclad Workflow
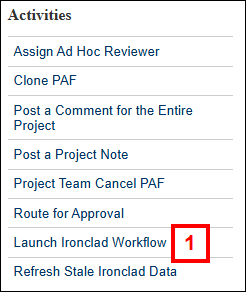
- From the UFA or PAF workspace, click the Launch Ironclad Workflow activity.
- Select the Workflow to Launch.
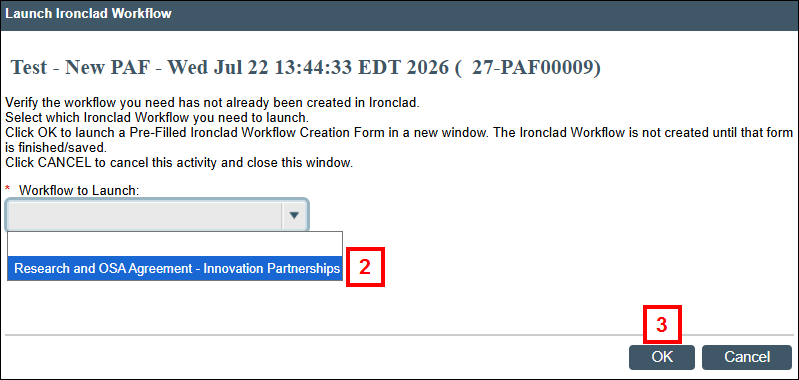
- Click OK to open a new workflow in Ironclad.
- The Ironclad workflow will open in a new window and copy over any mapped data points into the creation form. Complete the required fields and save/submit the form when ready to create the IC record and set the link between the workflow and the eRPM record.
- Once the IC is created, the link will appear in the Ironclad Workflows section on the UFA/PAF workspace.
Notifying the Project Team
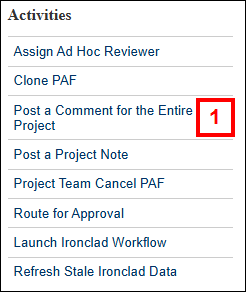
Once the Ironclad workflow is established, the Post a Comment for the Entire Team activity can be used to alert the project team to take over UFA/PAF record for the further data entry and processing.
- Click the Post a Comment for the Entire Project activity.
- Update the Subject Line.
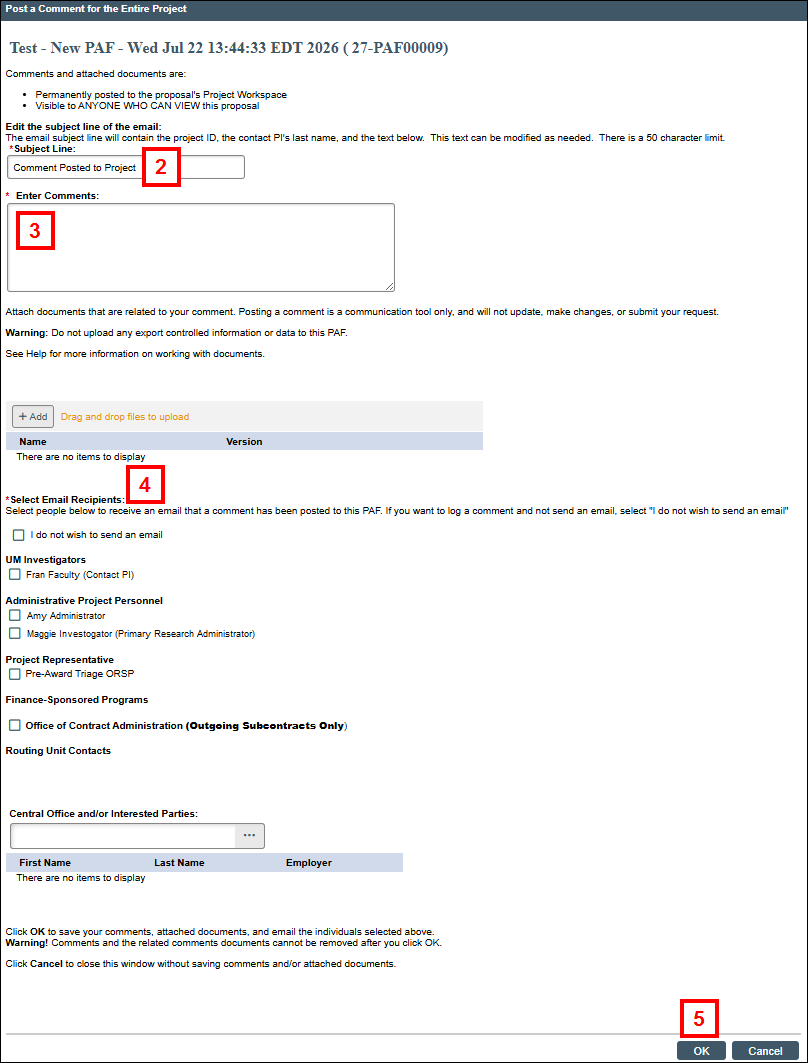
- Enter Comments for the email as desired.
- Select Email Recipients from the project team and/or administrative departments.
- Click OK.