Table of Contents
Searching
There are two main ways to search for documents:
- Creating your own search criteria
- Using a premade filter within a Document View
Creating Your Own Search
- From the home page, select Documents.

- On the left, select one of the Document Views.
The ITS BSA team configures views to make it easier to search within specific drawers in the system. You have access to Views based on your system access (i.e., the documents stored in a particular drawer in the system about a specific department or function).
- Click the drop-down arrow to the right of the view to see existing filters. They are further explained here. Select an appropriate filter or proceed to the next step.
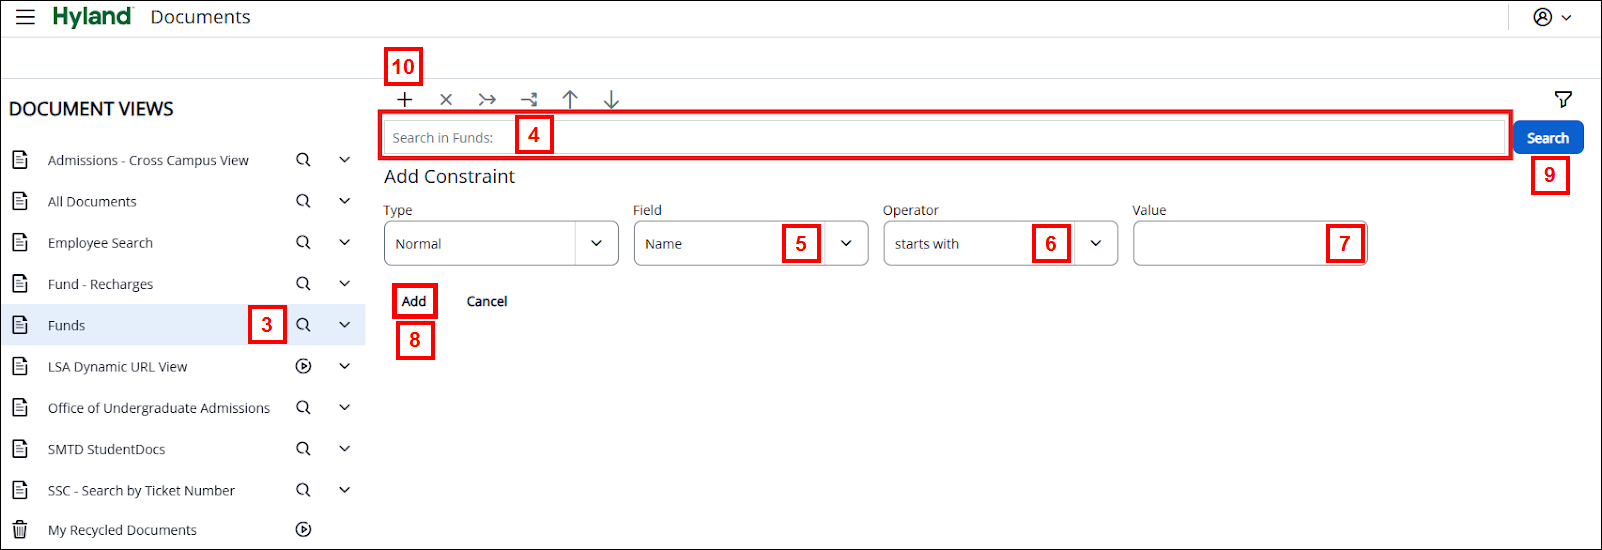
- Click anywhere in the Search in (selected view name): field located to the left of the Search button. An Add Constraint section will appear:
Leave the Type drop-down criteria set to Normal Constraint.
- In the Field drop-down criteria, scroll through the list and select the particular field that you wish to search on. This drop-down defaults to Name, which is the document system identifier value.
Note: The displayed dropdown options vary based on the selected Document View.
- In the Operator drop-down criteria, select the appropriate option for your search (e.g., equal to, greater than or equal to, is blank). This drop-down defaults to the starts with operator.
Note: If vague operators such as contains, does not contain, ends with, or does not end with are selected, the time to return the results may be substantial compared to using a direct operator such as the equal to operator.
- In the Value drop-down criteria, enter your appropriate search parameter. This is blank by default.
- Select Add to complete the search constraint. You cannot perform the search until the constraint is added. A Message appears letting you know the Constraint added successfully. Click the X or execute the search to close the message.

- Click Search to display your search results.
Note: There is no "loading" indicator when you are waiting for search results, but you do see a grid with gray lines blinking while waiting for search results to appear.
- If you want to refine your search further, select the plus icon (+) and repeat steps 4-9 to add another constraint. Multiple constraints can be added as necessary.
Note: To edit a constraint, click inside the particular constraint box and update the necessary parameters. Additionally, if you have multiple constraints, and you want to change the AND to an OR, simply click on that conjunction, and you will see that it switches from one to the other.
Using Filters
Over the years of using Document Imaging, public filters have been established for specific drawers in the system to make it easier and quicker to search for documents using standard criteria.
There are two types of filters - Public and Private. Public filters display the ![]() icon to the right of the title and the left of the carat. Private filters display the
icon to the right of the title and the left of the carat. Private filters display the ![]() icon in the same location. Public filters are visible to all users, while private filters are visible only to the user who created them.
icon in the same location. Public filters are visible to all users, while private filters are visible only to the user who created them.
Public Search Filters
To use public filters, select the down arrow immediately to the right of the Document View you want to filter.
![]()
Selecting this icon displays filters configured to assist with searching within that View (e.g., UMID Search, Project Grant Search, Name Search, FY Search).
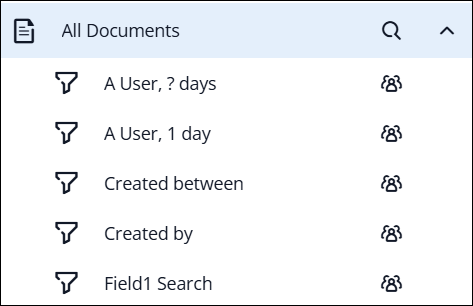
Here is an example of how these filters display under the All Documents view:
Once you select a filter, enter the required information. The filter may prompt you for an exact match, a partial match (e.g., enter UMID, enter part of Name, or enter the beginning of Name), or a range match (e.g., enter a date range).
The examples and definitions below are for the All Documents view. The available options will vary by View:
- A User, ? days: Use this filter to find any documents you created within the last so many days. You will be prompted to enter how many days back you would like to review (e.g., enter 30 for the previous month, 365 for the previous year).
- A User, 1 day: Use this filter to find any documents you created within the previous 24 hours. This filter lets you quickly review anything you just uploaded, making it easy to find and edit a document.
- Created between: Use this filter to search for all documents uploaded during a specified time period. The prompt defaults to today's date, so you can easily search for documents uploaded today. Change the dates as necessary.
- Created by: Use this filter to search for all documents uploaded by a given uniqname during a specified time period. You are prompted to enter/select both a uniqname and a date range.
- Field 1 Search: Use this filter to search all documents for a specific Field 1 value. Oftentimes, this is used for entering a UMID, voucher ID, or another type of value stored in this field.
The ITS BSA team configures these filters upon request. If your team identifies another standard criterion to use for searching, open a Document Imaging request, and we will create a new filter for you.
Private Search Filters
If you frequently need to perform the same type of search to review documents, you can save it as a private filter.
Remember, the private filter uses the ![]() icon and is only visible to the user who created it.
icon and is only visible to the user who created it.
- Follow the instructions to search for your document(s).
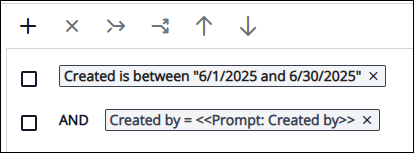
Note: While we recommend using “Normal Constraints” for one-off searching, for a repeatable filter/search, consider using “Prompted Constraints” for any parts of your search that you may need to update each time (i.e., if you need to search for UMID, but it isn’t the same UMID each time).
For example, here are search criteria to find documents created last month by a specific user (i.e., Created By field). This is what the criterion would look like for June 2025 results:
- To save this search as a private filter, click the filter icon in the upper-right corner of the search window.

- A prompt appears to enter your filter name. Click Create.
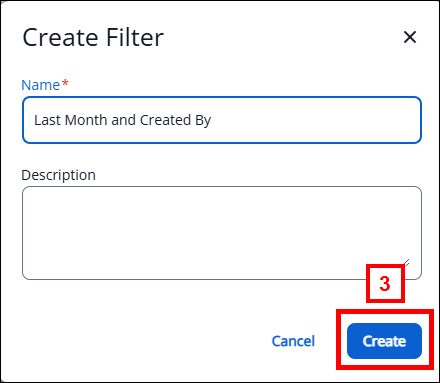
A Message appears letting you know the Filter was successfully created. Click the X to close the message.
- Your new private filter will then appear in the Document Views list on the left side of the screen under Funds.
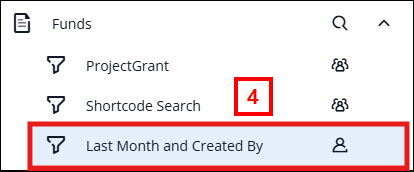
Note: These are private filters, so only you will see them. If your colleagues would benefit from having the filter available to them as well, open a Document Imaging request, and we can make it available to all your business partners. - If you need to update your filter at any time, make the desired changes to your search criteria while the private filter is selected, then click the Save button.

- Click the Search button to rerun the updated filter.
- If you no longer need a private filter, while selecting it, click the Delete button. A pop-up window is displayed. Click the Delete button to confirm the deletion.

Modifying Search Results
Once you have completed an initial document search, the four icons in the top-right corner of your screen can be used to refine your search further or organize results. Here is a screenshot:
![]()
TIP: Active panels have a blue underline beneath the icon.
![]() Columns
Columns
When you select this icon, you are prompted with this screenshot:
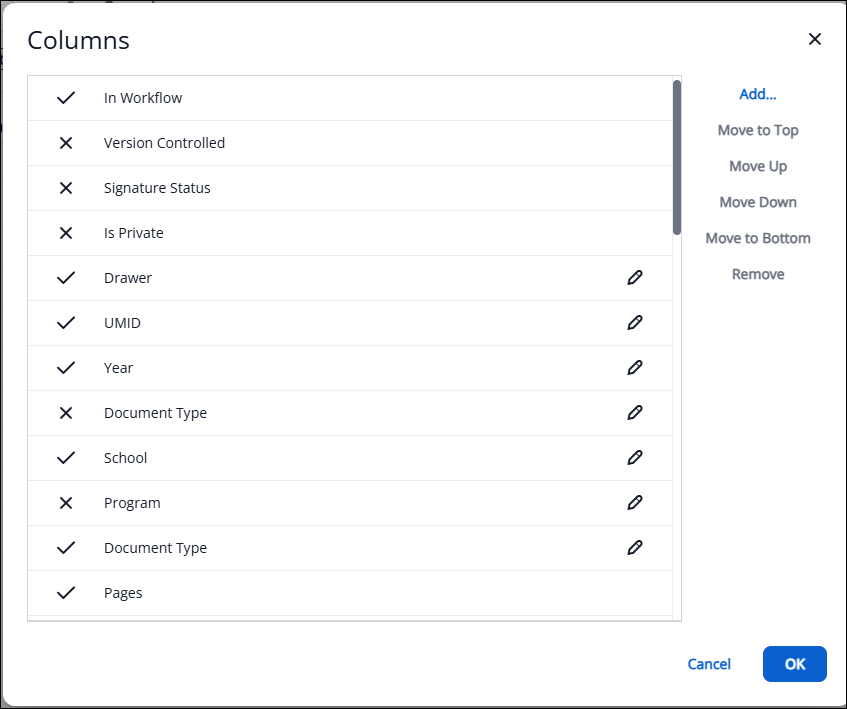
This allows you to reorder the columns in your search results, omit unnecessary columns, and rename selected column labels. These settings are retained for the duration of your current working session.
![]() Restore view settings
Restore view settings
This allows you to reexecute the most recent search you ran with a filter, without having to reselect it from the Document views or recreate the search. You can easily change any prompt parameter (e.g., if you have searched for documents created by a user but want to check for another user, click the Restore View Settings button, then change the uniqname and research). If you are starting a new search, clicking the Restore View Settings button resets the search criteria (i.e., the Prompted constraints are displayed so you can reselect them).
Note: The Restore View Setting button only shows after a search has been executed.
![]() Show grouping area
Show grouping area
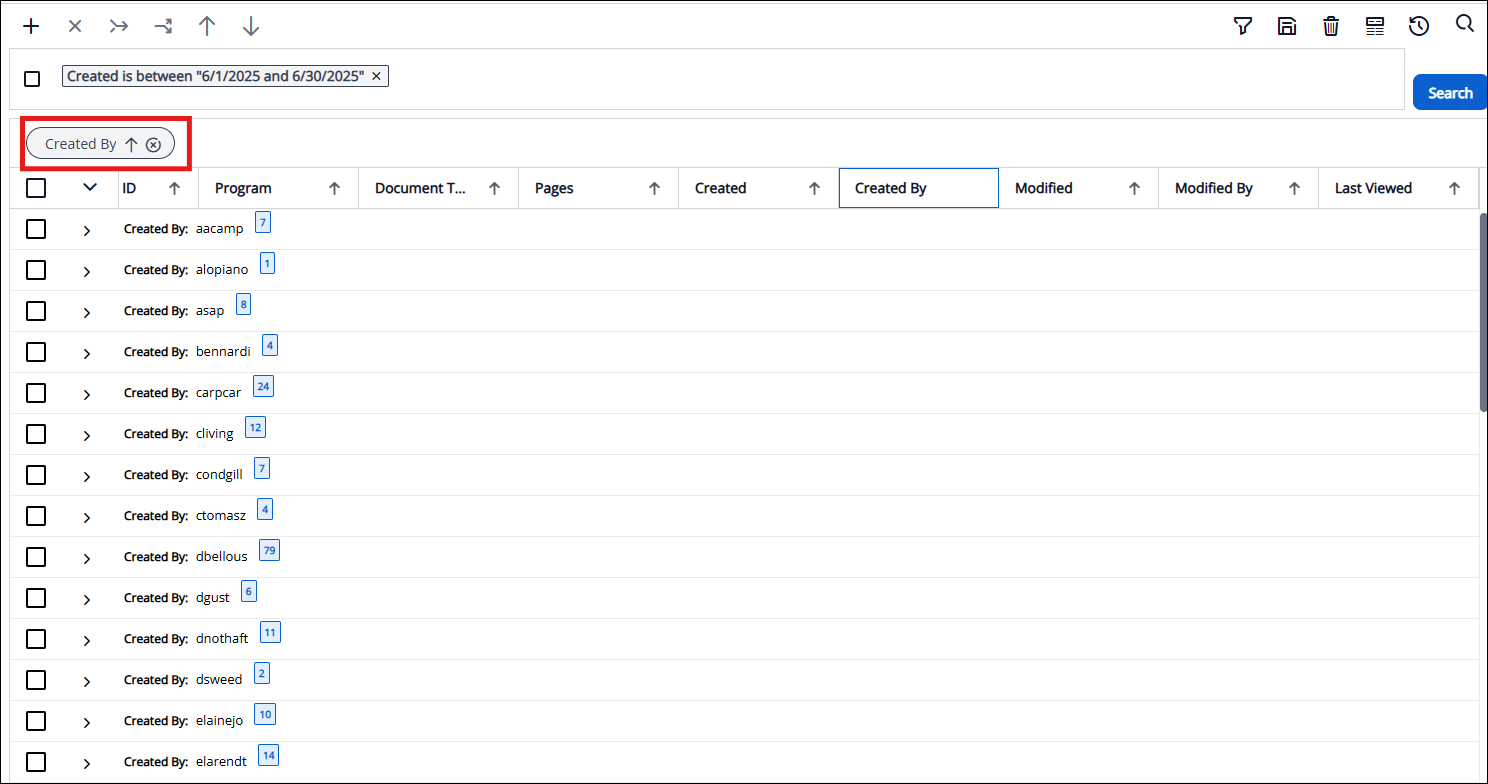
This allows you to drag column headers into the selector field to group your search results by. (e.g., You search for users who created documents in a specific drawer for a specific month, and you want to see how many documents the user entered into that drawer for that month. You select the month time frame and drag the Created By field to the selector area).
![]()
![]() Show find in grid
Show find in grid
This allows you to search for a specific string of text across all Document Properties in your search results. Clicking this button opens the prompt at the bottom of your window to enter your search query. Then, you can navigate to any matches by clicking the Previous or Next buttons. Entries that match your search criteria are highlighted in blue. Using the same search results from the previous paragraph, search for FinOps Establish, which is used in the Document Type field.

The resulting screenshot is below.
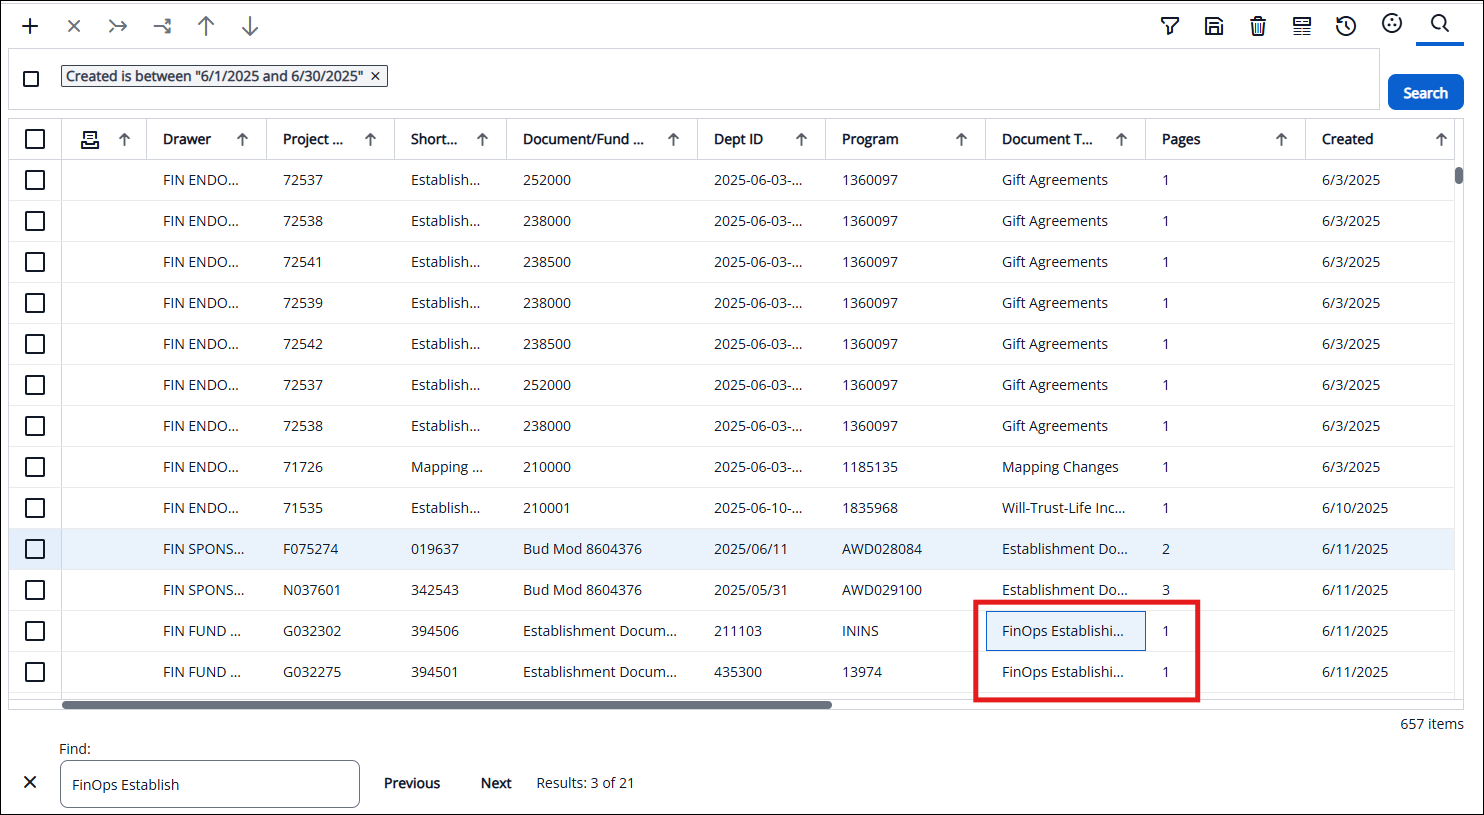
Note: The blue highlight is not showing in the screenshot. Only one highlighted item is shown in blue at a time as you select Previous or Next.
Multi-Level Sorting
Another way to refine your search results is to sort them. Within search results, you can sort by multiple data fields (i.e., if you'd like to sort by column 3, then have a secondary sort by column 4, then have a third sort by column 2). You'll see a superscript number designating the order that you've selected. To remove your sorting selection, you simply toggle back on that column’s arrow until the superscript number is removed. The first time you select the arrow, the column is sorted in ascending order. The second time you select the arrow, the sorting changes from ascending to descending. Then, with the following selection, the sorting is removed.
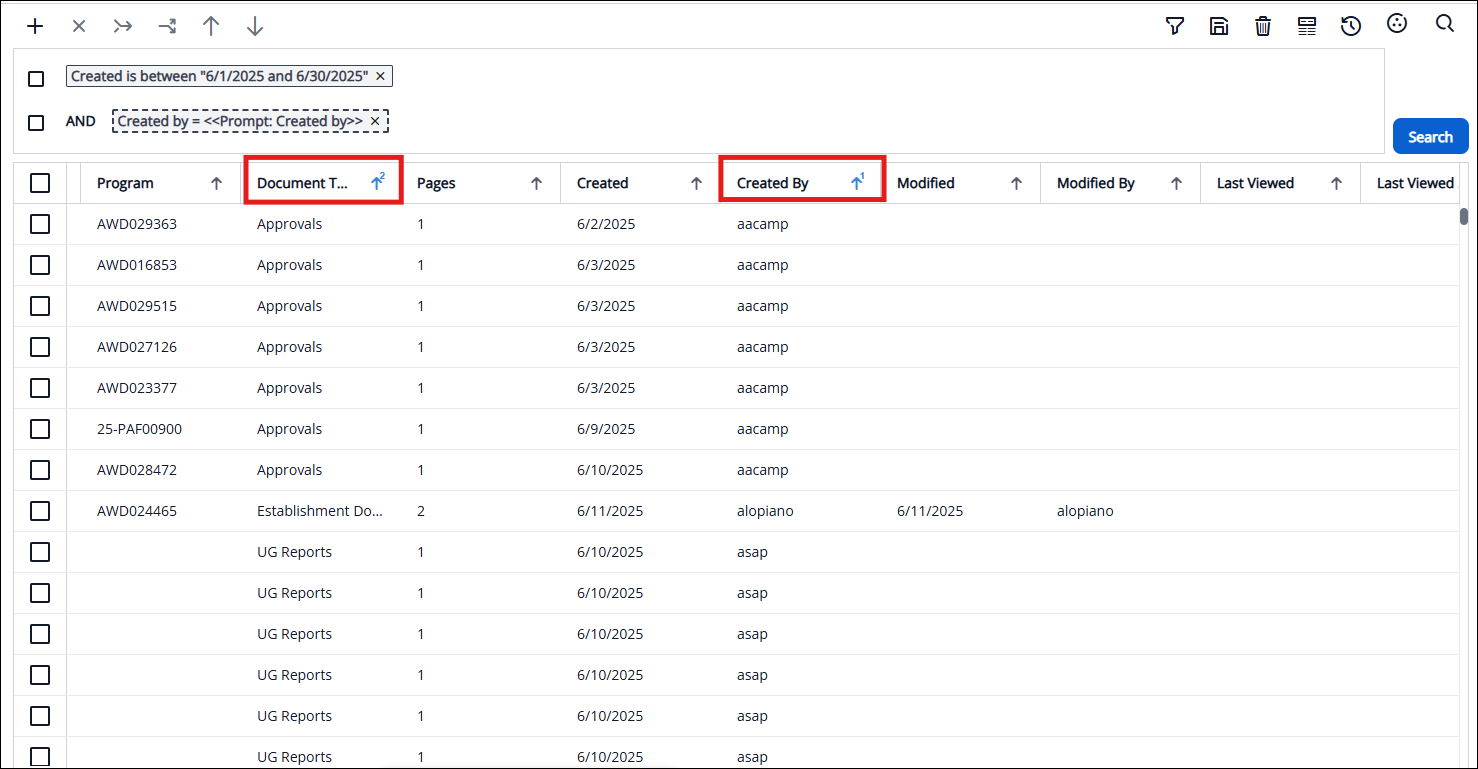
Using the same search results from above, this list is sorted by the Created By column, then by the Document Type column. Here are the results:
Viewing
When viewing a document, multiple features let you adjust how its contents are displayed.
Action Panel
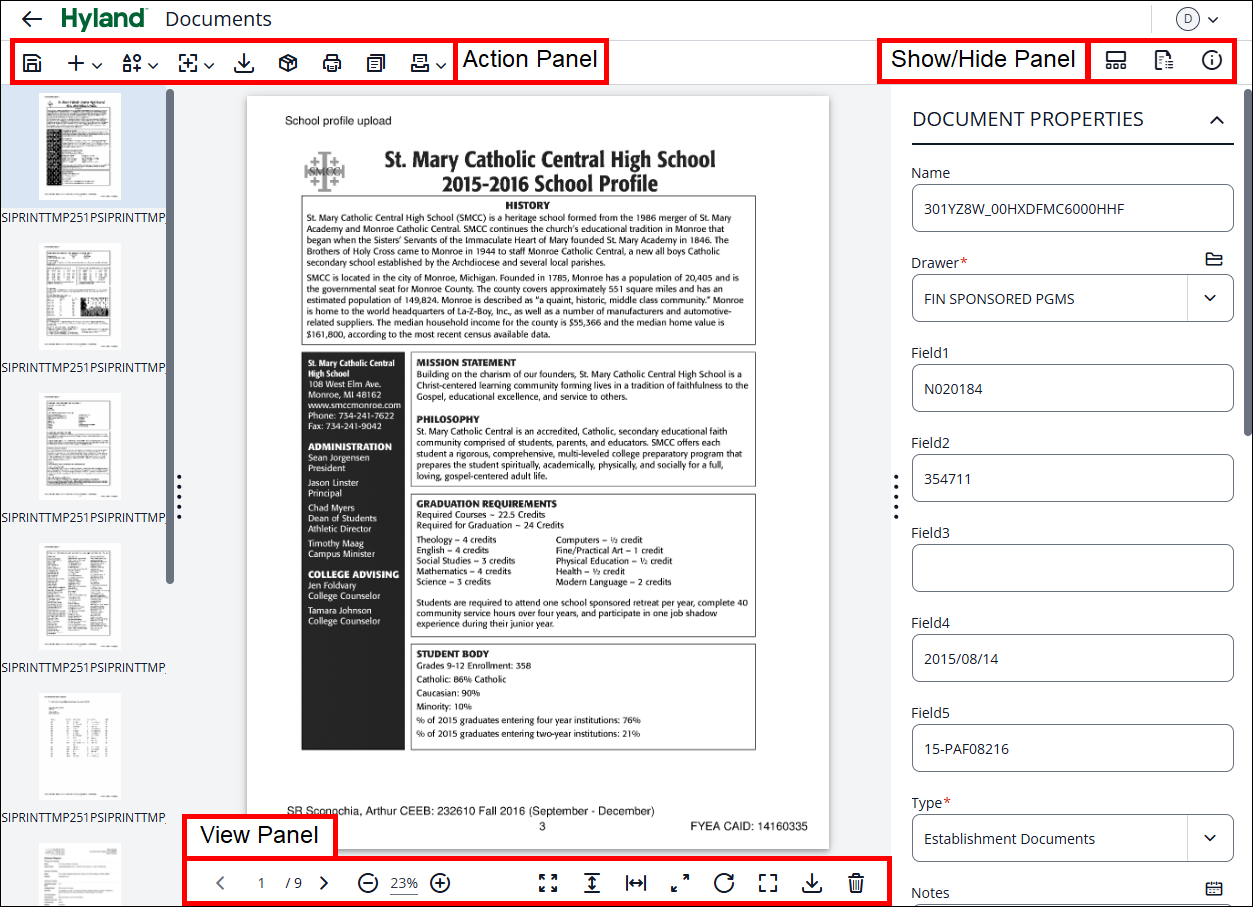
When viewing a document, the Action Panel lets you modify and interact with it. This will appear in the top left corner of the document viewer window.
![]()
Note: Depending on your assigned access, you may not see all of these features.
Here is a summary of these icons:
 Save: Allows you to save any changes to the current document (e.g., modifying keys, drawers, annotations, etc.)
 New (New Document/Create Shortcut): Allows you to create a new document. This new document has no content, just document properties. Also, allows you to create a shortcut to this document.
 Annotate Page (Hide Annotations/Create Annotation): Allows you to create a new annotation on a document page or hide existing annotations that may cover parts of the document.
 Add Page (Add after Page/Add before Page/Replace Page): Allows you to add or replace a page to a document. You can add a page before or after the shown page.
 Download Document: Allows you to download the current document in the current file format.
 Export to PDF: Allows you to export (i.e., save) the document in single-page PDF format.
 Print Document: Allows you to print the document using your print settings.
  Copy Document: Allows you to create a duplicate of the document.
 Workflow (Add to Workflow/Check for Workflow History): Allows you to add the document to a workflow or view its workflow history.
Show/Hide Panel
The Show/Hide Panel lets you show or hide other panels to free up space to view the document. This is in the top-right corner of the document viewer window.
![]()
TIP: Active panels have a blue underline beneath the icon.
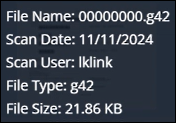
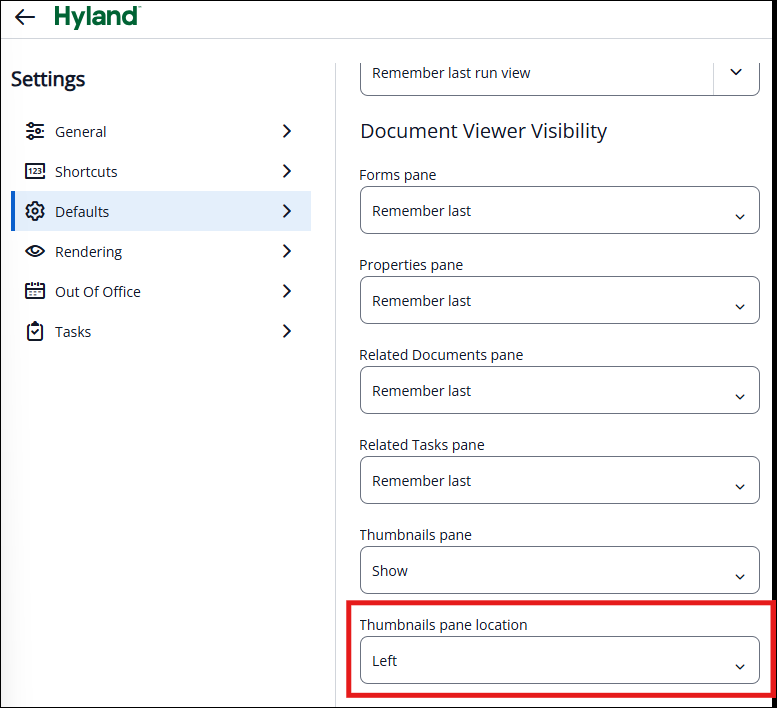
![]() Show/Hide Thumbnails: This displays the Thumbnail panel, which defaults to the left side of the document viewer window. Thumbnails are only available for TIF and G42 document types. If you would like to view individual pages of a PDF as thumbnails/previews, follow the rendering instructions below. When you hover over the thumbnail or document name, the File Name, Scan Date, Scan User, File Type, and File Size fields are displayed.
Show/Hide Thumbnails: This displays the Thumbnail panel, which defaults to the left side of the document viewer window. Thumbnails are only available for TIF and G42 document types. If you would like to view individual pages of a PDF as thumbnails/previews, follow the rendering instructions below. When you hover over the thumbnail or document name, the File Name, Scan Date, Scan User, File Type, and File Size fields are displayed.
Note: Thumbnails may appear on the left or at the bottom of the document, depending on your individual choice. To change the location, navigate to the Person Icon ![]() in the top-right, then choose Settings > Defaults. Under the Document Viewer Visibility section, scroll to the Thumbnails pane location field to select either Left or Bottom.
in the top-right, then choose Settings > Defaults. Under the Document Viewer Visibility section, scroll to the Thumbnails pane location field to select either Left or Bottom.
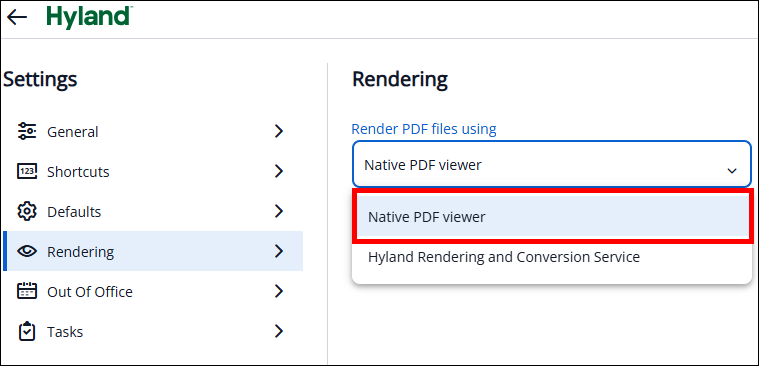
Rendering Settings: To view individual pages in PDF documents as thumbnails or previews, you must first change your rendering settings. To do so, navigate to Settings > Rendering and select Native PDF Viewer.
![]() Show/Hide Related Documents: This allows you to see related documents to the one you are viewing, based on the selected criteria.
Show/Hide Related Documents: This allows you to see related documents to the one you are viewing, based on the selected criteria.
![]() Show/Hide Properties: This allows you to hide or view the Document Properties panel.
Show/Hide Properties: This allows you to hide or view the Document Properties panel.
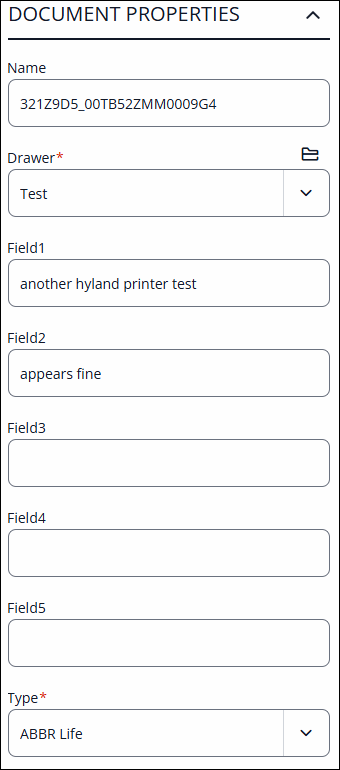
The Properties Panel has two relevant sections: Document Properties and Page Properties.
Document Properties: This lists the document keys: Drawer, Fields 1-5, and Type.
These keys are editable with the proper access.
Page Properties: File name and type are shown here.
View Panel
When viewing a document, you can use the View Panel to adjust how the document displays on your screen. This appears at the bottom of the document viewer window. The options that appear depend on which type of document you are viewing (i.e., pdf, tif, docx, etc.) and your individual access.
![]()
![]() Page Navigator: The active page number is the number on the left. Use the left and right arrows to navigate between pages.
Page Navigator: The active page number is the number on the left. Use the left and right arrows to navigate between pages.
![]() Zoom Level: The number displayed here is the zoom level. Adjust by either manually dragging the scroll bar or using the plus or minus symbols to the right and left of the scroll bar.
Zoom Level: The number displayed here is the zoom level. Adjust by either manually dragging the scroll bar or using the plus or minus symbols to the right and left of the scroll bar.
![]() Fit Content: Selecting this displays the document at its largest size, with the edges visible.
Fit Content: Selecting this displays the document at its largest size, with the edges visible.
![]() Fit Height: Selecting this displays the document at its largest size while preserving the top and bottom edges. This means the left and right sides of the document may be cut off if this is selected.
Fit Height: Selecting this displays the document at its largest size while preserving the top and bottom edges. This means the left and right sides of the document may be cut off if this is selected.
![]() Fit Width: Selecting this displays the document as large as possible while respecting the left and right edges. This means the top and bottom sides of the document may be cut off if this is selected.
Fit Width: Selecting this displays the document as large as possible while respecting the left and right edges. This means the top and bottom sides of the document may be cut off if this is selected.
![]() Actual Size: Selecting this displays the document at 100% zoom. This means the document may be cut off, except for the top-left corner.
Actual Size: Selecting this displays the document at 100% zoom. This means the document may be cut off, except for the top-left corner.
![]() Rotate: Selecting this rotates the document left or right.
Rotate: Selecting this rotates the document left or right.
![]() Full Screen: Selecting this fills your entire monitor with the document viewer.
Full Screen: Selecting this fills your entire monitor with the document viewer.
![]() Download Page: Selecting this downloads the currently viewed page in its current file format.
Download Page: Selecting this downloads the currently viewed page in its current file format.
![]() Delete Selected Pages: Selecting this deletes the selected pages in the thumbnail view panel.
Delete Selected Pages: Selecting this deletes the selected pages in the thumbnail view panel.
Caution: This action cannot be undone.
Help
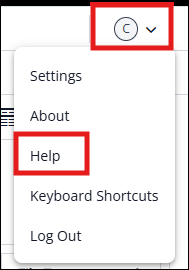
If you need further assistance, the ITS Document Imaging Support site can be accessed by clicking the Person Icon in the top-right corner and selecting Help.