Selecting your Assets
- Carefully consider the filter criteria for each section. Sections can be created to filter by various metadata (e.g., the beginning of or part of a filename, a particular keyword, an event, a location). It is important to think of what is sustainable, especially when using the dynamic capability.
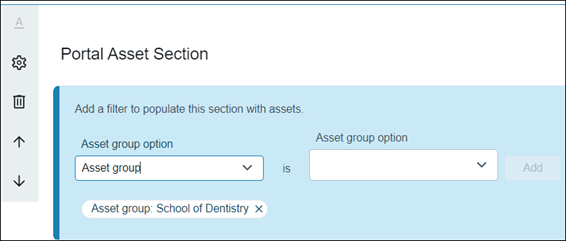
- Include your particular Asset Group as part of the criteria in your portal sections to ensure that your portal only contains assets that your unit has uploaded.
For example: ag:({Stamps Arts & Design}) or select your Asset Group from the filter dropdown.
- Use the Advanced Search functionality to find the assets you want to include.
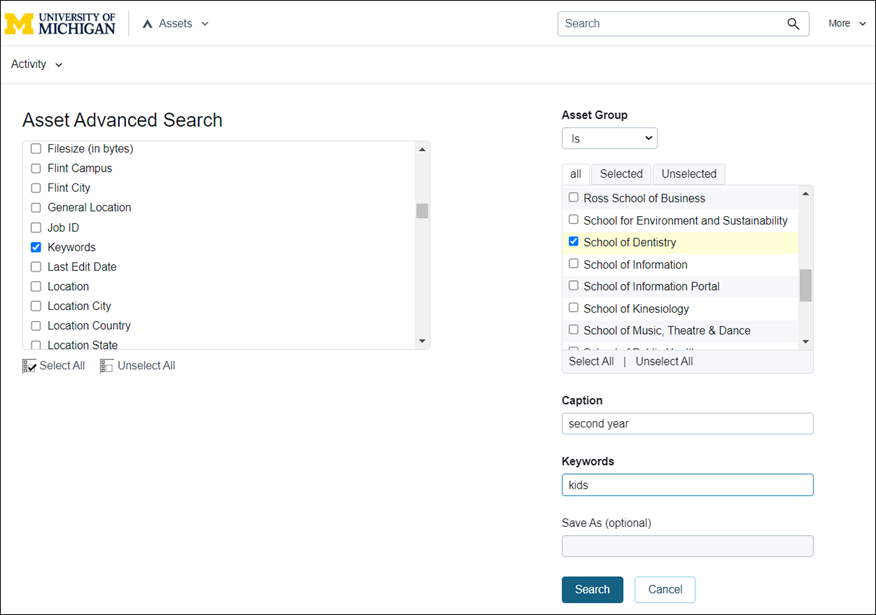
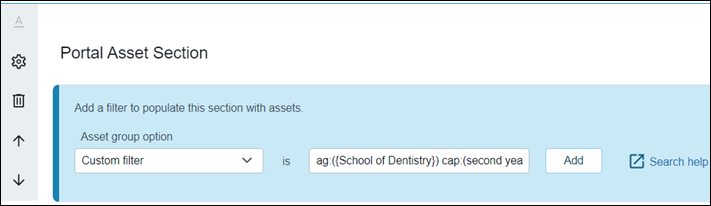
- Once you have the results that you truly want, copy/paste that search criteria (found on the top Search box) as a custom filter in your portal definition. This is the easiest way to ensure you have the correct syntax, particularly when you are including multiple criteria for your portal section.
For example: Photos for second year dentistry students that contain kids are found by: ag:({School of Dentistry}) cap:(second year) key:kids
- Set up sections dynamically to allow for assets matching the section filter to be automatically added (i.e., new assets uploaded to DAC which meet your criteria for this particular section of your portal, will then be added without you needing to manually add them).
Considerations on Design/Setup
- Create a navigation menu or a table of contents to allow easy access to navigate within your portal. This serves as a means to have quick links to either multiple sections within your portal, or even to multiple portals (i.e., portals within a portal)
- Be aware that settings do not cascade from one portal section to the next. When creating sections, the particular settings/permissions (i.e., downloading or sharing) need to be set on each section.
- In certain circumstances, create a template to use. Essentially, you create a portal with a basic structure (e.g., layout, color) that you can then duplicate in order to use on multiple portals that you will be creating. Creating this template will save you some time if you want consistency among your portals.
How to build this portal
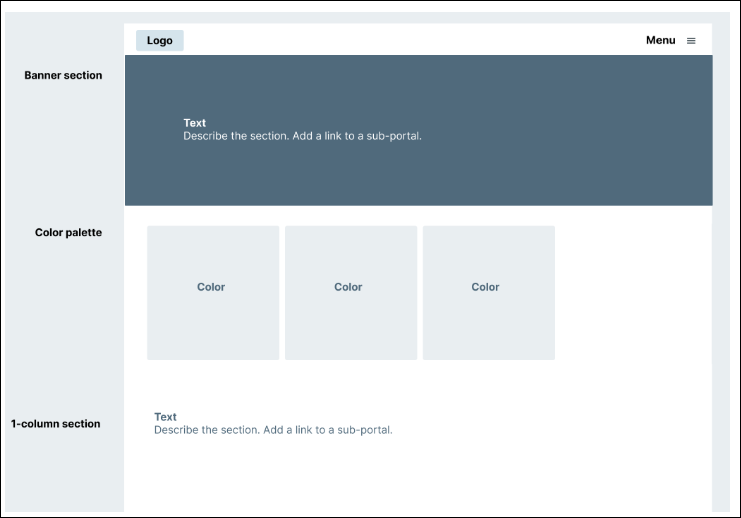
- Click Brand on the Choose a Portal Type page.
- Click Add logo and search for a logo in your DAM.
- Click Add menu and add links or a table of contents.
- In the banner section text editor, add a header and text describing the portal and what it contains.
- Click Change background color and select a color.
- In the color palette section, hover over a color block and click Edit. Add your brand colors, HEX, and other color values. Repeat for your other brand colors.
- Delete the default section below the palette.
- Add a text section by clicking Add section, Column section, and 1 Column.
- Click Add column and Add text. Describe the section.
- Once you’ve created sub-portals, add a link to a sub-portal by highlighting a portion of text and selecting the link icon. Make sure that your subportals have the same share settings as the main portal.
- To add another text section with a different background color, add a banner section. Click Add section and Banner section. In the banner section text editor, add a header and text.
- Click Change background color and select a color.
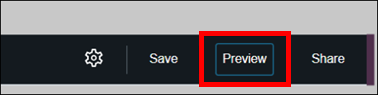
- Toggle between the create portal view and the preview view to verify how your portal will be displayed.
- Enable the Search function within each section of your portal to assist users in finding assets and/or filtering results.
Note Although a portal section can display up to 10,000 assets, it might be cumbersome for users to scroll through so many assets.
When Ready to Publish
- Consider embedding your portal link on your unit‘s website (behind the SSO login) to keep access limited to U-M credentials.
- Create a user guide for your portal audience. This will serve as a guide to how to navigate and/or understand what assets are available to them. Take a look at a sample guide for reference.
Last Updated
Monday, October 9, 2023