Overview
This step-by-step procedure demonstrates how to send emails using Marketing Cloud.
Emails in Marketing Cloud must be assigned a send Classification of either Commercial or Transactional. It is critical that emails are classified correctly. Each separate email in violation of the CAN-SPAM Act is subject to a $43,280 fine. A misclassification of emails could cost the University millions of dollars in fines and you could lose your ability to send marketing emails. Read the descriptions below, refer to the Commercial vs. Transactional Emails chart, and/or submit a help ticket to determine the appropriate classification.
- Commercial Emails: The CAN-SPAM Act defines a Commercial email message as "any electronic mail message the primary purpose of which is the commercial advertisement or promotion of a commercial product or service." Commercial messages must include a mechanism to unsubscribe, the physical mailing address of the sender, and a notice of advertisement if unsolicited. Refer to Send Classifications for Marketing Cloud Email for more information.
- Transactional Emails: Transactional (or Relationship) emails consist of content that includes, but is not limited to:
- Official communications
- Transaction confirmations/updates
- Information about a free product, service, resource, or event
Step-by-Step Procedure
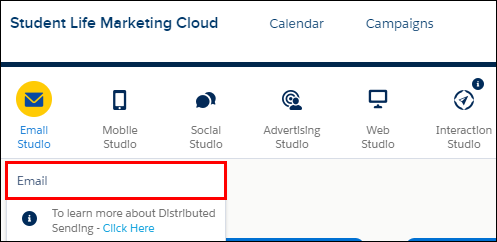
- Log in to Marketing Cloud.
- Select Email from the Email Studio drop-down list.
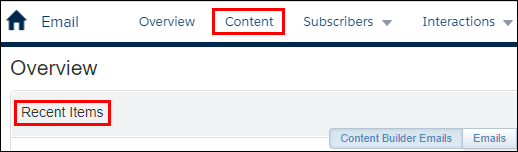
- Select a template from one of the following locations:
- Recent Items section of the Overview tab.
- Shared folder list on the Content tab.
Notes:- If commercial, verify that the email template has the proper footer, which includes an unsubscribe link. Content > Folders > Shared > Subscription Footers.
- DO NOT edit the footer. If edits are needed for your unit's footer, submit a help ticket.
- Click Send.
- Select Default Commercial or Default Transactional from the Send Classification drop-down list.
Warning: It is critical that emails are classified correctly. Each separate email in violation of the CAN-SPAM Act is subject to a $43,280 fine. A misclassification of emails could cost the University millions of dollars in fines and you could lose your ability to send marketing emails. Read the descriptions in the Overview section of this document, refer to the Commercial vs. Transactional Emails chart, and/or submit a help ticket to determine the appropriate classification.
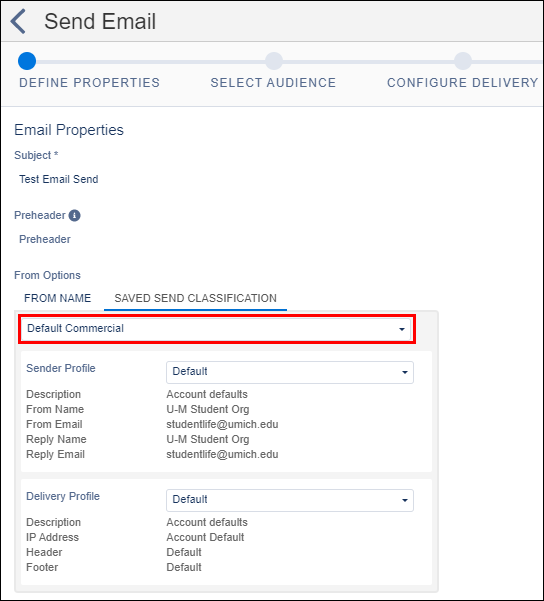
- Select a Sender Profile from the drop-down list.
- Select a Delivery Profile from the drop-down list.
- Click Next.
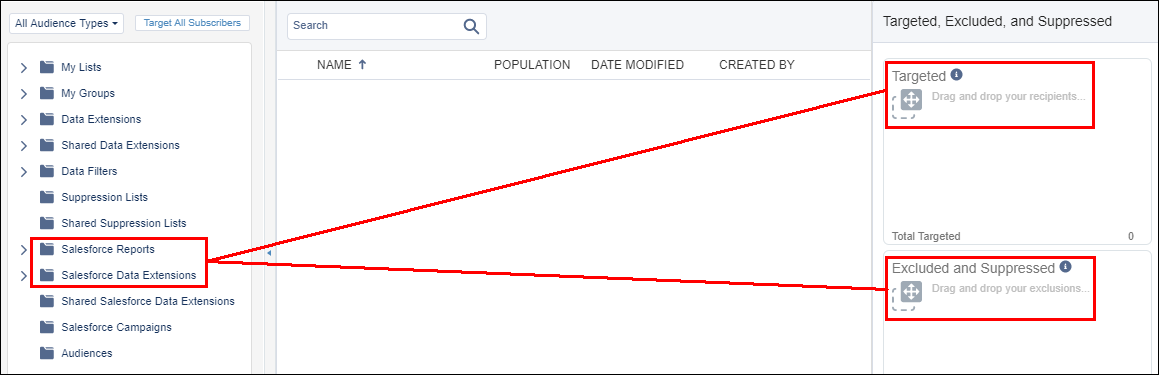
- Drag-and-drop applicable recipients from the Salesforce Reports or Salesforce Data Extensions folders to the Targeted section.
 Note: If the report displays a Sendable value of No, verify that the Contacts and Email objects are included in the report. Refer to Marketing Cloud: Build a Salesforce Report for a Targeted Audience for additional information.
 - Drag-and-drop excluded recipients from the Salesforce Reports or Salesforce Data Extensions folders to the Excluded and Suppressed section.
Note: If commercial, you must include the corresponding “OptOut” Salesforce Reports or Salesforce Data Extension that relates to footer in the template.
- Click Next.
- Adjust Configure Delivery settings as desired.
- Click Next.
- Review all settings.
Notes:
- If commercial, verify that the email template has the proper footer, which includes an unsubscribe link. Content > Folders > Shared > Subscription Footers.
- DO NOT edit the footer. If edits are needed for your unit's footer, submit a help ticket.
- Check the This information is correct and this email is ready to send box.
- Click Send.
Last Updated
Friday, December 11, 2020