Overview
Cisco Finesse is an Agent and Supervisor Desktop that is completely web-based. No additional program is needed on the PC other than a web browser. Cisco Finesse will not require client upgrades as in the previous desktop application.
Additional improvements over the previous web client include:
- The ability of Agents to use Cisco Jabber with the Cisco Finesse Contact Center on both Windows and macOS machines.
- An upgraded look of the Cisco Finesse web client to help increase usability.
Browser Support
The Cisco Finesse web client will work on supported browser versions of Microsoft Edge, Firefox, and Chrome.
Getting Started
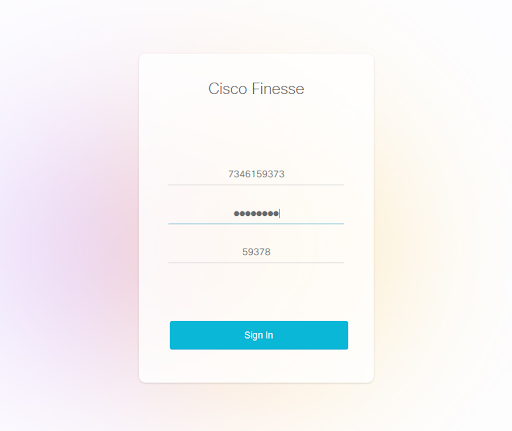
Sign in
- Click the appropriate login page link for your campus cluster on U-M’s Telephone: Contact Center Cisco Websites.
- Enter your username in the Username field.
- Enter your password in the Password field.
- Enter your extension in the Extension field.
- Click Sign In.
Note: After login, you may be asked to accept security certificates for the two contact center servers. Click Accept.
Change Status
You must be in a Ready state to receive your contact center’s calls.
To change your status from Not Ready to Ready:
- At the top of the Cisco Finesse screen, click Not Ready.
- Select Ready from the drop-down menu. You should now be available to accept calls.
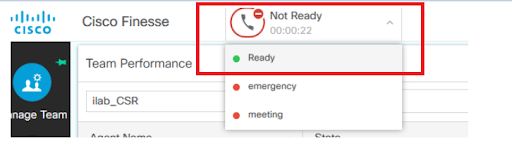
Not Ready Codes
Based on the activity you are doing with the customer at that time. If you need further instructions, please consult your Supervisor.
Sign Out
- Ensure your status is set to Not Ready. (See “Change status” above for steps.)
- In the upper right corner of your screen, click the user icon and select Sign Out from the drop-down menu.
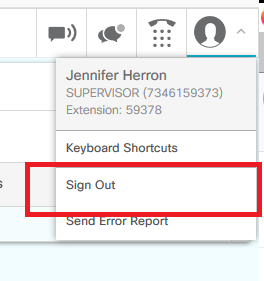
Important: Agents and Supervisors should sign in at the beginning of their shift and sign out at the end of each day.
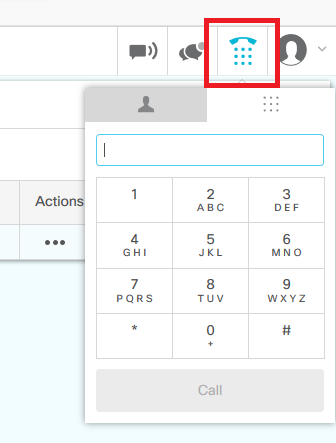
Make a New Call
- Ensure your status is set to Not Ready. (See “Change status” above for steps.)
- In the upper right corner of your screen, click the phone dial pad icon. (Clicking the Manage Call tab provides the same functionality.)
- From the dial pad, enter the desired phone number (e.g., 9124898372882).
Important: You must add “91” to the beginning of the 5- or 10-digit number.
Note: Your desk or softphone will still be available for use.
Call Functions
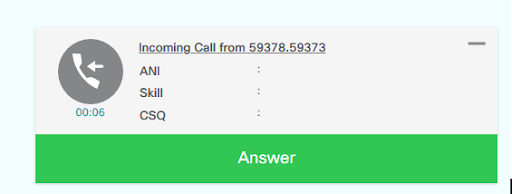
Answering a Call
- When a call comes into the queue, click Answer in the lower right corner of your screen. You are connected to the caller.
- To end the call, click End.
Note: You can receive a call from another Agent while you are in the Not Ready state.
Important: It is a best practice to periodically check to ensure your state returns to Ready after completing a call or stepping away from your computer. Some factors will affect the automatic switch to the Ready state, such as your department's After Call time, whether or not you missed a call, and who ended the call.
Holding a Call
To place a call on hold, click Hold on the call bar.
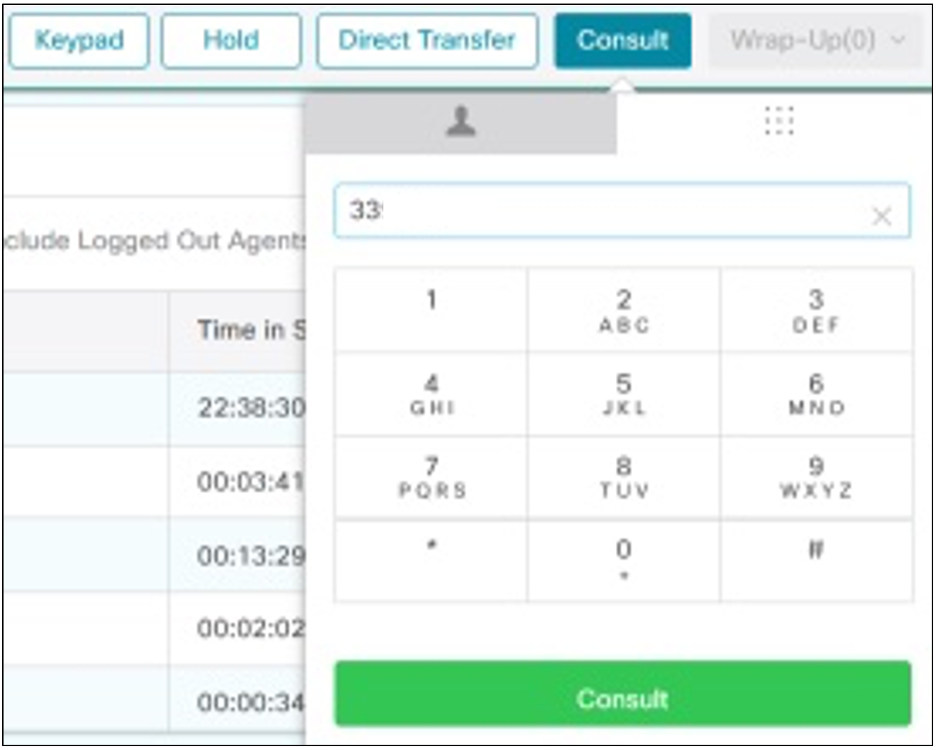
Consult, Transfer and Conference
These functions will appear when on an active call.
- Keypad: To open the dial pad.
- Hold: To place a call on hold.
- Direct Transfer: To transfer a call to another number without remaining on the call.
- Consult. While on an active call, this function will allow the Agent to ask others a question or add others to a conference phone call. Click Consult, the call control area will expand to show the keypad. Select the contact number you wish to consult and click Call. The customer is placed on hold, and you are connected to the Agent/Supervisor you called. After you consult with the customer, you can choose to either end the call or conference the customer into the Agent/Supervisor call. Click Consult again when you are finished.
Agent Reports
Home
The Home tab contains two Live Reports, which can be sorted by column.
- Agent Contact Service Queues (CSQ) Statistics Report
- CSQ Name - Displays the queue name.
- Calls Waiting - Displays the number of calls waiting in each queue.
- Longest Call in Queue - Displays the longest call in the queue.
- Agent Team Summary Report (State Information)
- Agent Name - Displays the other members of your team.
- State - Displays each person’s current state.
- Reason - Displays a system reason code. (You can ignore this column.)
My Statistics Tab
The My Statistics tab contains two additional Live Reports, which can be sorted by columns.
- Agent Statistics Report
- Calls Offered - Displays the number of calls offered to you.
- Calls Handled - Displays the number of calls you handled.
- Talk Time (Average / Maximum / Total) - Displays the time you spent talking since your last logout.
- Hold Time (Average / Maximum / Total) - Displays the time you spent holding customers since your last logout.
- Ready (Average / Maximum / Total) - Displays your time in Ready since your last logout.
- Not Ready (Average / Maximum / Total) - Displays the time you spent in Not Ready since your last logout.
- After Call Work (Average / Maximum / Total) - Displays the time you spent in After Call since your last logout.
- Recent State History
- Start Time - Displays the timestamp for the change in state.
- State - Displays the subsequent state.
- Reason - Displays the system-generated reason code that applies to the Agent.
- Duration - Displays the time spent in each state.