Overview
This procedure details how to:
- Attach Proposal Documents: Browse and attach documents from within the PAF Worksheet (6.3 Final Documents for Submission and 6.4 Supporting Documents).
- Upload New Version of a Proposal Document: Upload a new version of an existing document and keep a version history (keeps previous documents).
- View Proposal Document Version History: View past versions of documents and revert to previous versions if needed.
- Delete Proposal Document: Remove a document. Does not keep any version history.
- Use Document Controls on Other Sections of PAF and Other Project Types: e.g., how to upload, update, delete documents on Award (AWD), Modification (MOD), Award Change Request (ACR), Subcontract (SUBK), Unfunded Agreement (UFA).
Notes
- There is no limit on the number of documents that can be attached; however, each document cannot be larger than 268MB.
- Documents can be any file type (e.g., .ppt, .xls, . pdf, .doc).
- The person viewing the document must have the correct program to view your attachments. For example, if someone does not have Microsoft Project they cannot view MS Project files (.mpp).
- Consider uploading a lower version of file types to ensure everyone can view your document, e.g., upload .doc instead of .docx.
- Mac users: make sure you turn on file extensions. Any file uploaded without an extension (e.g., doc) cannot be viewed by others.
Step-by-Step Process
Navigation
Role: All Roles > Home Workspace > PAF Workspace > PAF Worksheet > Proposal Documents page
Attach Document
- Click Choose File.

- Select the file to upload, then click Open.
- If applicable, enter a Title for the document.
- Select or verify the document Type.
Note When uploading Internal Documents you have a choice of different document types. Otherwise the Type matches the section you are completing. (e.g., UM Cost Share is associated with documents attached in the UM Cost Sharing Section). - Click Attach.
Important Your document is not uploaded unless you click Attach.
Your document is attached and appears as Version 0.01.
Note You can change a document properties (Title,Type) at any time (e.g., before or after you attach the document). The change is saved when you Save the page or click Continue to go to the next page in the PAF Worksheet.
Upload New Version of a Document
- Click Choose File to locate the new version of the document that has already been attached/uploaded.
Note When uploading a new version, make sure you are on the line for the current document and not on the blank line.

- Select the file to upload, then click Open.
- If applicable, enter or change a Title for the document.
- Verify the document Type.
- Click Attach.
Notes- Verify the Version number change and the Last Upload date/time.
- A version number increase (e.g., change from version 0.01 to 0.02) signifies that you have attached a new version of the document. Similarly, if the Last Upload date and/or time differs from the Initial Upload date/time, it signifies that a new version of the document has been attached.
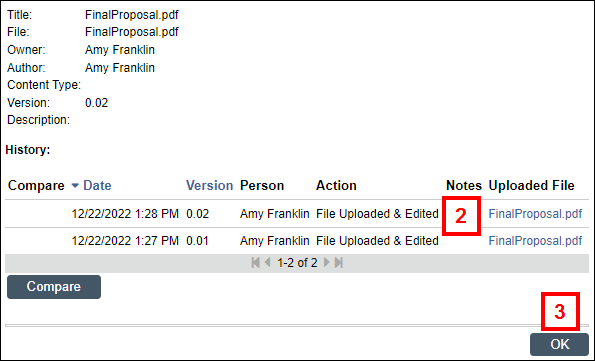
View Document Version History
- Click the version number or View Revision History.

- Click the applicable link in the Uploaded File column to view/download a particular version of the file.
Notes- Each version of the document is listed on its own line.
- To revert to an earlier version of a document, save and upload the document (follow the steps to Upload a New Version of a Document).

- Click OK to return to the previous page.
Delete Document
- Click Delete.

- Click OK to the warning.
The document and all previous versions are permanently deleted.
Document Controls on other Sections of PAF and Other Project Types
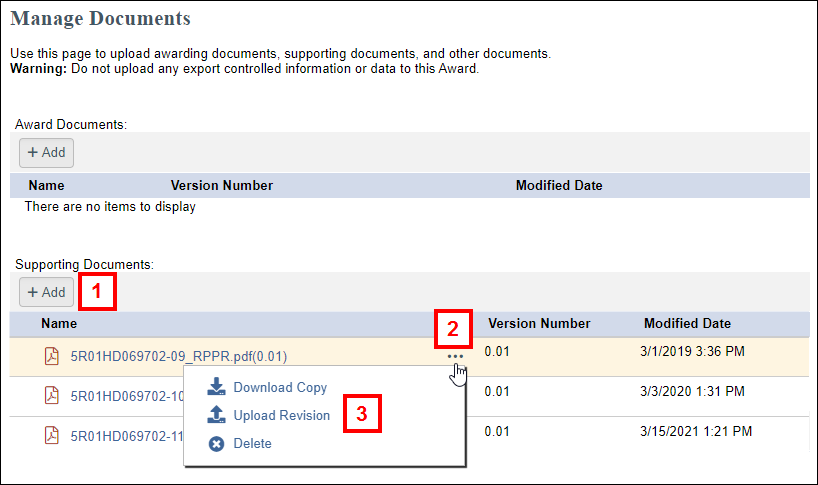
When working with documents in other project worksheets, such as AWD, ACR, MOD, SUBK, UFA, or in other sections of the PAF, the button names and controls on document stacks look different than in PAF Section 6 Submission Information.
- Click Add to attach a new document, Choose File to upload , then click OK.
Note Or you can drag-and-drop a file to attach it to the applicable section (e.g., Award Documents, Supporting Documents).

- Click the Browse browse button next to the Version Number.
- Select the applicable option to:
- download Download Copy
- upload Upload Revision – to update an existing document
- history View History
- compare Compare with Previous Version – to compare two most recent versions
- delete Delete –to remove a document
Notes
- The options that are available may vary based on the project-type, question, document-type and user role.
- On UFAs, click Add to Attach a new document, or click Update to edit an existing document, make your selections on the screen(s) that follow, then click OK.
Last Updated
Tuesday, January 7, 2025
