This document reflects an older version. Please update your bookmarks to the new Administrative Information (Add PI) guide.
Overview
The Principal Investigator (PI) is the person responsible for the protocol application. The PI’s name and contact information must be entered before the application can be created and saved. Only one PI is allowed per application.
All questions must be answered and fields filled out in order to submit the application.
Step-by-Step Process
- Click Add.
Note The Close Without Saving button is only available until the Principal Investigator (PI) is entered and the record saved.

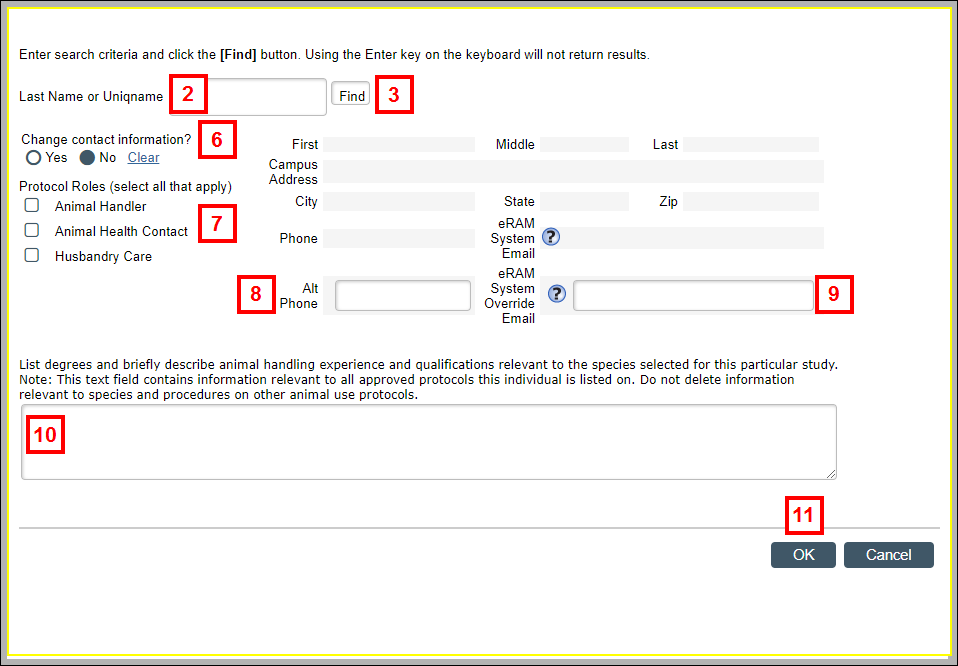
- Enter the individual’s Last Name or Uniqname, or any part of either.
Tip Use percent sign (%) as a wildcard character to specify parts of words. For example, searching for %kim% returns Hakim, Kim and Kimball. - Click Find.
Note Pressing Enter will not return results. - If the individual is listed in the search results, click the correct Name and go to step 6.
- If the individual is not listed, click the expand arrow
 next to User Not Found? for further instructions. New users can only be created by Protocol Creators.
 - Select Yes/No in the Change Contact Information? field.
Note The contact information automatically populates from the person’s M-Pathways data. If you select Yes in step 6, the fields can be edited as needed. - Check the applicable boxes under PI Role: Protocol Roles (Animal Handler, Animal Health Contact, and/or Husbandry Care).
Notes- An Animal Health Contact and an Animal Handler must be specified on the application. However, it is not required for the PI to fulfill those roles.
- Husbandry Care: Any person on your protocol that performs and is responsible for direct animal care on a regular basis. Can only be assigned by the PI and must be approved by IACUC. Tasks include:
- Identifying clinical and behavioral signs of illness in animals and reporting accordingly.
- Transferring animals to clean cages.
- Cleaning equipment located inside animal rooms.
- Sweeping/mopping and sanitation of animal rooms.
- Trash removal.
- Changing paper liners in animal cages.
- Prepping and organizing supplies in response to rodent health management procedures.
- Stocking supplies in animal rooms and taking inventory of items needed.
- Other administrative tasks related to animal care such as scheduling of student help for husbandry care, emergency coverage, weekend care, etc.
- Documenting animal care activities.
- (optional) Enter a contact phone number in the Alt Phone field.
- (optional) Enter a contact email address in the eRAM System Override Email field.
Note This is the email address that you want eRAM system generated notifications to go instead of the previous eRAM system email address. - Enter a detailed explanation in the List degrees and briefly describe animal handling experience... field.
Note If the PI was included in a previous application/protocol and an experience and qualifications description entered, that description defaults in this field. The description is editable; however any changes made are reflected on all existing applications and protocols. - Click OK.
Notes- The PI’s contact information, roles and experience explanation can be edited by clicking Update.
- If the PI needs to be changed to a different individual, click
 (delete) to remove the current PI, then repeat steps 1-13.
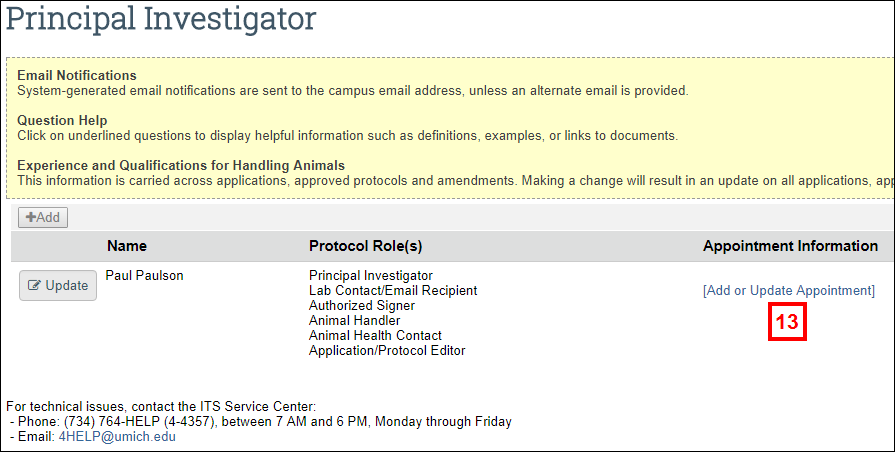
- Click Save.
Note Once the PI information is saved, the application is given a number. This is the number the application will have at every stage moving forward. - Click Add or Update Appointment.

- If the appointment under which the PI is filing the application displays, select the appointment, then go to step 23.
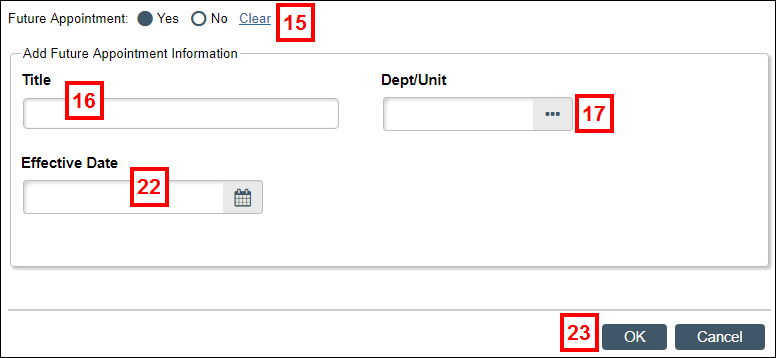
- If the appointment is in the future and not listed, select Yes in the Future Appointment field.

- Enter the PI’s future appointment in the Title field.
- Click ... (browse) in the Dept/Unit field.
- Enter all or part of the appointment’s department name in the Filter by field.
Note You can search for the department by ID by selecting Department ID from the Filter by drop-down menu and entering the ID in the text field. - Click Go.
- Select the correct Department.
- Click OK.
- Enter or select the Effective Date.
- Click OK.
- Click Save.
Last Updated
Monday, November 20, 2023
