
Content
Before You Upload:
- Ensure that your assets are directly accessible from local or shared network folders.
You need to be able to directly select files in this manner for the upload process. You cannot load them from Google Drive, DropBox, or other systems. - Review/rename your assets to ensure no duplicate filenames are loaded.
Remember, the filename is the unique identifier in the DAC system, so it is imperative that every asset added to the system has a unique filename. This document provides the standards and recommended file naming convention for ensuring that uniqueness. - Enter metadata during your asset review process.You will use a photo management tool for ingest and tagging, such as Adobe Bridge or Photo Mechanic for uploading metadata. You will enter all of the data fields that will then be automatically imported from the embedded asset data upon asset upload (i.e., if your standard process for selecting your final, approved assets uses a photo management tool). Additional information on Metadata and Metadata templates for use in the photo management tools are available.
- Consider internet bandwidth and volume of assets when you plan to upload.
Uploading assets can be time-consuming, so you will need to learn what works best for you (e.g., how many assets to load at one time? where is the best location for you to complete this process -- perhaps on campus?). The asset uploader has a two-hour security time-out. So, if you initiate an upload and it hasn't been completed in the two hour timeframe, you will be logged out and you will need to determine which assets still need to be uploaded.
Uploading Assets
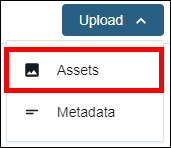
When ready to upload assets, the Asset Expert accesses the Upload button from the main DAC dashboard and selects Assets.
The critical step of this process is having your assets directly accessible from local or shared network folders.
Remember to be patient when uploading assets. The process may take awhile. If you see this blue box when viewing an asset, the upload for that asset has not yet completed. Users should NOT try to edit metadata on assets if you see this message:

After the process completes (i.e., not necessarily immediately after, but when time permits), you should review and update the metadata on the uploaded assets for completeness and accuracy. In particular, you want to make sure that you have the required fields entered.
Uploading Metadata
The first action to take when uploading metadata is selecting the assets that you plan to update (i.e., click the check mark in each asset’s thumbnail, or drag to highlight a group of assets, or a combination thereof … whatever works best for you).
Note If your selection is large, you will notice that the system only permits a viewing/selecting of up to 500 assets per page at a time.
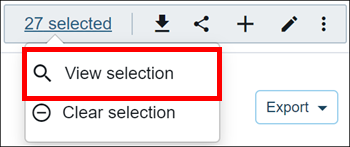
Once you have selected your assets, the selection bar will display at the top right of the screen.

Click on the “## selected > View selection” so that your Assets in Selection are solely displayed. These are the assets that you plan to update.
You can perform metadata updates in three different ways:
- Individual Asset Update - update a metadata field for a couple of assets.
- Batch Asset Update - updating the same metadata field for multiple assets.
- Updates via CSV - allows an individual without system access to update the metadata. This is also good for updating multiple metadata fields for multiple assets.
Individual Asset Update
If you would like to individually update the metadata on the assets in the selection (i.e., applying potentially different metadata), simply click on the first asset’s filename listed, update the metadata, then navigate to the next asset in the selection by clicking Next.

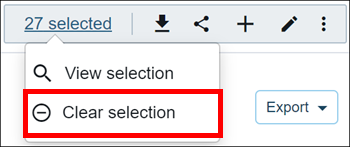
When done, click Return. You will be presented back to the list of the assets in your selection. At this point, you’ll want to remember to clear this selection. If you don’t remember to do this step, whenever you select more assets, it will add to this selection. In addition, if you want to start fresh and perform a new search for assets, it will prompt you with this asset selection and not return to ALL system assets.
Bottom line: You must clear your selection.
Batch Asset Update
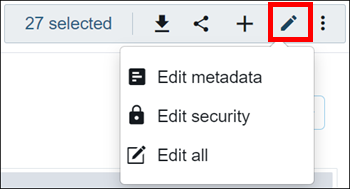
If you would like to perform a batch update of the metadata on the assets in your selection, you can select one of three updates, via the Edit  icon:
icon:
-
Edit metadata is a means to apply the same metadata to all the selected assets
-
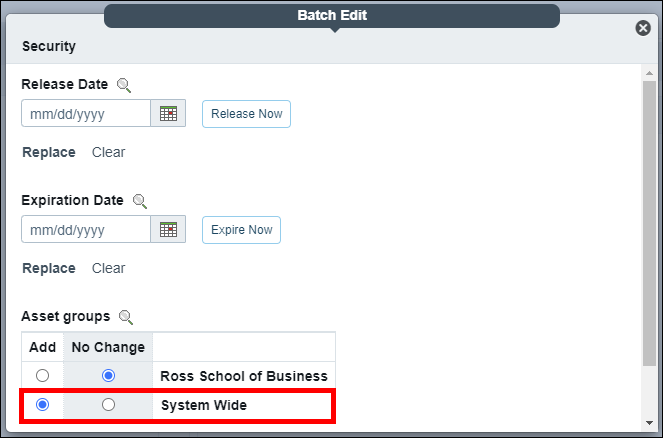
Edit security is a means to update three security-related aspects on the assets. Most commonly, it will be used to Add these assets to the System Wide Asset Group. You do this by simply clicking the button under Add for the System Wide row, as pictured here:
-
Edit all is a means to update both the metadata and the security-related aspects for all the selected assets.
Updates via CSV
If you would like to have another colleague (perhaps an Asset User in your unit) assist in updating the metadata in a spreadsheet or if you would like to do it, you can prepare metadata in a CSV (Excel) format and import the spreadsheet to update metadata for a selection of assets. This process is also good for updating multiple metadata fields for multiple assets.
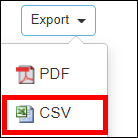
To start this process, you first need to select the assets that you plan to update (i.e., perform a search based on some criteria). Then, in the upper right of the screen, click the Export to CSV.
When the export is complete, you access the file by navigating to Activity > Exports.
Realize that when you open the file in Excel, you will see LOTS of columns of data. And the last twenty columns are purely system-related information that is not to be included when updating your metadata. The first action that you need to take is to remove all extraneous columns from your file, to prepare it for your update.
The first column, Column A, titled Filename, is the critical column that you need to keep as is. No updating is to be done on Column A!
For the metadata fields that you want to update, you need only keep Column A plus those particular columns in the spreadsheet, with the column name(s) as is.
For example, if you plan to update the Location, Description, and Suggested Alt Text fields for your assets in this selection, you only need to keep 4 columns → Filename, Alt Text, Description, and Location. You can remove all other columns, save your CSV (making sure to keep it saved as a CSV UTF-8 file format), and then either share the file with a colleague to begin entering in the metadata, or you begin entering the metadata.
Note Make sure to pay attention to the type of field you are including in your update. Make sure the format is correct and you are only adding values that exist if updating a metadata type that is a dropdown.
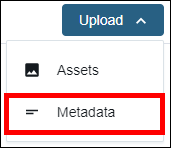
Once you have your CSV file complete with all your metadata updates, you (an Asset Expert) access the Upload button from the main DAC dashboard and select Metadata.
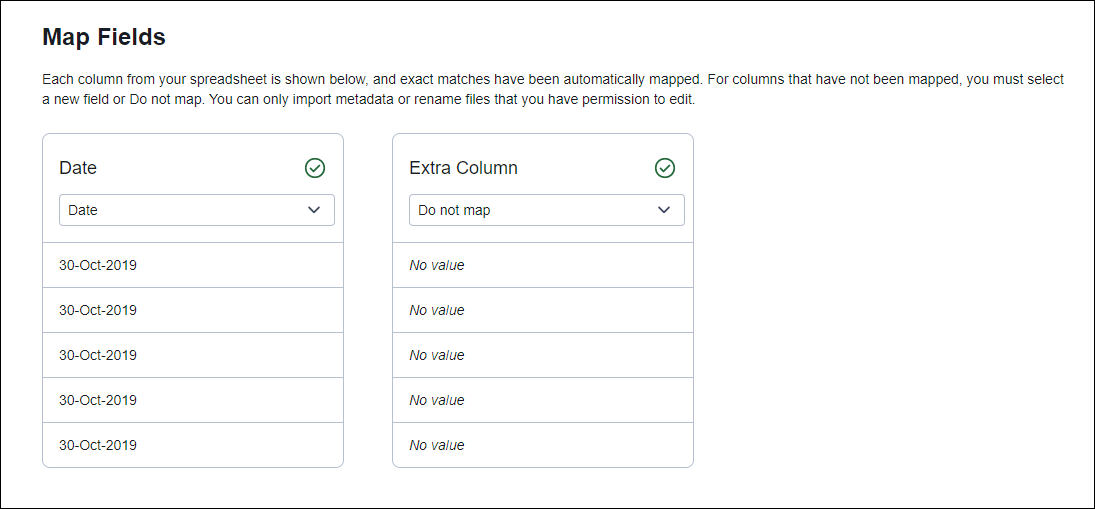
Select your CSV file and click the Next: Map fields button found on the bottom right of the screen.
Review the mapped fields. Assuming you left the field headings as they were exported, the mappings should be selected automatically for you. Double check that the right data is mapped to the correct field and make any updates as needed. If a field does not need to be imported, select Do not map.
Click Next: Review details at the bottom right of the screen. This will bring you to the final step in the process before importing where you are presented with a summary of how many assets will be updated.
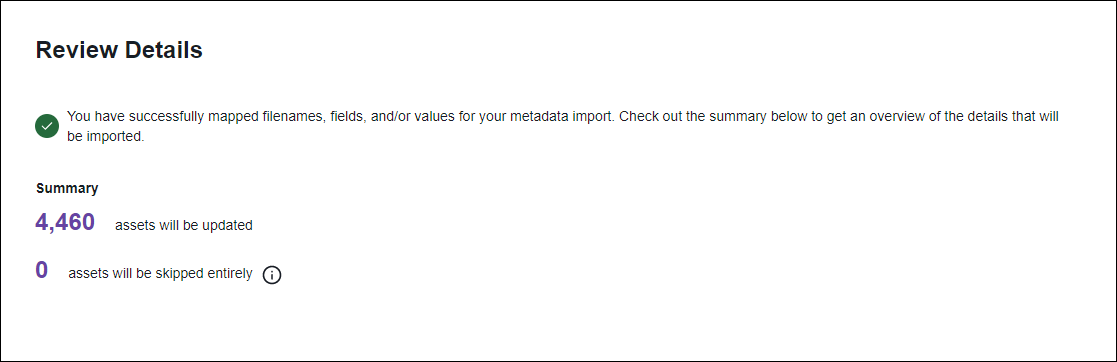
If any assets will be skipped, you will be able to see which ones will be skipped after importing.
Click Import at the bottom right of the screen. Depending on how many assets will be updated, it may take a bit of time to complete. You will get an email when your import is finished.
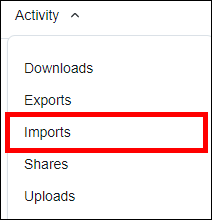
To return back to the Import area to review the results later, from the main dashboard, select the Activity dropdown and then select Imports.
You will see a listing of imports:

If there are any skipped assets, you can select the 3 vertical dots next to the import and click Download skipped files report to review. The report will let you know a reason why the asset was skipped.
More information about importing metadata, including information on how to format the CSV, can be found in this support article from Acquia DAM.