Overview
ImportantGoogle Chrome is the recommended browser for Pinnacle. Firefox is also compatible.
This document provides a reference for navigating in Pinnacle. Examples show what is visible while using the Back Office User role. If you change from one role to another, the available menus and functions change.
Navigation Layout
The main window can be divided into two parts, the Navigation Frame and the Content Frame. The top part of the window, the Navigation Frame, contains all of the controls you need to navigate to specific parts of the application. The bottom part of the window, the Content Frame, provides the data to search or act on based on what area of the application you’ve navigated to.
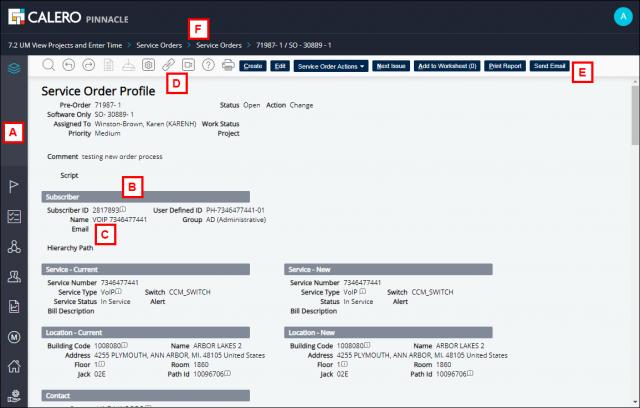
The following is a brief description of each of these screenshot elements.
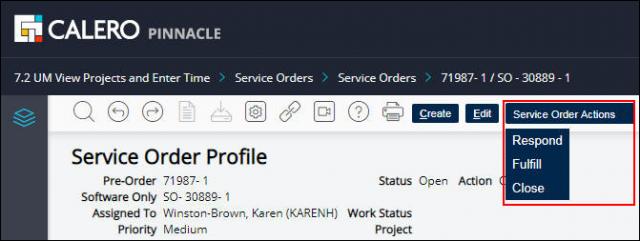
- Main Menu (A) - These menus provide access to all of the functionality available to the selected role.
- Tabs (B) - These provide easy access to the different menu items in the selected menu. When you select a menu, these tabs change to match the menu items for that menu.
- Tab Menu Items (C) - These clickable links provide access to functions that relate to the data on the current page.
- Icons (D) - The icons in the Icon Bar enable you to perform additional functions, navigate in the application, and access the Online Help.
- Action Buttons (E)- These buttons provide functions relative to the specific page you are viewing.
- Breadcrumb (F) - This identifies exactly what page you are viewing in relation to the main menu. Each step in the navigation path can be used for backtracking and quick navigation.
Main Menu and Tabs
Clicking the menu displays drop-down commands and the tabs within that menu. When you select a command in a menu, PINNACLE lists that menu’s commands as Tabs in the Navigation Frame.
Icons
The icons in the Icon Bar enable you to perform specific functions, navigate within the application, and access help screens and videos. Each icon is enabled or disabled (grayed out) relative to the page you are currently viewing. For example, the Excel icon is only enabled for List pages while the Quick Links icon is only enabled for Profile pages.
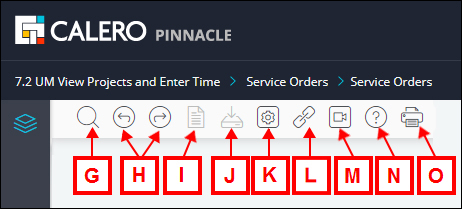
- Advanced Search (G) - Lets you use additional search fields and save your search parameters for later reuse.
- Previous and Next Item (H) - These arrow buttons are used in Profile pages to navigate from one record to another. For example, if you are viewing a series of services, these buttons let you view the next or previous service in the list.
- Worksheet (I) - This icon opens the Worksheet to apply batch updates to the selected records.
- Export to CSV (J) - This icon exports all of the rows in the List page to an Excel spreadsheet. The Excel icon is active only on some pages in the Customer Role, Account Manager role, and Department Manager Role.
- Personalize (K) - Personalizes the view (typically disabled).
- Quick Links (L) - This icon opens a list of all of the regions within a Profile page so you can quickly view a desired region. The Quick Links icon is only available when viewing a Profile page.
- Video Help (M) - If a short tutorial video is available for the page you are viewing, this icon will be available. Click the icon for an illustration of how to use this page. Custom videos that are created can be linked to this button.
- Help (N) - This button displays PINNACLE’s Online Help for the current page you are viewing. The Help directory provides the “What and Why” about each page in PINNACLE. You can print specific Help pages by selecting the checkboxes by the desired pages and then clicking the Printer icon.
- Print (O) - This icon is used to print the current page in a report format.
Action Buttons
The action buttons enable you to perform specific tasks within a page. At a high level, the buttons let you create records, edit or delete existing records, or perform context-specific actions (like running a search). PINNACLE hides or disables action buttons that are not applicable to a page’s function. For instance, if the current user does not have the ability to create a new service, the “Create” button would not appear for that user.
Breadcrumbs
In the upper left corner of the main window, PINNACLE displays a clickable path (or breadcrumb) that indicates the exact location within the application that you are currently viewing. This path helps you keep track of where you are in PINNACLE at any given time. Each step in the breadcrumb is a hyperlink that can be clicked to navigate directly to another part of the application. If at any time you are confused or uncertain about the data you are viewing in PINNACLE, first look at the breadcrumb to get an understanding of exactly what is being displayed. After drilling into a record, the best way to go back to a previous page is to click the previous link in the breadcrumb.

List Page
A list page provides summary information on a set of records in a table format. There are many different list pages within PINNACLE. Although they show different columns depending on the type of record being shown, they all work the same way.
To view a list of records without filtering them, simply click the Search button. To perform a simple search, specify a value in any of the fields above the table, then click the Search button.
Common features of all List Pages
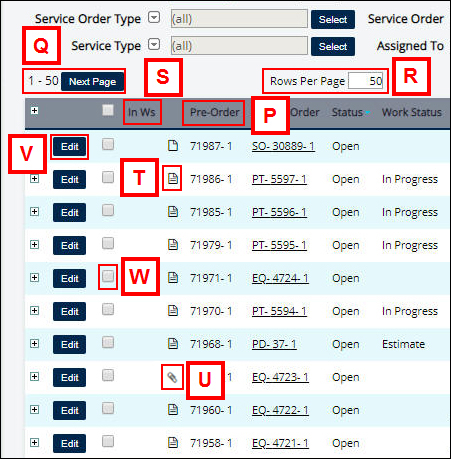
- Column Headings (P) - Provides a label to a column of information. These headings also provide the ability to sort the data ascending and descending.
- Previous and Next Page (Q) - Provides the ability to page through information. There is no limit to number of next pages a user can advance to.
- Row Display (R) - This displays the number of records that are displayed per page. The maximum number of records per page is currently limited to 250.
- In Worksheet (WS) (S) - This indicates whether a record is currently contained within the worksheet.
- Notes (T) - This icon provide a shortcut to the notes available for the particular record. Once a note is entered it cannot be removed.
- Attachments (U) - This icon provides a shortcut to the attachments available for the particular record.
- Row Edit (V) - This button provides a shortcut to allow a user to edit a record. This is the same function performed as drilling into a record and then selecting the edit button.
- Check Box and Check All (W) - These boxes provide the ability to select records in which a button will provide an action. The Check All button will select only records that are currently displayed on the page.
Advanced Search
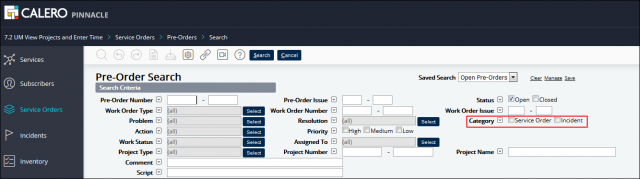
The Advanced Search provides the ability to expand your search for records across many different field types. This is useful when you need to search on specific fields that are not found in the list pages. The Advanced Search is accessed by clicking on the Magnifying Glass icon. magnifying glass icon
In the Category field, choose between Service Order or Incident to load the fields needed to populate.
Help
The help page displays help topics related to the area of the navigation and can be opened by clicking the Help icon.question mark icon 
From the help tree, you can expand a section and navigate to other areas of interest. Clicking on the Magnifying Glass icon  provides the ability to search the help content for a keyword.
Field level help can be accessed by hovering over the field or clicking on the field itself. This allows you to get useful help relative to the field you are questioning.
Information Page
Some fields have additional information available for it. These fields have an “i” button next to them, such as the Subscriber ID field in the screenshot below. Click on the “i” to view additional information relative to that field.
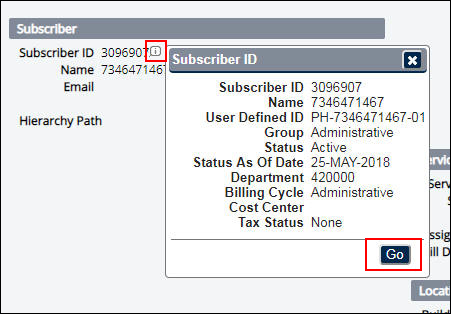
This information typically describes data that resides in a different part of the application. If you want to view more information, you can navigate directly to that record via the “GO” button.
Also notice the + next to a profile field. Click to open it and display more information.

Search and Select
The search and select “pop-up search” page is used to specify a value for a field by selecting it from a list. Fields that provide the search and select function have a magnifying glass icon next to them.
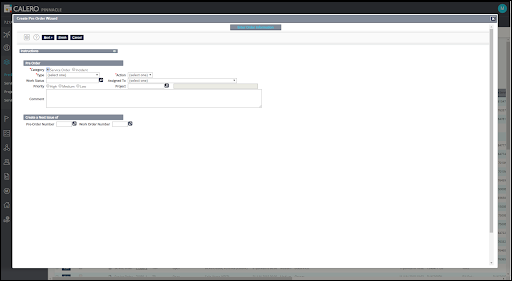
Form Wizards
The Wizard provides a structured set of steps that guide you through the process of a particular activity, such as creating a new record. Each wizard's process is divided into discrete steps to make that activity fast and easy. Each page has Previous and/or Next buttons that allow you to move backwards or forwards in the process. When you are working in a wizard, the database is not changed until you click the Finish button. Select the role 7.2 UM Maintain. Go to Service Orders -> Pre Orders -> Click on Create button