Overview
The Base Image must be properly configured before deploying a desktop pool. This document contains the steps that must be completed to ensure it is set up correctly and in accordance with vendor best practices.
Install the Operating System (for Blank Images ONLY)
- Open a web browser to MiDesktop vCenter. For more information, see steps in Accessing MiDesktop vCenter.
- Click the base image, and then click the Summary tab.
- Click Launch Remote Console and power on the VM.
- Click the VMRC menu > Removable Devices > CD/DVD drive 1 > Connect to Disk Image File (ISO), load the ISO.
- Issue a CTRL + ALT + DEL on the VMRC console to restart the VM and boot to the ISO to load the OS.
Configure Active Directory
- Before beginning, the base image must be added to U-M Active Directory. Please see Configure Active Directory Information on the Onboarding section of the MiDesktop service page to ensure you have the correct permissions to continue.
- Create an Active Directory computer object in your OU. It must have the same name as the hostname of your base image.
Log in to the Base Image and Change Admin Password (for MiDesktop-Provided Images)
MiDesktop will provide a local admin password for the base image
- Follow steps in Accessing vCenter to Manage Base Images.
- Click the base image, and then click Summary tab.
- Click Launch Remote Console and power on the VM.
- Log into the base image with the temporary credentials provided. You will be prompted to change the password at the first login.
Install VMWare Tools
sudo apt-get install open-vm-tools
Install Crowdstrike
- Verify your group has a unique Crowdstrike Customer ID. If not, please see CrowdStrike Falcon for Units for more information before continuing.
- Log in to the base image as local admin.
- Download the Crowdstrike installer from MiDesktop Downloads onto the base image, or copy it there.
- Run install file:
sudo dpkg -i ./Downloads/falcon-sensor_[version]_amd64.deb - Remove the agent ID:
sudo /opt/CrowdStrike/falconctl -d -f --aid - Add the customer ID:
sudo /opt/CrowdStrike/falconctl -s --cid=your dept cid - Restart the base image.
Install NVIDIA vGPU Driver (for GPU Base Images ONLY)
- Log in to the base image as local admin.
- Navigate to MiDesktop Downloads and download the NVIDIA vGPU driver (.deb file) and the Prod_DLS_ClientConfigToken file.
- Install driver:
sudo apt-get install /path/to/nvidia-linux-grid-[version]_amd64.deb - Modify FeatureType parameter:
sudo nano /etc/nvidia/gridd.conf
Set Modify FeatureType=1, save and exit - Copy the client configuration token to the NVIDIA GPU license directory:
sudo cp /path/to/Prod_DLS_ClientConfigToken__[token date].tok /etc/nvidia/ClientConfigToken/ - Set configuration token file permissions:
- sudo chmod 744 /etc/nvidia/ClientConfigToken/Prod_DLS_ClientConfigToken__[token date].tok
- Verify the change: sudo ls -l /etc/nvidia/ClientConfigToken
- You should get this result: -rwxr--r-- 1 root root
- Restart the base image.
- Check license status: nvidia-smi -q | grep "License Status"
Configure Base Image Active Directory
- Download Horizon Agent (.tar.gz file) from downloads.midesktop.it.umich.edu and extract the files:
tar -zxfv /path/to/VMware-horizonagent-linux-[version].el8.x86_64.tar.gz - Verify the domain is discoverable via DNS:
sudo realm -v discover adsroot.itcs.umich.edu - Run the Horizon Agent pre-check:
- cd /path/to/VMware-horizonagent-linux-[version].el8.x86_64
- sudo ./easyinstall_viewagent.sh -p
- Join the domain using the Horizon Agent easy installer:
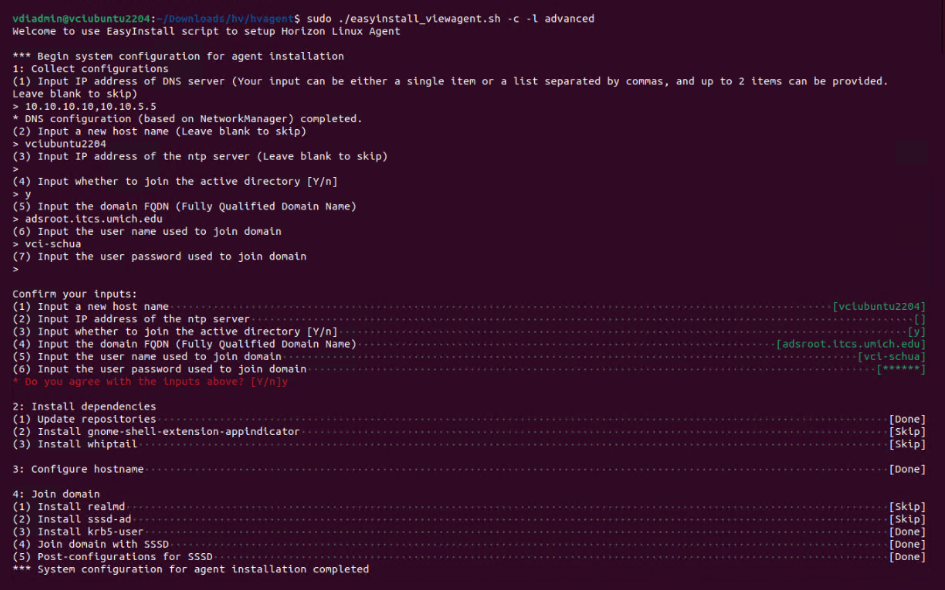
- sudo ./easyinstall_viewagent.sh -c -l advanced
- Respond to the prompts:
- DNS server: 10.10.10.10,10.10.5.5
- Host name: [the base image guest hostname]
- IP address of the ntp server: [leave blank]
- Join the active directory: y
- Domain FQDN: adsroot.itcs.umich.edu
- User name used to join domain: [user name]
- Password: [password]
Sample
Modify SSSD Configuration
- sudo nano /etc/sssd/sssd.conf
[sssd]
domains = adsroot.itcs.umich.edu
config_file_version = 2
services = nss, pam
[domain/adsroot.itcs.umich.edu]
ad_gpo_access_control = permissive
ad_gpo_map_interactive = +gdm-vmwcred
default_shell = /bin/bash
krb5_store_password_if_offline = True
cache_credentials = True
krb5_realm = ADSROOT.ITCS.UMICH.EDU
realmd_tags = manages-system joined-with-adcli
id_provider = ad
fallback_homedir = /home/%u
ad_domain = adsroot.itcs.umich.edu
use_fully_qualified_names = False
ldap_id_mapping = True
access_provider = ad
case_sensitive = False
dydns_update = True
ignore_group_members = True
ldap_user_gid_number = primaryGroupID- Verify permission and ownership of sssd.conf
ls -l /etc/sssd/sssd.conf
Output should be: -rw------- 1 root root [file size] [date and time] /etc/sssd/sssd.conf - Set /etc/hosts
- sudo nano /etc/hosts
127.0.0.1 your_server_name.adsroot.itcs.umich.edu your_server_name localhost
127.0.1.1 your_server_name
- sudo nano /etc/hosts
- Check /etc/resolv.conf, make sure DNS IP addresses are present
- 10.10.10.10
- 10.10.5.5
- Setup pam_mkhomedir
sudo pam-auth-update --enable mkhomedir - Reboot
Install Horizon View Agent
- cd ~/Downloads/VMware-horizonagent-linux-[version].el8.x86_64
- sudo ./easyinstall_viewagent.sh -i
- Reboot
Modify viewagent-custom.conf
- sudo nano /etc/vmware/viewagent-custom.conf
- Uncomment the following lines:
- SSOUserFormat=[domain]\\[usrname]
- OfflineJoinDomain=sssd
Last Updated
Thursday, June 19, 2025