Overview
This document provides first-time-setup instructions for MiWorkspace customers to install and set up CrashPlan on a MiWorkspace computer.
- Eligible MiWorkspace customers automatically have a Desktop Backup account provisioned for them, but still need to download and install the CrashPlan client from Software Center and configure their backup settings.
View CrashPlan resources for non-MiWorkspace customers.
Important! The University of Michigan Medical Health Information Technology & Services (HITS) also uses CrashPlan for a service called Data Guard. This document and the ITS Service Center do not cover the use of this service. For more information, please contact the Michigan Medicine Help Center.
Learn more about Desktop Backup, powered by CrashPlan, including system requirements, features, and rates. View additional CrashPlan resources for MiWorkspace customers.
Install CrashPlan Client
- Click the Block M in your system tray (Windows) or menu bar (Mac) and select Software Center.
- Search for and select the CrashPlan app.
- Click Install. The CrashPlan client install process will begin immediately.
Log In to CrashPlan
- Launch the CrashPlan application.
Windows: Click the Start menu, type CrashPlan in the search box, and press Enter.
Mac: In the Dock, open Finder, click Applications, and then click CrashPlan. - If prompted, enter your full UMICH email address ([email protected]), and then click Continue. Otherwise, skip to step 3.
- To sign in using a shared account, enter the shared account name and append @umich.edu to the end.
- A separate web browser opens asking you to sign in to U-M Microsoft 365 with your full UMICH email address and UMICH (Level-1) password (or shared account password, if applicable).
- Click Sign In, and then complete multi-factor authentication. Once successfully logged in, close the web browser and return to the CrashPlan application, which should already be open.
Client Configuration
Initial Backup
- Your initial backup should be performed on a fast network (e.g., U-M hard wired or MWireless network) to minimize time. Large single files typically upload at a faster rate than many small files. Each gigabyte of data will typically take 1.5 hours to complete.
- You can select multiple locations to include in the backup. Your Users folder on your computer’s hard drive is selected by default.
- Click Manage Files.
- Click the checkboxes to select the folders you want to back up.
Notes
- It is not necessary to back up the entire hard drive as CrashPlan cannot restore full operating systems. Nor is it necessary to select already backed-up locations, such as Box Sync.
- Select the Users folder with your uniqname, as well as any other locations you regularly save files.
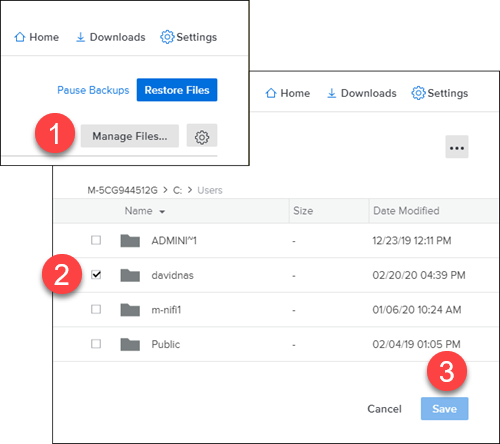
- Click Save. Your backup will begin immediately.
Important!
Complete the following additional steps in order to modify your CrashPlan settings and back up your data if you are using one of the following operating systems:
- macOS 10.14 or 10.15 Mojave
- macOS 12 Monterey
- Open System Preferences.
- Select Security and Privacy.
- Click on the Privacy tab.
- Click on Full Disk Access (on the left).
- Check the box for CrashPlan.
- Reboot your computer.
Complete the following additional steps in order to modify your CrashPlan settings and back up your data if you are using macOS 13 Ventura and above.
- Open System Settings.
- Select Privacy & Security.
- Click on Full Disk Access (on the right).
- Click the slider to activate CrashPlan.
- Reboot your computer.