Overview
This document provides instructions for restoring previously backed-up files using CrashPlan.
Learn more about Desktop Backup, powered by CrashPlan, including system requirements, features, and rates. View additional CrashPlan resources for MiWorkspace and non-MiWorkspace customers.
Restore Files
After the initial backup is complete, you are able to restore previously saved versions of files from the cloud.
- Launch the CrashPlan application.
- Login with your full UMICH email ([email protected]) and UMICH (Level-1) password, and then complete multi-factor authentication.
- Click Restore Files and select the device for which you will be restoring data from the dropdown menu. If you have CrashPlan installed on only one computer, a drop-down menu will not display.
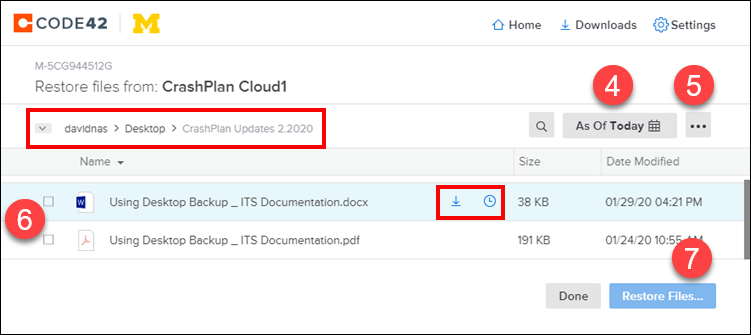
- CrashPlan displays the most recent versions by default. If desired, click the As of... calendar icon to select the specific date/time from which to restore items.
- If a file does not display in the list, click the ellipses button (three dots) and select Include deleted files or Show hidden files.
Note When hovering over an individual file (not a folder), two additional icons display:
- Click the download icon to save a copy of the file to your device. This is a quick way to restore a single file. Continue with step 6 to restore multiple files.
- Click the clock icon to view all previously backed-up versions of the file.
- Click the checkbox(es) next to the folder(s) or file(s) you want to restore. You can also click on a folder in order to view its contents or click in the breadcrumb trail to navigate back to a previous view.
- Click Restore Files.
- Click the applicable Restore Files Options dropdown menus to:
- select the location where the file(s) will be saved;
- choose if a file that already exists in the selected location will be renamed or overwritten;
- select the permissions associated with the file(s). Unless you’re familiar with permissions, it’s recommended to leave this set to Current.

- Click Go.
The Download Activity list displays the downloaded file(s). If desired, hover over a file and click the folder icon to show the folder on your device to which the file was saved.

Last Updated
Friday, February 27, 2026