Overview
Action Items are created within animal use forms, amendments and protocols to notify a person or group of a related task. If the action item requires an amendment, the action item and amendment need to be associated with each other.
When working with action items, there are activities specific to the assigner and the assignee, as well as activities that can be taken by both. When following the steps in this document, note the role(s) of the individual who can or must perform each activity.
Contents
- Creating an Action Item (Assigner)
- Associating an Amendment (Assigner or assignee)
- Managing an Assignment (Assigner)
- Adding a Comment (Assigner or assignee)
- Managing Assignee Notes (Assignee)
- Adding Documents (Assigner or Assignee)
- Completing the Action Item (Assignee)
- Closing the Action Item (Assigner)
- Tracking Action Items
Creating an Action Item (Assigner)
- Click Create Action Item on the approved protocol workspace.
Note This process works similarly if done from the Amendment Workspace and Animal Use Workspace. Select the appropriate Action Item from the Action Item Type menu. Available options include:
- Add Authorized Animals
- Amendment Needed
- Funding Amendment Needed
- Funding Amendment Needed per Post Approval
- General Action Item for Lab
- General Action Item for UCUCA
- General Action Item for ULAM
- General Action Item needed per Post Approval
- Personnel Amendment Needed
- Personnel Amendment needed per Post Approval
- Scientific Amendment Needed
- Scientific Amendment Needed per Post Approval
- Submit a New Purchase Request
- Submit a Non Trad. Aqu. Form (D Form)
- Submit a U of M Transfer Request (C Form)
Note This list may change over time.
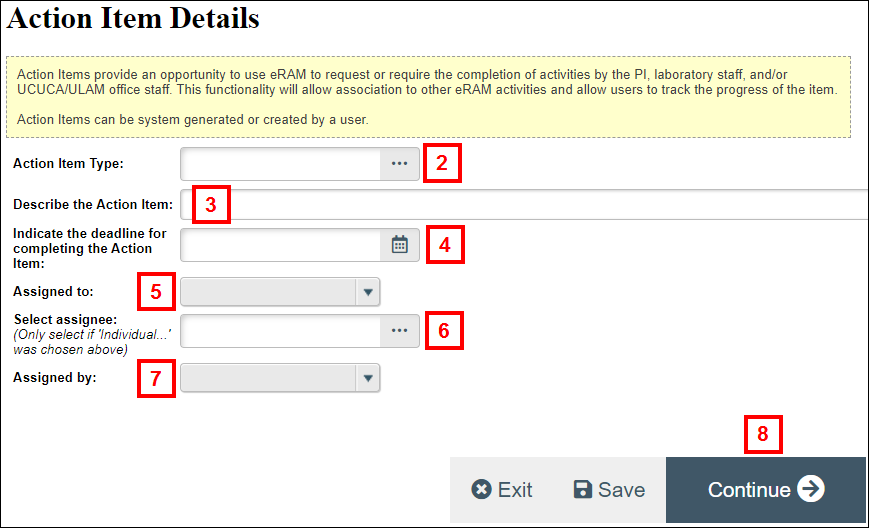
- Enter a description of the action item in the Describe the Action Item field.
- Set a deadline date for the action item in the Indicate the deadline for completing the Action Item field.
- Select the person(s) to whom the action item is assigned from the Assigned To drop-down list.
Note The assignee can be an individual, a group or an office. The action item will display in the user(s)’s Action Item tab on the Home Workspace. Anyone associated with the action item can add comments to it. - If Individual Person was selected in step 5, click Select... in the Select Assignee field and locate the individual.
- Select the person, group or office assigning the action item from the Assigned by field.
Notes- The Assigner does not have to be the person creating the action item. For example, an administrative assistant may create the action item in the system, but it is being assigned by a ULAM office.
- The Assigner has the ability to close and reopen the action item.
- Click Continue to save the action item.
Associating an Amendment (Assigner or Assignee)
Before associating an action item with an amendment, the amendment needs to be created. See Create Amendments – Step-by-Step Procedure. Note that this applies only to some of the action item types.
- Click Manage Amendment Association on the Action Item Workspace.
- Click Browse...
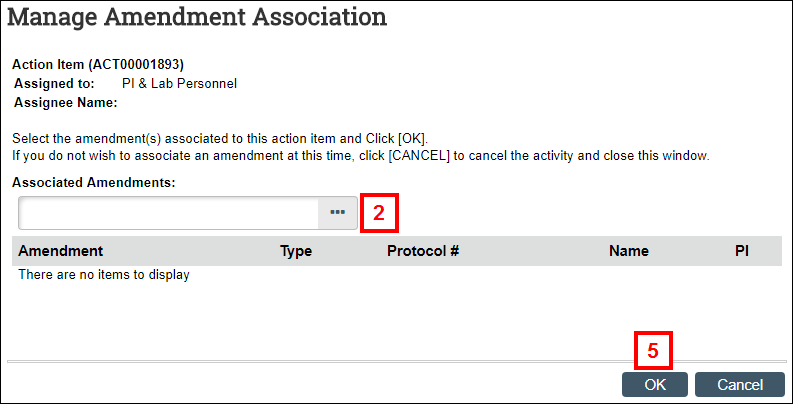
- Check the box next to the correct amendment.
Notes- Use the Filter By options to narrow the list of amendments.
- If the action item impacts more than one amendment, check all of the applicable amendments.
- Click OK.
- Click OK.
Managing an Assignment (Assigner)
The person(s) assigned to the action item can be changed using the Manage Assignment function.
- Click Manage Assignment on the Action Item Workspace.
- Select the person(s) to whom the action item is being reassigned from the Assign to drop-down list.
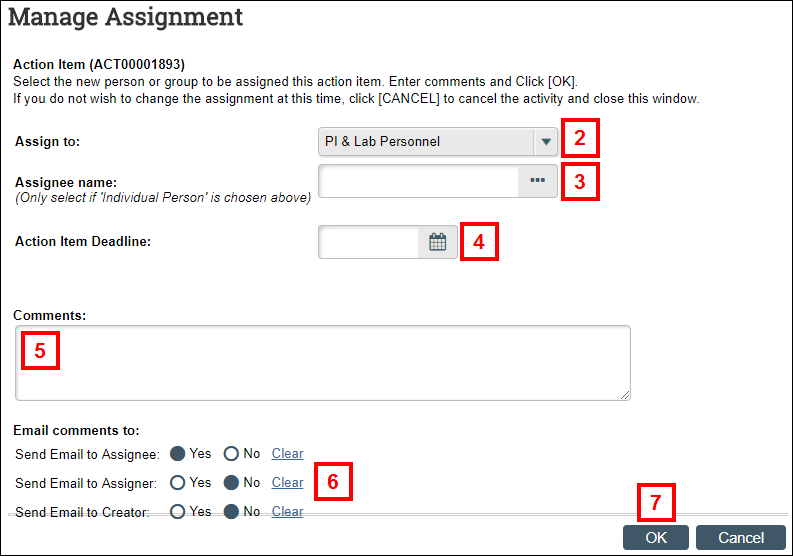
- If Individual Person is selected in step 2, click Browse... in the Assignee name field and locate the individual.
- Enter or select an Action Item Deadline.
- Enter any comments about the assignment change in the Comments field.
- Click the appropriate Yes or No radio buttons next to the individuals to whom you want to email comments in the Email comments to field.
- Click OK.
Adding a Comment (Assigner or Assignee)
Comments can be added to action items by anyone associated with the action item.
- Click Add Comment on the Action Item Workspace.
- Enter your comments about the action item in the Comments field.
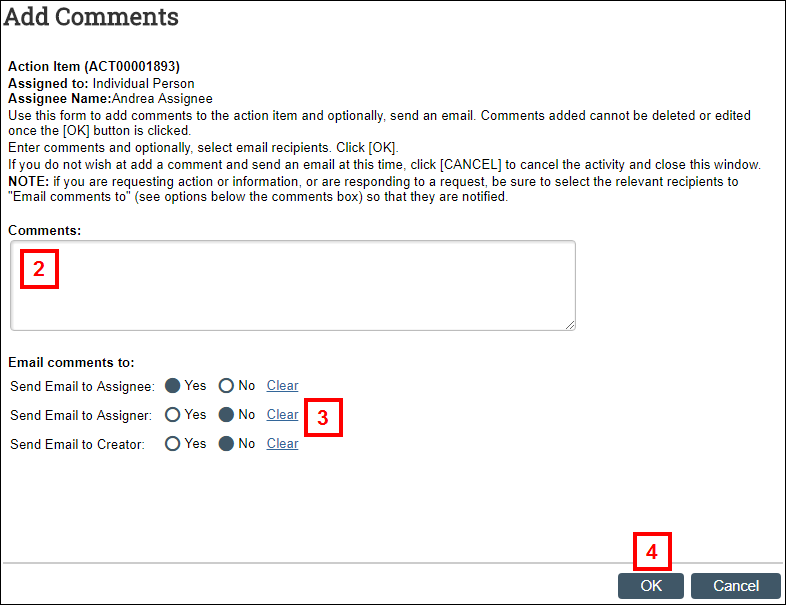
- Click the appropriate Yes or No radio buttons next to the individuals to whom you want to email comments in the Email comments to field.
- Click OK.
Managing Assignee Notes (Assignee)
Notes can be sent to the action item assignee from within the action item.
- Click Manage Assignee Notes on the Action Item Workspace.
- Enter your notes to the assignee in the Assignee Notes field. The notes are emailed to the assignee.
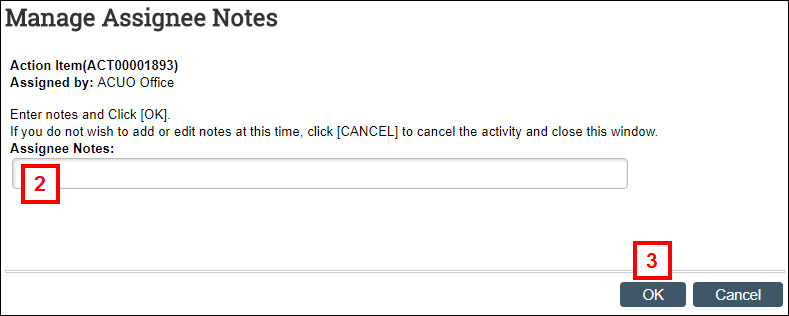
- Click OK.
Adding Documents (Assigner or Assignee)
Documents related to the action item can be uploaded and attached to that action item.
- Click Add Documents on the Action Item Workspace.
- Click Add.
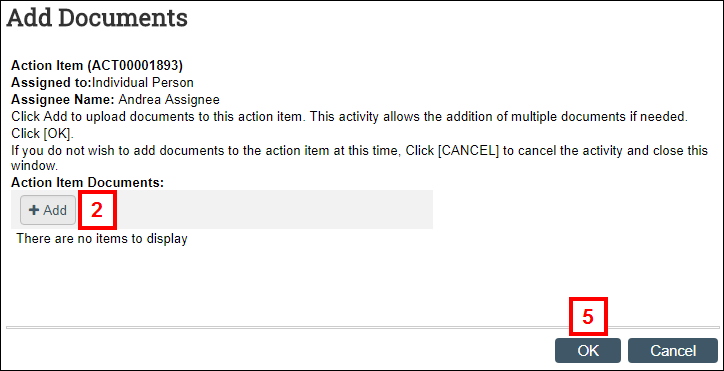
- Enter the title of the document in the Title field. If no title is entered, the document file name is saved as the title.
- Click Browse..., then navigate to and select the document.
Note If more than one document needs to be attached to the application, click OK and Add Another and repeat steps 3-4. - Click OK.
Completing the Action Item (Assignee)
- If the action item is complete, click Complete Action Item from the Action Item Workspace.
- Enter any comments about the action item in the Comments field.
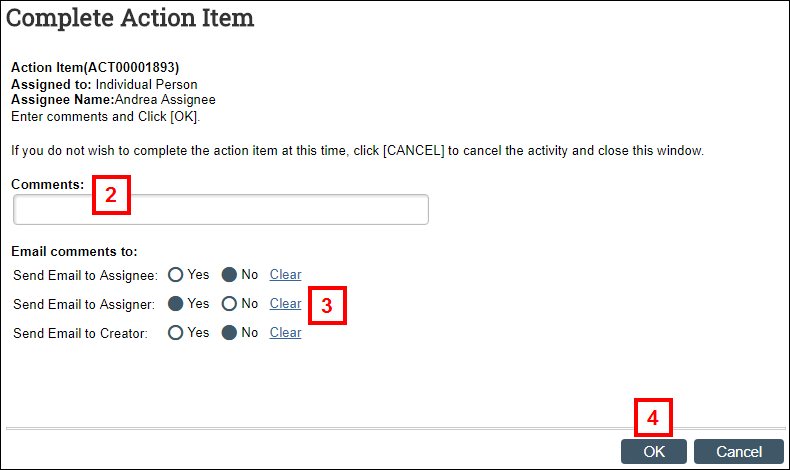
- Click the appropriate Yes or No radio buttons next to the individuals to whom you want to email comments in the Email comments to field.
- Click OK.
Closing the Action Item (Assigner)
When the action item is complete or no longer needed, it needs to be closed. This is performed by the assigner.
- Click Close Action Item on the Action Item Workspace.
- Enter an explanation for closing the action item in the Reason field.
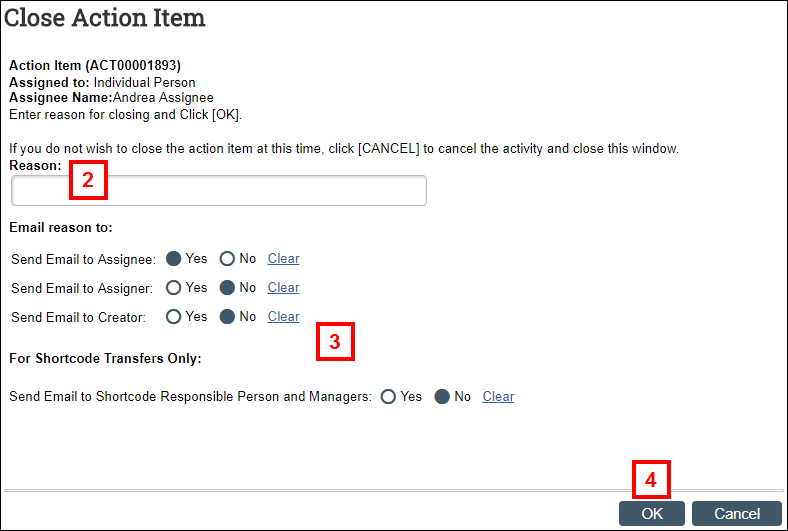
- Click the appropriate Yes or No radio buttons next to the individuals to whom you want to email the close notification and reason in the Email reason to field.
- Click OK.
Note The Assigner can use an activity to send the action item back to the Assignee if it isn’t actually complete.
Tracking Action Items
Protocol Workspace > Action Items tab
Progress of the Action Item can be tracked on the Action Items tab in the associated protocol or amendment workspace on the following lists:
- Open Action Items – Once created, the Action Item initially displays in this list as it is processed.
- Verify Action Items – Once the Action Item has been completed, if it requires verification from the assignee, it displays in this list in the state of Action Item Complete. No verification is needed for Barcode Activation Sheets requests.
- Closed Action Items – Once the Action Item has been completed and closed, it displays in this list in the state of Action Item Closed.