Overview
This document includes instructions for importing a wireless Access Point (AP) site survey and uploading photos associated with AP projects into NetBox. These instructions cover importing a .ZIP file of photos associated with a site survey spreadsheet and uploading individual photos directly to an Access Point.
Notes:
- The Access Point must already be created in NetBox to upload photos, or the Site Survey spreadsheet can be uploaded at the same time as the photos.
- The photo files can be in .JPEG or .PNG format.
- Multiple photos files can be uploaded, but only the first two will be printed on the AP Detail Report.
- As photos are named to match the Access Point Name, they can be uploaded at any time.
- When uploading new photos with the same name, the photos in NetBox will be replaced with the new photos.
- When a NetBox WIFI/AP is created (either via import, or manually) - it contains WIFI/RADIOs. These WIFI/RADIOs have an initial status of Planned, but that is not a valid status in our context. The network engineer should update each WIFI/RADIO status to either Active, if it should be enabled, or Offline if it should be disabled. There is no other lifecycle for these WIFI/RADIO objects, just Active (enabled) or Offline (disabled) states.
Table of Contents:
- Save the survey spreadsheet in the proper format
- Save the photo files in the proper naming convention
- Import spreadsheet and photo .ZIP file
- Confirm Devices imported
- Confirm photos were uploaded
- Upload photos to a single Access Point
Save the Survey Spreadsheet in the Proper Format
- Excel spreadsheet:
Save as > File Format > CSV UTF-8 (comma delimited) (.CSV)
- Google Sheet:
File > Download > Comma-separated values (.CSV, current sheet)
Save the Photo Files in the Proper Naming Convention
- Rename the photos to match the Access Point Name and add “-#” at the end of the name, where # is a unique number for each photo (i.e., ap-PALMER-1001-1).
- Compress the photos into a .ZIP file if the photos are associated with a Site Survey spreadsheet.
Import Spreadsheet and Photo .ZIP File
- Log in to NetBox at https://netbox-wdb.infra.apps.it.umich.edu/.
- Click Plugins and select Site Survey Upload.

- Under Survey CSV, click Choose File and navigate to the .CSV file previously saved.
- Under Upload Photos, click Choose File and navigate to the .ZIP file previously saved.
- Click Import. When complete, “File successfully uploaded” will be displayed at the top of the NetBox window.
Notes:
- Depending on the size of the spreadsheet, it may take up to one minute to load.
- If photos are added with names that do not match an Access Point Name, an error message will be displayed at the top of the window and the files will not be uploaded. You can correct the names, compress the file, and then upload the new .ZIP file.
Confirm Devices Imported
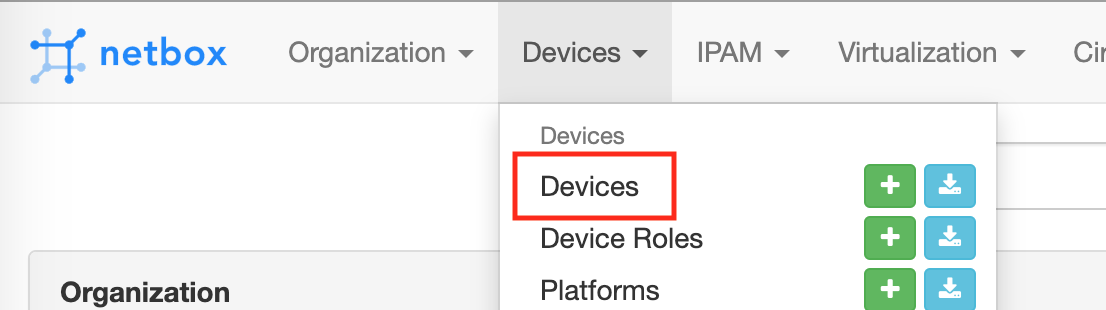
- Click Devices and select Devices at the top of the NetBox window.
- Review the list to confirm that the new Access Point Names, their radios, antennas, and inventory devices were uploaded correctly.
Note: All the devices are associated with the Site Survey Preorder identified in the spreadsheet.
Confirm Photos Were Uploaded
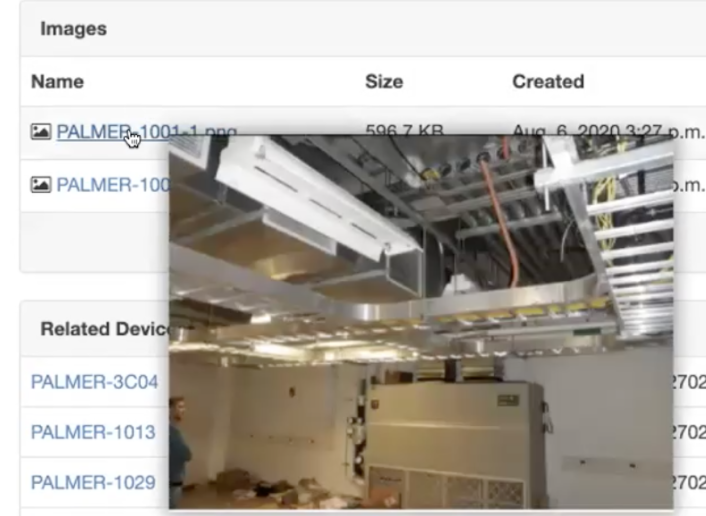
- Click the applicable Access Point Name.
- Scroll down to the Images section and click the photo name to see a preview of the photo.
Upload Photos to a Single Access Point
- Log in to NetBox at https://netbox-wdb.infra.apps.it.umich.edu/
- Click Devices and select Devices at the top of the NetBox window.
- Click the applicable Access Point Name.
- Scroll down to the Images section and click Attach an Image.
- Click the photo name to see a preview of the photo.
Last Updated
Wednesday, September 1, 2021